Who is this article for?
This article is for parents and carers using XUNO to approve, decline, fill out forms and pay for events and fees at their children's school.
There are two ways to access XUNO:
- The XUNO parent portal (using a computer's web browser or a mobile browser)
To access this, you will need your school's XUNO website address.
NOTE: This is not the same as the XUNO website at xuno.com.au. You need to go to the specific XUNO website for your school.The URL for this website would have been sent to you in your initial XUNO welcome email, however your school will be able to provide it to you if you don't know it.
- The XUNO Family app, on your mobile device (e.g. phone or tablet)
Follow the instructions for either the parent portal or the app below.
In this article
Important notes about events and fees for parents and carers
Online event approval:
This option is only available for an event if your school has enabled it. A verification code will be sent to your mobile number. If your mobile is not correct, you will need to contact your school to change it.
Who can pay for and approve events or fees?
Who the school has allowed Payments can be split between primary and secondary families, in consultation with your school
Due dates for events & fees:
If an event or fee has passed its payment, form and/or approval due dates, you may still be able to make payment, approve or fill out forms, depending on the settings defined by the school. If you need to find out more, please contact your school directly.
Using the XUNO parent portal
Viewing events and fees
There are a few different ways to view an event or fee for your child. Choose one of the options below:
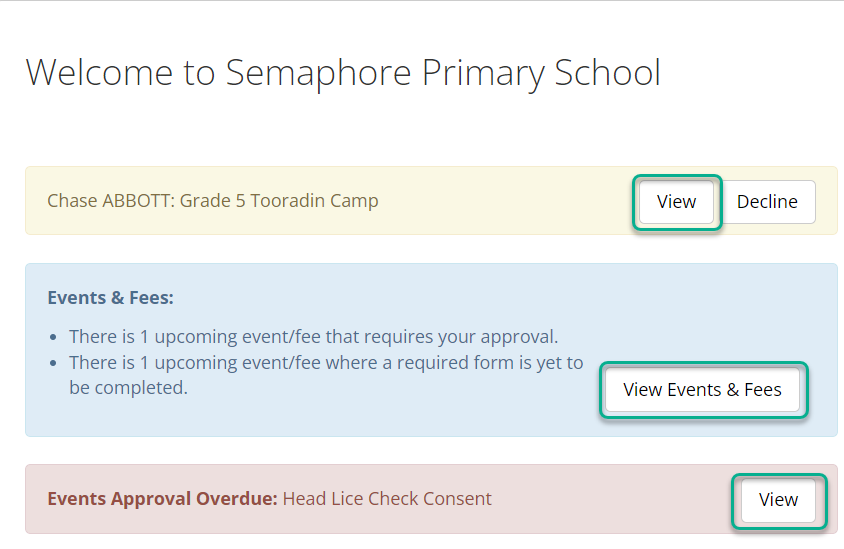
- Some important events may be 'pinned' to the top of your dashboard. To access these, click View in the yellow band next to that event or fee.
- If there is an upcoming event or fee for your child that requires approval or payment, click View Events & Fees in the blue band to access a list of all events and fees. Then, click on the name of the event or fee to view it.
- If there are events or fees with overdue approvals, forms or payments, click View in the red band.
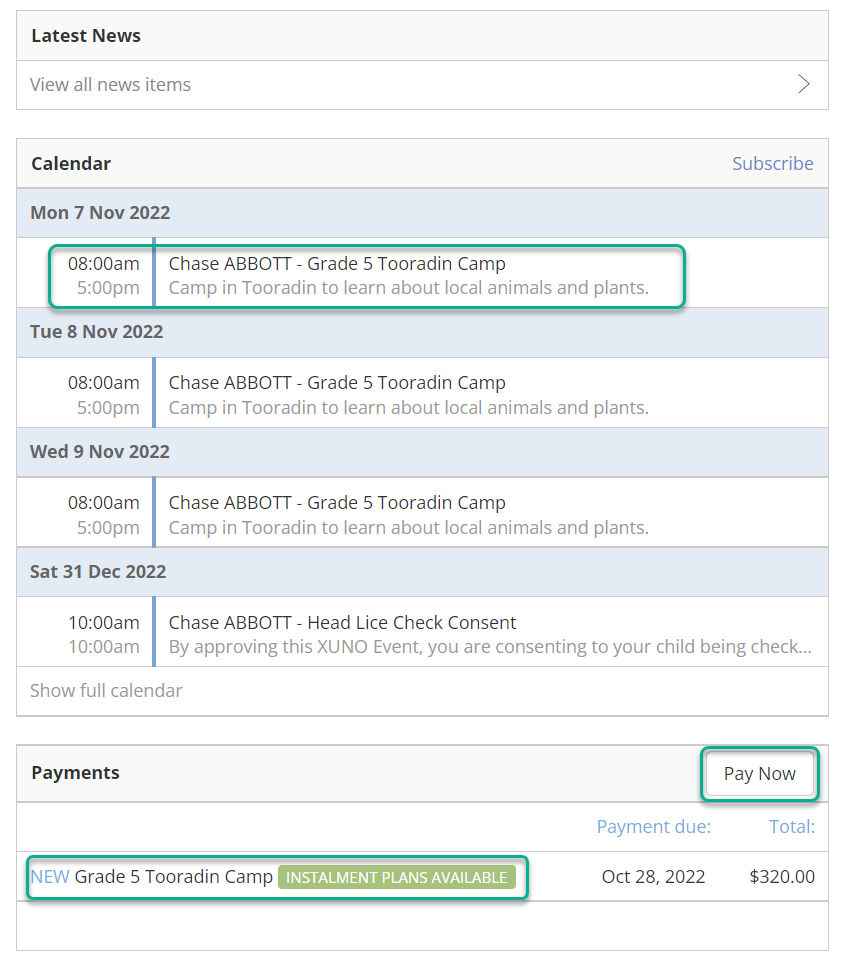
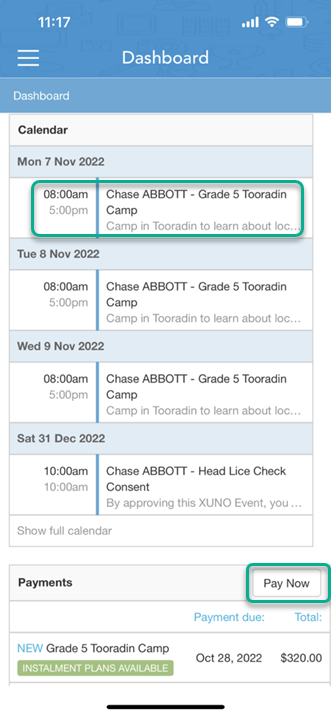
- Upcoming events will show in your Calendar on the dashboard. You can click on the name of the event to view it.
- The Payments section shows all outstanding event or fee payments. You can click on Pay Now to see all payments due.
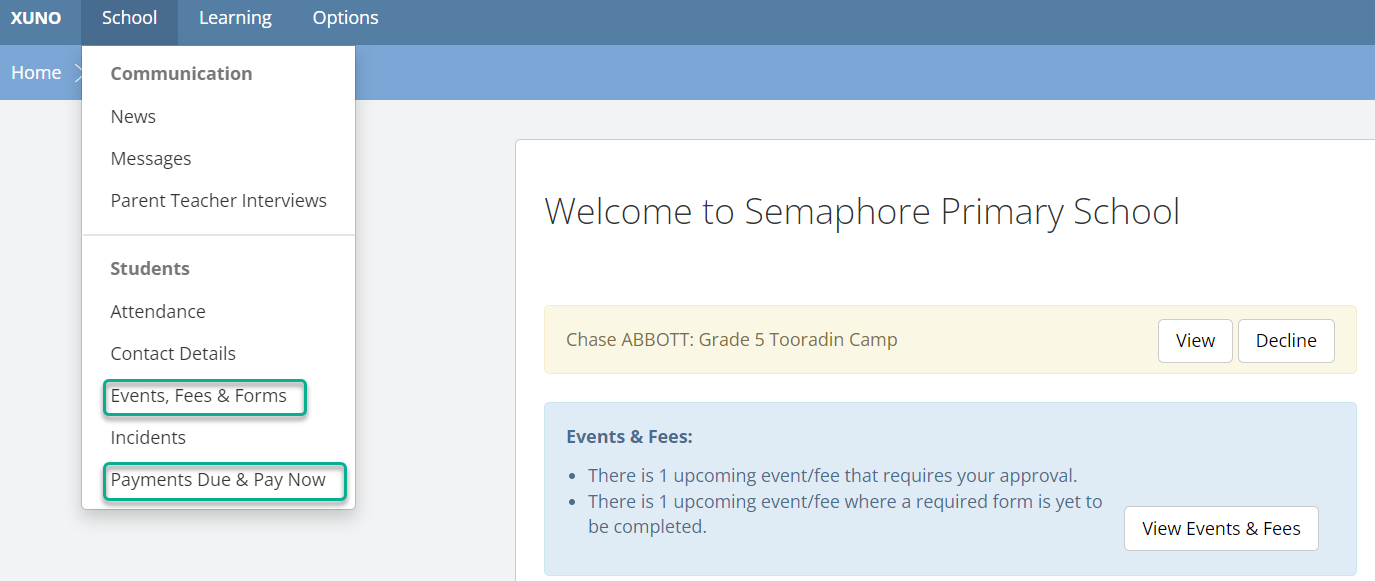
- You can also view all events by clicking on the School menu and choosing the Events, Fees & Forms menu option. Click on any event or fee name to view details. Payments can be viewed if you click on the School menu and choose Payments Due & Pay Now.
Approving or declining events and fees
- Use one of the methods listed above to view the event or fee. If your event is pinned to the top of your dashboard in a yellow box, you can decline the event using the Decline button.
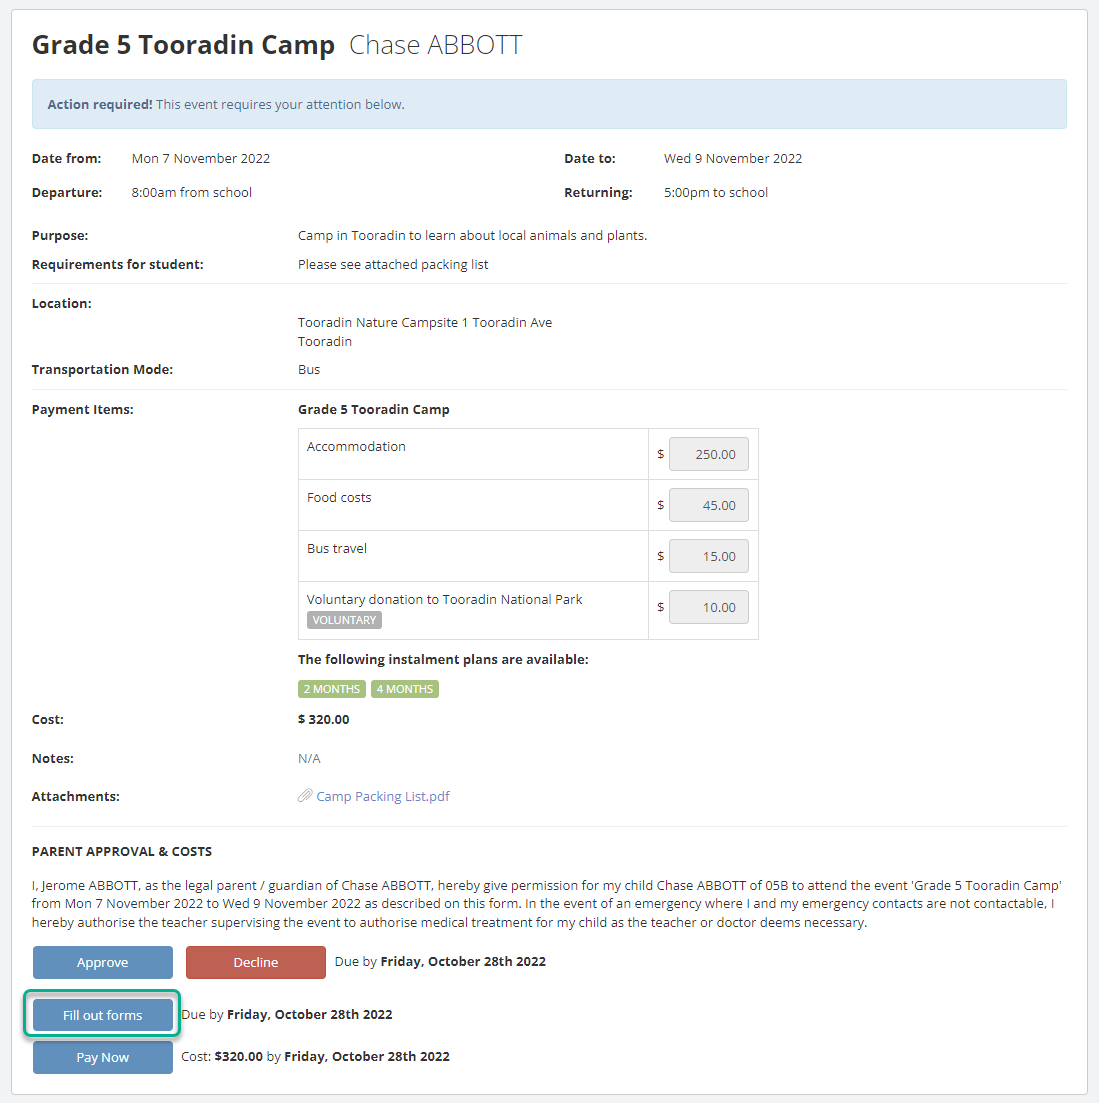
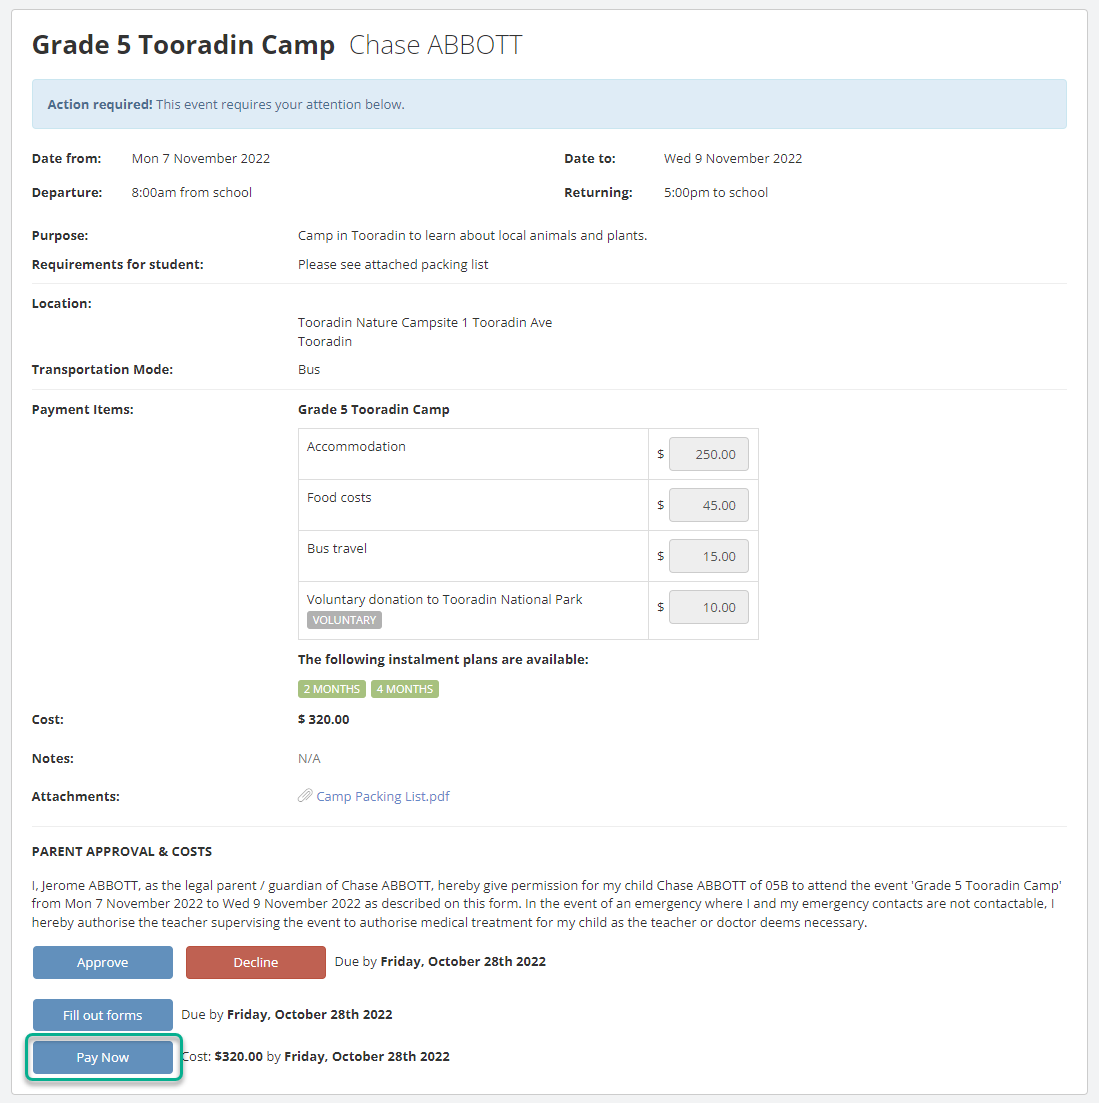
- Review the event or fee details.
- Click the Approve or Decline button. If you don't see one or both of these buttons, it means that this particular event/fee does not require this step. Move on to the instructions for filling out event forms, or making payments.
- If you clicked Approve, read on. If you clicked Decline, go to step 5.
You can:- Print out the approval form and sign it to return to your school by clicking Print Event Form. Note If you want a paper form for an event to answer questions the school has asked, you can print the form in this step.
OR - Approve the event online, if your school has enabled this option. Click Send verification code.

- Print out the approval form and sign it to return to your school by clicking Print Event Form. Note If you want a paper form for an event to answer questions the school has asked, you can print the form in this step.
- If approving online, a 6-digit code will be sent to your mobile number. Note that this code may take up to 60 seconds to arrive by SMS. Enter it in the boxes and then click Yes, I approve. A green popup will appear to indicate that you have successfully approved the event or fee.
Note: if you do not receive the code, please contact your school to check your contact details.
- If you clicked Decline, a popup window will appear. You can enter a comment in the text area if you like. This is optional.

- Click the Decline button.
- You will see a message pop up to confirm this.

- Note: If you have declined or approved an event in error, please contact your school office for assistance.
Filling out forms
- Use any of the methods above to view the event or fee. Click on the Fill out forms button. If you do not see this button, it means that there is no form to fill in for this event or fee.
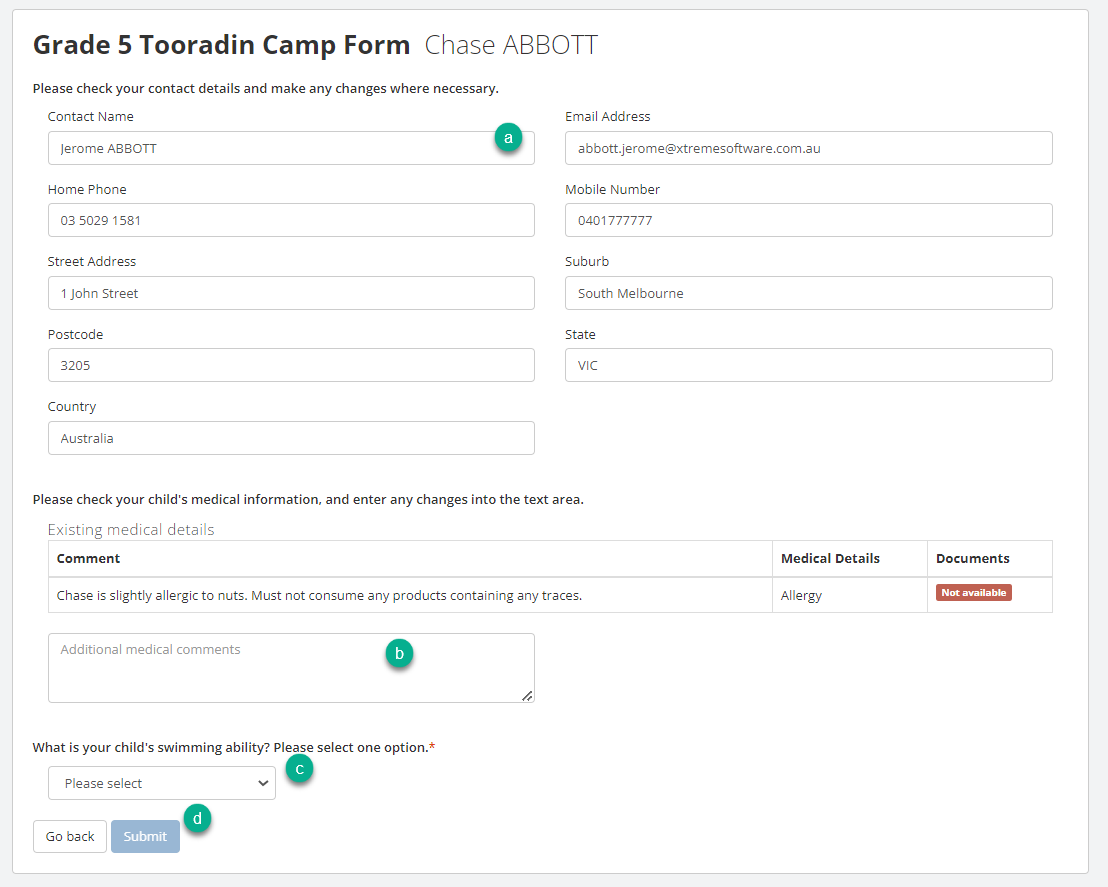
- Here is a sample form with some typical questions included for an excursion. Note: If you would prefer a paper form to fill in, follow the instructions above for approving the event/fee.
- In the first question, you can directly edit details to let the school know your contact details have changed. XUNO will send an email to your school to make these changes in their records, which will transfer to XUNO within 24 hours or so.
- In the second question, you can add additional medical details for your child. As above, XUNO will email your school about these changes.
- You can see by the red asterisk (*) that the third question is a required question. You must enter information here before you can submit the form.
- Answer all questions as applicable, then click the Submit button.

Paying for events and fees
- If you are in the details page of the event, click on the Pay Now button. If you do not see this button, there is no payment required for the event. You can also access payments using any of the relevant methods in the above section, Viewing events and fees.
- In your Payments page, you can see details of all payments due for any of your children. From this page you can also:
- Use the three tabs at the top to see either Outstanding, Direct Debit, or Paid payments.
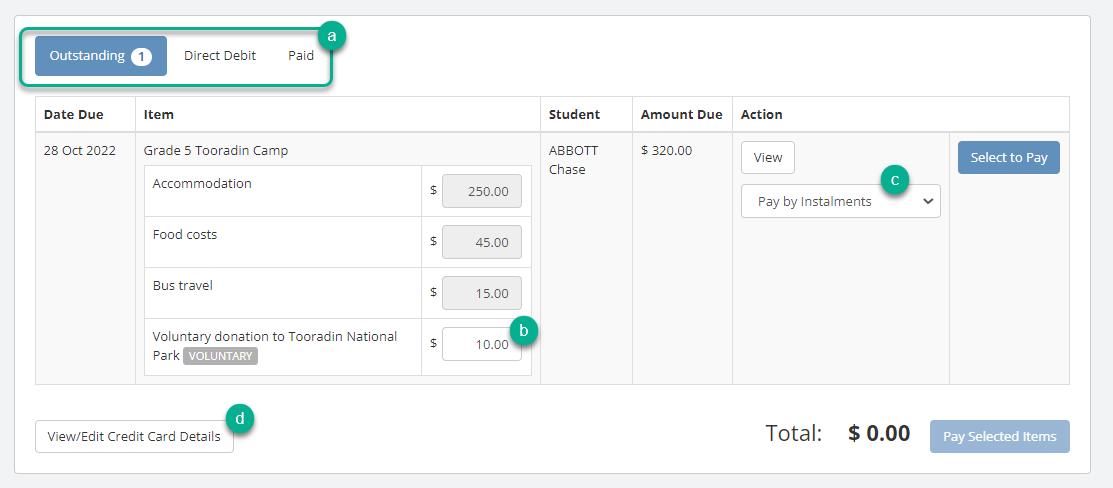
- Change the amount you would like to pay for any Voluntary payments. You can delete the amount showing and enter your preferred amount in the field. You will only be able to edit amounts for payments that the school has set as voluntary.
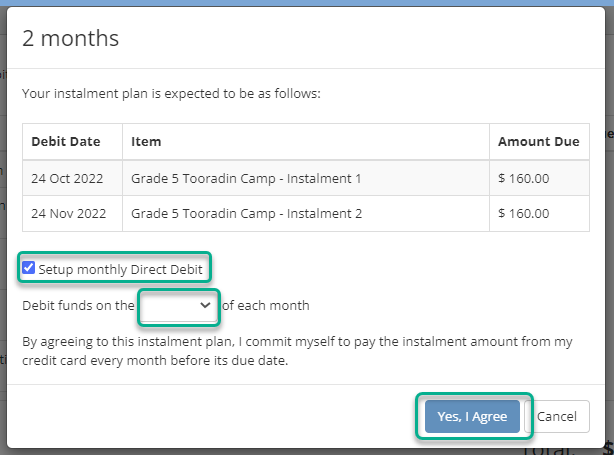
- If your school has enabled the option, you can Pay by Instalments. Click the dropdown menu and select a plan. You can choose to:
- Make manual instalment payments, by logging in to XUNO each month to pay for the event or fee by unticking Setup monthly Direct Debit and clicking Yes, I Agree, OR
- Set up a direct debit instalment plan if you prefer. To do this, tick Setup monthly Direct Debit and choose the day of the month you would like payments debited each month from the dropdown, then click Yes, I Agree.

- Use the three tabs at the top to see either Outstanding, Direct Debit, or Paid payments.
- View or edit your credit card details - click the button to change or update your credit card details. A popup window will appear - click the Save button when you have finished making changes.
Note: If you save your card details in XUNO, you do not need to enter them every time you make payments. This is compulsory ONLY if you are using direct debit for instalment payments. Your credit card number is stored in our authorised payment gateway and not in XUNO. XUNO only stores the last 4 digit of your credit card number for display purposes. - Select one or more payments by clicking its Select to Pay button. The event or fee will change to a green background. When you have selected all payments you wish to pay today, click Pay Selected Items.
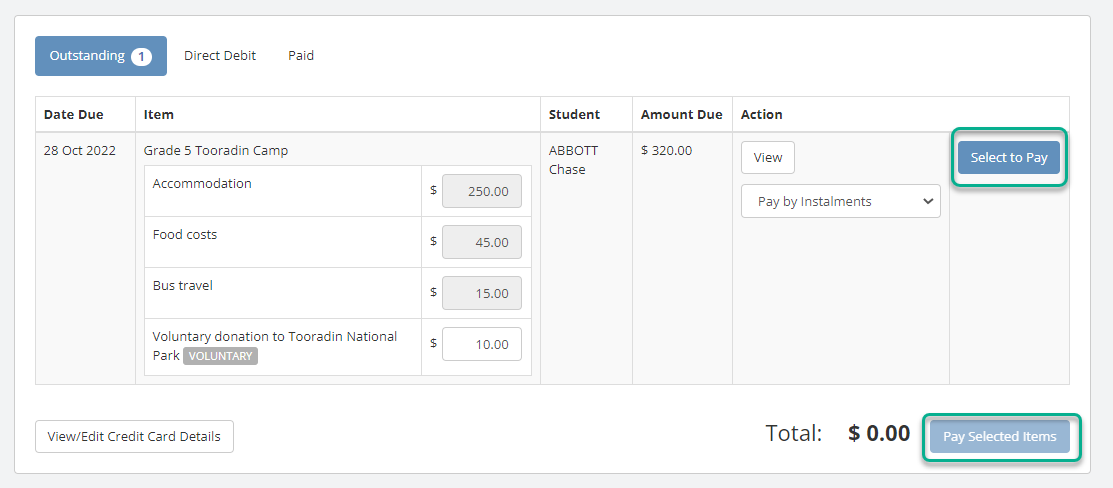
- Enter or review your card details and click Change if you need to change your credit card details. Click Make Payment to process the transaction.

You'll receive a success message and transaction number if your payment was successfully processed. Please record the transaction number, date and amount for your records. You will also receive an emailed receipt. - Click on Finish. A list of all successfully paid transactions your family has made will be shown.
Using the XUNO Family app
Viewing events and fees
There are a few different ways to view an event or fee for your child. Choose one of the options below:
- Some important events may be 'pinned' to the top of your dashboard. To access these, tap View in the yellow band next to that event or fee.
- If there is an upcoming event or fee for your child that requires approval or payment, tap the arrow in the blue band to access a list of all events and fees. Then, tap on the name of the event or fee to view it.
- If there are events or fees with overdue approvals, forms or payments, tap the arrow in the red band.
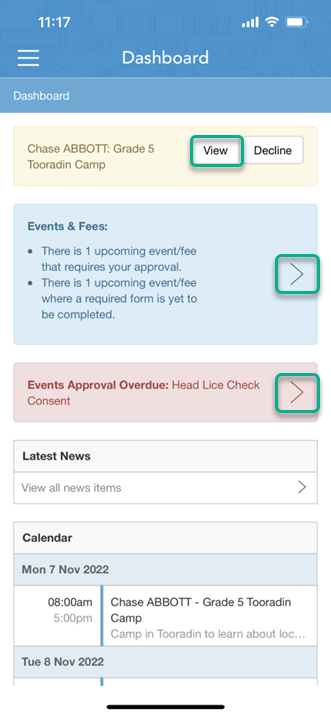
- Upcoming events will show in your Calendar on the dashboard. You can tap on the name of the event to view it.
- The Payments section shows all outstanding event or fee payments. You can tap on Pay Now to see all payments due.
- You can also view all events by tapping on the three horizontal lines in the top left and choosing the Events, Fees & Forms menu option. Tap on View more information for any event or fee name to view details. Payments can be viewed if you tap on the Payments menu option.

Approving or declining events and fees
- Use one of the methods listed above to view the event or fee. If your event is pinned to the top of your dashboard in a yellow box, you can decline the event using the Decline button.
- Review the event or fee details.
- Tap the Approve or Decline button. If you don't see one or both of these buttons, it means that this particular event/fee does not require this step. Move on to the instructions for filling out event forms, or making payments.
- If you tapped Approve, read on. If you tapped Decline, go to step 5.
You can:- Print out the approval form and sign it to return to your school by tapping Print Event Form. Note If you want a paper form for an event to answer questions the school has asked, you can print the form in this step.
OR - Approve the event online, if your school has enabled this option. Tap Send verification code.
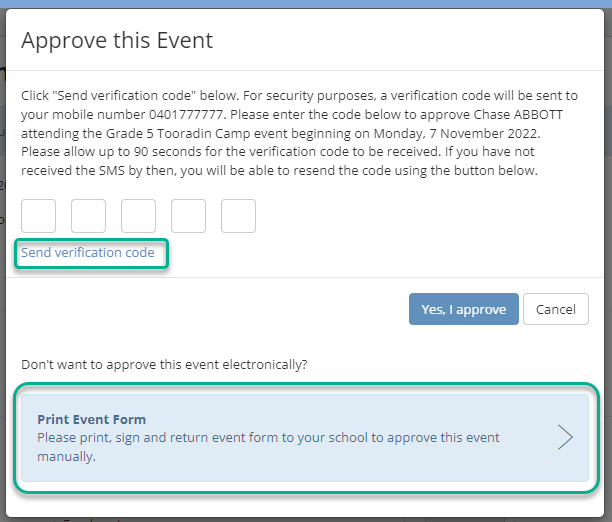
- Print out the approval form and sign it to return to your school by tapping Print Event Form. Note If you want a paper form for an event to answer questions the school has asked, you can print the form in this step.
- If approving online, a 6-digit code will be sent to your mobile number. Note that this code may take up to 60 seconds to arrive by SMS. Enter it in the boxes and then tap Yes, I approve. A green popup will appear to indicate that you have successfully approved the event or fee.
Note: if you do not receive the code, please contact your school to check your contact details.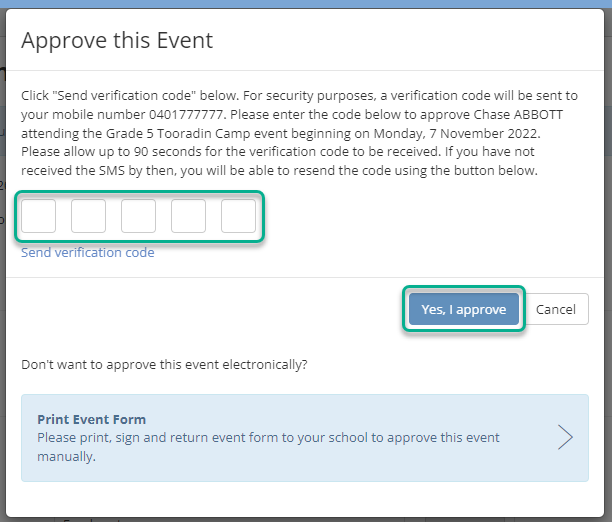
- If you tapped Decline, a popup window will appear. You can enter a comment in the text area if you like. This is optional.
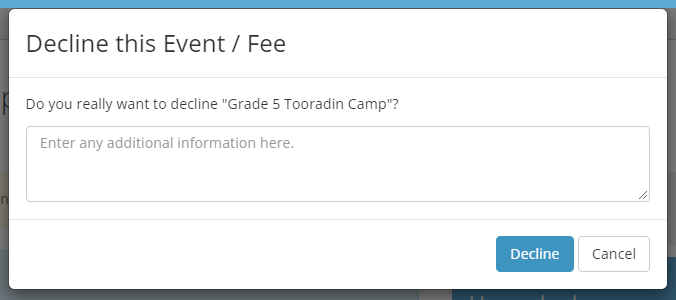
- Tap the Decline button.
- You will see a message pop up to confirm this.

- Note: If you have declined or approved an event in error, please contact your school office for assistance.
Filling out forms
- Use any of the methods above to view the event or fee. Tap on the Fill out forms button. If you do not see this button, it means that there is no form to fill in for this event or fee.

- Here is a sample form with some typical questions included for an excursion. Note: If you would prefer a paper form to fill in, follow the instructions above for approving the event/fee.
- In the first question, you can directly edit details to let the school know your contact details have changed. XUNO will send an email to your school to make these changes in their records, which will transfer to XUNO within 24 hours or so.
- In the second question, you can add additional medical details for your child. As above, XUNO will email your school about these changes.
- You can see by the red asterisk (*) that the third question is a required question. You must enter information here before you can submit the form.
- Answer all questions as applicable, then click the Submit button.
Paying for events and fees
- If you are in the details page of the event, tap on the Pay Now button. If you do not see this button, there is no payment required for the event. You can also access payments using any of the relevant methods in the above section, Viewing events and fees.

- In your Payments page, you can see details of all payments due for any of your children. From this page you can also:
- Use the three tabs at the top to see either Outstanding, Direct Debit, or Paid payments.

- Change the amount you would like to pay for any Voluntary payments. You can delete the amount showing and enter your preferred amount in the field. You will only be able to edit amounts for payments that the school has set as voluntary.
- If your school has enabled the option, you can Pay by Instalments. Tap the dropdown menu and select a plan. You can choose to:
- Make manual instalment payments, by logging in to XUNO each month to pay for the event or fee by unticking Setup monthly Direct Debit and tapping Yes, I Agree, OR
- Set up a direct debit instalment plan if you prefer. To do this, tick Setup monthly Direct Debit and choose the day of the month you would like payments debited each month from the dropdown, then tap Yes, I Agree.
- Use the three tabs at the top to see either Outstanding, Direct Debit, or Paid payments.
- View or edit your credit card details - tap the button to change or update your credit card details. A popup window will appear - tap the Save button when you have finished making changes.
Note: If you save your card details in XUNO, you do not need to enter them every time you make payments. This is compulsory ONLY if you are using direct debit for instalment payments. Your credit card number is stored in our authorised payment gateway and not in XUNO. XUNO only stores the last 4 digit of your credit card number for display purposes. - Select one or more payments by tapping its Select to Pay button. The event or fee will change to a green background. When you have selected all payments you wish to pay today, tap Pay Selected Items.

- Enter or review your card details and tap Change if you need to change your credit card details. Tap Make Payment to process the transaction.

You'll receive a success message and transaction number if your payment was successfully processed. Please record the transaction number, date and amount for your records. You will also receive an emailed receipt. - Tap on Finish. A list of all successfully paid transactions your family has made will be shown.