In this article
1. Administration
1.1 Scheduled Program categories
Scheduled Program Categories allow you to group Scheduled Programs into types. For instance, Violin and Singing could be part of the 'Instrumental Music' category, and Robotics could come under a 'Clubs' category. Categories also determine whether the classes within that category need to import into Accelerus for reporting purposes (feature to come). While categories are required, you can simply create one called 'Scheduled Programs' if you do not wish to break them into sub-categories.
STEP 1: Creating a category
- Go to Options > Software Settings > Lists & Options.
- in the dropdown list, select Categories under the Scheduled Programs subheading.
- In the Add a new category field, type in the name of the category.
- Under Accelerus reporting, tick the box if it will require a report.
- Click the Add button.
- Repeat for other categories.
STEP 2: Hiding/deleting categories
- If a category is no longer required, click the Eye icon to hide it, rather than delete it.
- If you need to delete a category that has not been used before, click the X icon to delete it.
NOTE: Deleting a category should only be done when a category has never been used.
1.2 Creating Scheduled Programs
Once Scheduled Programs categories exist, Scheduled Programs may be created. As many programs may be created as required, either by the member of staff taking the program, or on behalf of the staff member. In the steps below, we will use the example of an Instrumental Music program, with students studying Flute. We will use a staff member with full permissions. Explanation of the different types of permissions can be found later in the article.
STEP 1: Open Scheduled Programs
Go to School > Timetable & Rooms > Scheduled Programs.
Explanation
| My Programs: Programs where the logged in user is the staff member running the program |
| All Programs: Every Scheduled Program (including cancelled programs) the user has permission to view |
| Pending: Scheduled Programs awaiting approval |
| Approved: All approved scheduled programs the user has permission to view |
| Not Approved / Cancelled: Any Scheduled Programs that have not been approved to run and any Scheduled Programs that have been cancelled |
| Previous: Scheduled Programs with dates in the past |
| Add Program: Opens a new Scheduled Program window |
| Add Programs in Bulk: Opens a pop up to allow CSV file import |
| Search bar: Searches for any Scheduled Program in the current tab. In the case of the picture above – the approved programs. |
| Name: The name of the Scheduled Program. Note: This is visible to students and parents once published. This field also indicates whether the program has been published to students and parents |
| Students: The number of students currently in the program |
| Status: Whether the Scheduled Program is: Pending Approval Approved Not Approved Cancelled |
| Dates: The dates during which the sessions will run |
| Owner: The person who created the Scheduled Program |
| Teacher/s: The staff members running the particular sessions |
| Actions: The ability to make a copy of a Scheduled Program |
STEP 2: Create a Scheduled Program
Click the Add Program button.
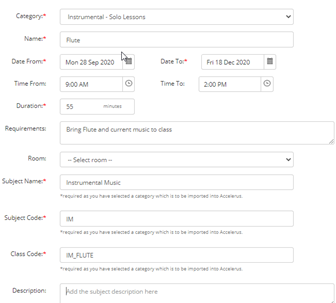
In the Program Details tab, add the following information:
STEP 3: Save the Scheduled Program
Click the Save button.
STEP 4: Add students
Once the Scheduled Program has been saved, two new tabs will appear (Students and Staff).
- Click the Students tab.
- Click the Add Students button.
- Select the students participating in the program, either individually, or by form, year level or class using the relevant tabs in the pop up.
- Click the Add Students button.
Note: Students may still be added once the Scheduled Program has been approved.
STEP 5: Add Staff
- Click on the Staff tab.
- Click the Add Staff button.
- Select the Teacher(s) who will be taking the program.
- Any teacher who is ticked as ‘Supervising Teacher’ will be used when importing classes to Accelerus, if reporting on the category is enabled.
- Click the Add Staff button.
- Click on the Program Details tab.
- Scroll down to Program Approved:
- Select Yes to approve the Scheduled Program or No to reject the proposed program. If a program has been approved but then is no longer running, choose Cancelled.
- Once the Scheduled Program has been approved, it cannot be deleted, only cancelled.
2. Scheduling students
Once Scheduled Programs have been created, students are scheduled for their individual sessions. This is generally done by the teacher of the session, but may also be done by a coordinator.
All students may be scheduled at the same time or at individual times. It is also possible to have a subset of students sharing a session. Additional sessions may also be scheduled for students.
Explanation
| Add Students: Add students into the Scheduled Program |
| Ticked Options: Remove students from the program, print program attendance, or message the selected students or their parents/carers |
| Week selector: Select the week you are scheduling sessions for |
| Student selector: The box in the top row will select all students, or individual students may be selected using the checkbox next to their name |
| Students: All students in the group. These may be sorted alphabetically |
| Total sessions scheduled: This shows a count of all the sessions that have been scheduled for the student. This includes future sessions. |
| Attendance: Number of sessions attended/number of sessions scheduled. This is attendance based on attendance of sessions that have already run (sessions that are in the past). The numbers do not include future sessions. |
| Session Time: The date and start time of the session |
| Mark Attendance: Ability to mark class attendance appears once the class has been scheduled. This is included in the attendance statistics on this page, but is not included in XUNO's main attendance reports. |
| Delete session icon: This removes a scheduled session. It does not remove the student from the Scheduled Program. Do this via Ticked Options. |
| Schedule as a group: This allows all students to be scheduled for the same session time |
| Add additional session icon: Creates an extra session row for a student for that specific week. Used when certain students require extra sessions, e.g. to make up a session if the student or teacher couldn’t attend in the previous week. |
3. Teacher and student view
3.1 Teachers
Teachers will see any of their own Scheduled Programs on the same screen as their Timetable. Scheduled Programs3.1.1 Timetabled classes
Teachers taking a ‘timetabled’ class (i.e. not a session of a Scheduled Program) will still see students undertaking a Scheduled Program in their class roll. They should still mark the attendance as per normal, indicating that the student is not in the timetabled class, e.g. using an attendance type such as 'Other educational activity'. To assist the teacher in knowing why a student may be absent, details are displayed under the roll for the student. The name of the Scheduled Program, together with the time the program is running, displays under the attendance so the teacher may know if the student is expected in class for any of the lesson. Scheduled Programs will also show in a student's dashboard, so that it is easy to see where a student is at any given time via this screen, as shown in the screenshot below: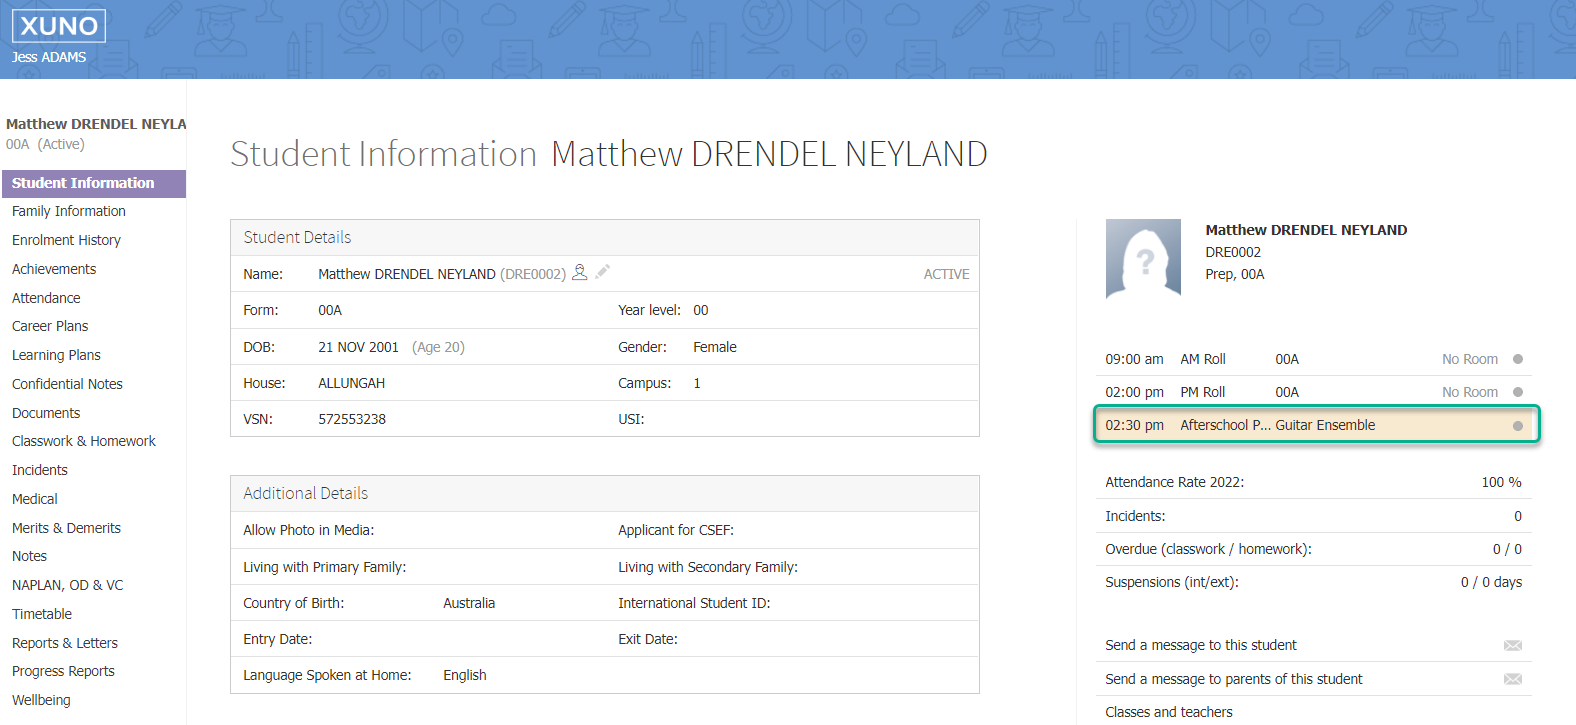
3.2 Students
Students will see any of their Scheduled Programs on the same screen as their Timetable. It will display the standard class they would otherwise be attending, along with the Scheduled Program. The Scheduled Program will display the name and the time. Where a Scheduled Program crosses several standard classes, it will be shown against each period it runs in.4. Permissions
The table below indicates what access is given with each permission. Permissions are granted under Options > Software Settings > User Groups & Permissions > School > Scheduled Programs.
| Permission | Explanation |
| Read only (Own) |
|
| Read Only (Own + Others) |
|
| Modify + Read (Own) |
|
| Modify (Own) + Read (Others) |
|
| Modify + Read (Own + Others) |
|
| Add, Modify + Read (Own) |
|
| Add, Modify + Read (Own + Others) |
|
| Add, Modify + Read (Own + Others + Approval) |
|
| No access |
|