For more information on user groups and assigning permissions in XUNO, see the article Managing user groups & permissions.
In this article
- What you need to know about user accounts
- Importing your data
- How to manage new users
- The XUNO User Accounts page
- How to send welcome emails
- How to create welcome letters
- How to enable or disable user accounts
- How to disable 2FA for user accounts
- How to manage user details and API keys
- How to assign users into user groups
What you need to know about user accounts
User accounts are automatically created or disabled when parents, students and staff are imported from your Student Information System (SIS) administration software into XUNO. This means that IT staff will have a minimal workload to maintain user accounts.
XUNO supports and imports data from the following SIS products:
- MAZE
- Civica
- CASES21 / CHESS
- Denbigh
- Human Edge SAS/SAS2000
- EdSAS and DUX
- Integris
- OneSchool
If your school is using XUNO as a SIS, please see articles in the section Using XUNO as a SIS.
Importing Your Data
The steps needed to import your data depend on which SIS program you are using. We do not allow you to edit your SIS data inside of XUNO so as to keep your data integrity. Your SIS should always be your primary and accurate source of data.
Follow the related articles that correspond to your SIS. Please contact your SIS supplier if the instructions you need are not found here.
How to manage new users
Important notes
- New students and staff with an 'active' status will have their user accounts automatically enabled and added to your default corresponding permissions group. Parent/carer accounts are created and added to the default parents user group, but disabled by default - this is a security feature, so that you can review the accounts for access restrictions before enabling them.
- When the status of existing students and staff are updated in your SIS as non-active (i.e. leaving, left, future, inactive etc.), their user accounts in XUNO are automatically disabled.
- Parent/carer accounts are automatically disabled once all of their children's statuses are set to non-active.
- New students and staff with an 'active' status will be able to sign in to XUNO straight away after the SIS import with their new user account. Since a password has not yet been set the first time they sign in, XUNO will prompt them to create a password.
- Permissions are set via user groups. Each user can only belong to one permission group.
- You can email any user or group of users a welcome email, export their account details, print welcome letters, reset their passwords, etc.
- Each parent/carer in a family receives their own XUNO user account. Parent/carer accounts in the same family are able to see each other's contact details, whereas parent accounts in separate families (i.e. primary and secondary families) will not be able to see each other's contact details. Only primary family parents and their students are able to see emergency contact details.
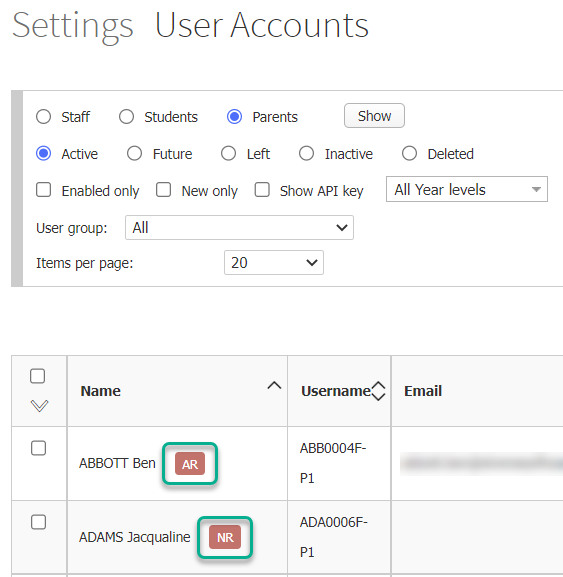
- You will sometimes see two red flags next to the parent/carer user accounts. These flags come from CASES21. The "AR" (Access Restrictions) flag means that some of the parent's children have access or parent contact restrictions. "NR" (No Reports) flag means that the parent will not have access to the student's academic reports in the XUNO Parent Portal.
- New users will have a green "NEW" flag next to their name. Users are considered 'New' if they haven't yet signed in, and have not been sent a welcome email or letter.

All users must use their email address (as registered in your SIS administration software) or their unique XUNO username to sign in. Their email address is used when users want to reset their password.
User accounts are automatically created or disabled when parents/carers, students and staff are imported from your SIS into XUNO, based on the rules in the summary above. You will only need to review and enable new parent accounts as required, and set user group permissions or provide new students and staff with their usernames if needed. Students and staff will be able to log in and reset their password as soon as their account is created.
We recommend that you periodically check for new parent/carer accounts in XUNO, enable these as required, and send a bulk welcome email to all new parents/carers you wish to invite to begin using XUNO.
The XUNO User Accounts page
The following will explain how to access the User Accounts page in XUNO, and what information is displayed.
- Sign in to XUNO as an Administrator.
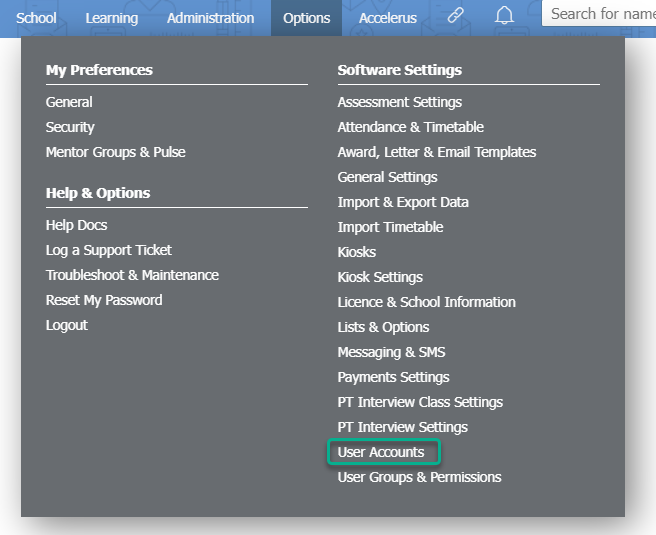
- Go to Options > Software Settings > User Accounts.
- Use the tables below for guidance on how to use this page to view user account details.
Filter section
Make your filter selections using the table below for guidance, then click the Show button to display results.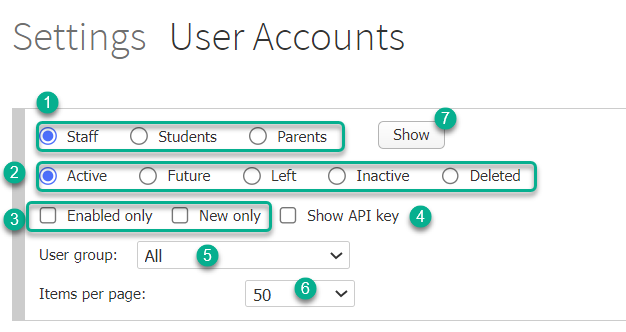
| Number | Description |
 |
Use radio buttons to select user account type (Staff, Students or Parents). |
 |
Use radio buttons to select user account status (Active, Future, Left, Inactive or Deleted). |
 |
Tick the applicable checkbox to display Enabled accounts or New accounts only. |
 |
Tick the checkbox to display the user's API key. |
 |
Use the dropdown list to display users in a selected User group. |
 |
Use the Items per page: dropdown list to determine how many results are displayed per page. Large numbers of records will take longer to load. |
 |
Click the Show button to display your results, based on your filter selections. |
User Account table section
You can use the table's search bar to find a specific user, and you can sort any column using up or down arrows in the column header.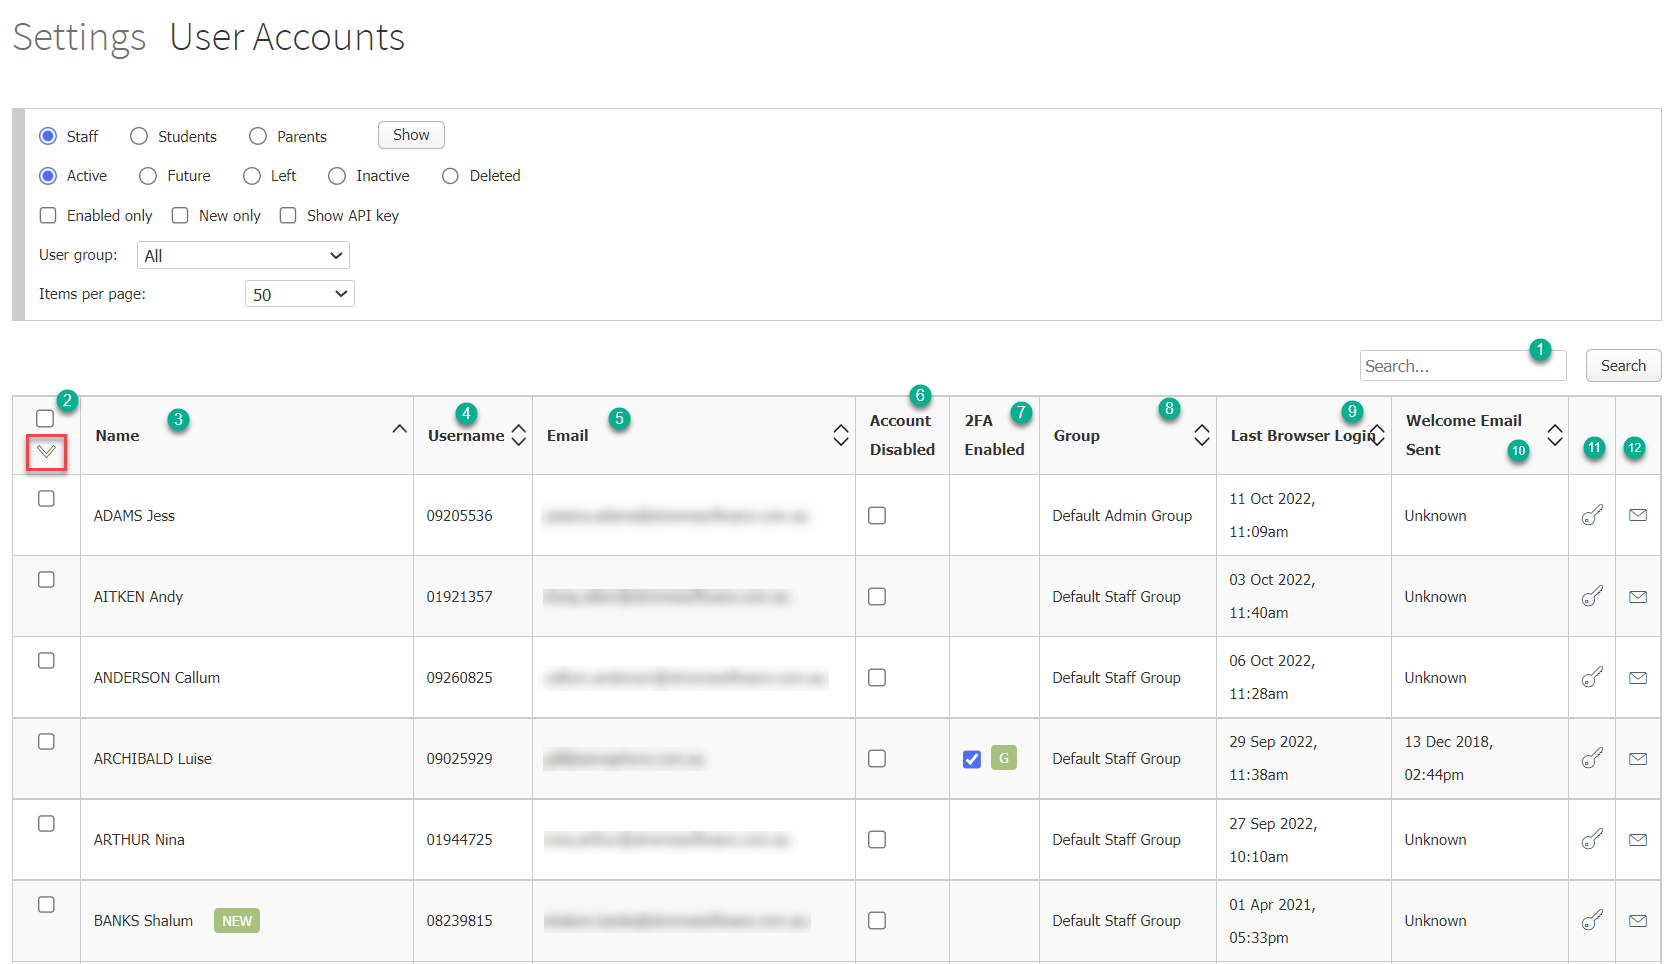
| Number | Column/feature name | Description |
|
Search bar | Search by name, username, or email address to find specific user accounts. |
|
Checkbox column | Use the checkbox to the left of a user account to tick/untick, or use the checkbox in the column header to tick/untick all user accounts displayed. Note: Only records shown on the current page will be ticked, so check your Items per page value to ensure you are selecting all appropriate records. Note: the down arrow in the checkbox column header (shown in the red box) is used to perform various actions, such as moving users to a new user group, or sending welcome emails in bulk. See the sections below for more details. |
|
Name column | User's name as imported from your SIS. |
|
Username column | Unique XUNO username imported from your SIS. For CASES21 schools, this will be the TO number for staff, the student code for students, and a username based on the family code for parents/carers. Users can use their username or email address to log in to XUNO. |
|
Email column | Email address as imported from your SIS. Users can use their username or email address to log in to XUNO. |
|
Account Disabled column | Tick this checkbox to disable a user account. Note: A disabled user cannot log in to XUNO. However, they can still receive emails or SMS via XUNO. |
|
2FA Enabled column | If a user has enabled Two-Factor Authentication (2FA) on their account, a checkbox and a flag will appear in this column. A G flag indicates the user has enabled Google Authenticator 2FA, and an E flag indicates the user has enabled 2FA by email. You can untick the checkbox if a user requests this, so that they can reset their 2FA. |
 |
Group column | Indicates the user group that this user belongs to. See the sections below on user group management for more details. |
 |
Last Browser Login column | Displays the last time the user logged in to XUNO on a browser (NOT via the XUNO Staff or Family app). |
 |
Welcome Email column | Displays date and time of the most recent welcome email sent to the user. |
 |
Reset password column | Click on the Key icon to reset a user's password. XUNO passwords must be at least 8 characters long and contain an uppercase letter, a numeral and a special character. |
 |
Send welcome email column | Click on the Envelope icon to send a new welcome email. This will reset the user's password. |
How to send welcome emails
Warning: Sending a welcome email to a user will reset that user's password.
- Sign in to XUNO as an Administrator.
- Go to Options > Software Settings > User Accounts.
- Filter your user accounts as required by using the filtering options provided. You can tick the New only checkbox to display only new user accounts. Click the Show button to view your filtered results.
- You can easily identify new users by the "NEW" tag next to their name. Alerts will also be shown for users using the red tags "AR" (Access Restrictions) and "NR" (No Reports). Users are considered 'New' if they haven't yet signed in and have not received a welcome email or letter.
- Select the checkboxes of the users that you want to send a welcome email to. You can also use the column header checkbox to select all users in the list.
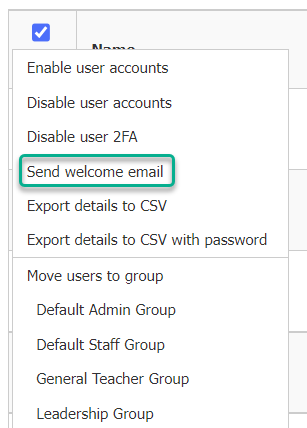
- Click on the down arrow next to the column header checkbox, and then click on the Send welcome email option. This option will reset their password, then send a welcome email with a link that will allow them to create a new password, and instructions on how to sign in to XUNO.
- Alternatively, you can click on the Envelope icon next to each user account to send individual welcome emails one by one.
How to create welcome letters
Warning: Using the 'Export details to CSV with password' option will reset each selected user's password.
If you want to send a welcome letter, you can export the user account details to a CSV file and then use these to perform a mail merge in your Word processing software.
- Sign in to XUNO as an Administrator.
- Go to Options > Software Settings > User Accounts.
- Filter your user accounts as required by using the filtering options provided. You can tick the New only checkbox to display only new user accounts. Click the Show button to view your filtered results.
- You can easily identify new users by the "NEW" tag next to their name. Alerts will also be shown for users using the red tags "AR" (Access Restrictions) and "NR" (No Reports). Users are considered 'New' if they haven't yet signed in, and have not received a welcome email or letter.
- Select the checkboxes of the users that you want to send a welcome letter to. You can also use the column header checkbox to select all users in the list.
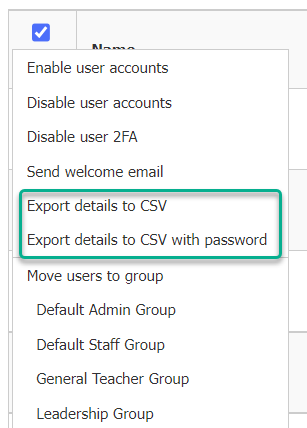
- Click on the down arrow next to the column header checkbox, and then click on the Export details to CSV option to export the user details without a password; or alternatively, click on the Export details to CSV with password option to reset the selected users' passwords and export the details, including their new password, to a CSV file.
How to enable or disable user accounts
When the status of existing students and staff is updated as non-active (i.e. leaving, left, future, inactive), their user accounts are automatically disabled. Parent/carer accounts are automatically disabled once all of their children's statuses are set to non-active.
- Sign in to XUNO as an Administrator.
- Go to Options > Software Settings > User Accounts.
- Filter your user accounts as required by using the filtering options provided. You can tick the New only checkbox to display only new user accounts. Click the Show button to view your filtered results.
- You can easily identify new users by the "NEW" tag next to their name. Alerts will also be shown for users using the red tags "AR" (Access Restrictions) and "NR" (No Reports). Users are considered 'New' if they haven't yet signed in and have not received a welcome email or letter.
- Select the checkboxes of the users that you want to enable or disable. You can also use the column header checkbox to select all users in the list.
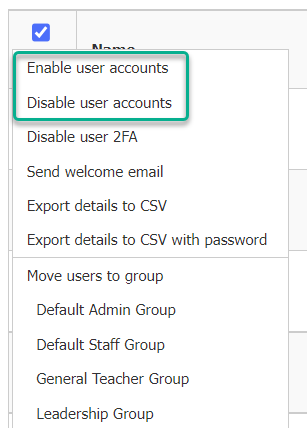
- Click on the down arrow next to the column header checkbox, and then click on either the Enable user accounts or Disable user accounts option as required. Disabled users will not be able to sign in to XUNO. They can, however, still receive emails or SMS via XUNO.
- Alternatively, you can enable or disable an individual user account by selecting or deselecting the corresponding user's Account Disabled checkbox.
How to disable 2FA for user accounts
- Sign in to XUNO as an Administrator.
- Go to Options > Software Settings > User Accounts.
- Filter your user accounts as required by using the filtering options provided. Click the Show button to view your filtered results.
- Select the checkboxes of the users that you want to disable 2FA for. You can also use the column header checkbox to select all users in the list.
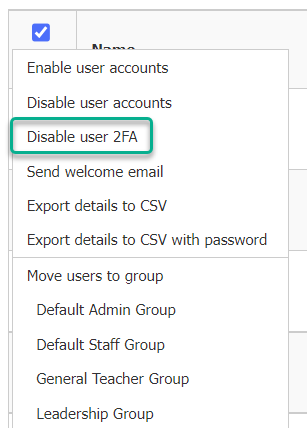
- Click on the down arrow next to the column header checkbox, and then click on the Disable user 2FA option.
- Alternatively, you can enable or disable 2FA for an individual user account by unticking the corresponding user's 2FA Enabled checkbox.
How to manage user details and API keys
User details, such as their email address changes or names, need to be updated in your SIS administration software. When you re-import the updated details, your user accounts will also be updated. This functionality is intentional, so that your SIS database and XUNO both have accurate and up-to-date records.
Each user receives an API key that is used to authenticate them when they sign in to XUNO or use the XUNO API (Application Programming Interface). Most users will never need to be told what their API key is.
To integrate XUNO with other applications, you'll need to use a user's API key. The endpoints and data an API key has access to is dependant on the user's group permissions. If you don't want to use an existing user's API key, you can create a new CRT staff member, which will automatically create a new user and API key. Set the permissions of this user and use their API key to integrate XUNO with other applications.
To view or reset a user's API key:
- Sign in to XUNO as an Administrator.
- Go to Options > Software Settings > User Accounts.
- Filter your user accounts as required by using the filtering options provided. Make sure you tick the Show API key checkbox.
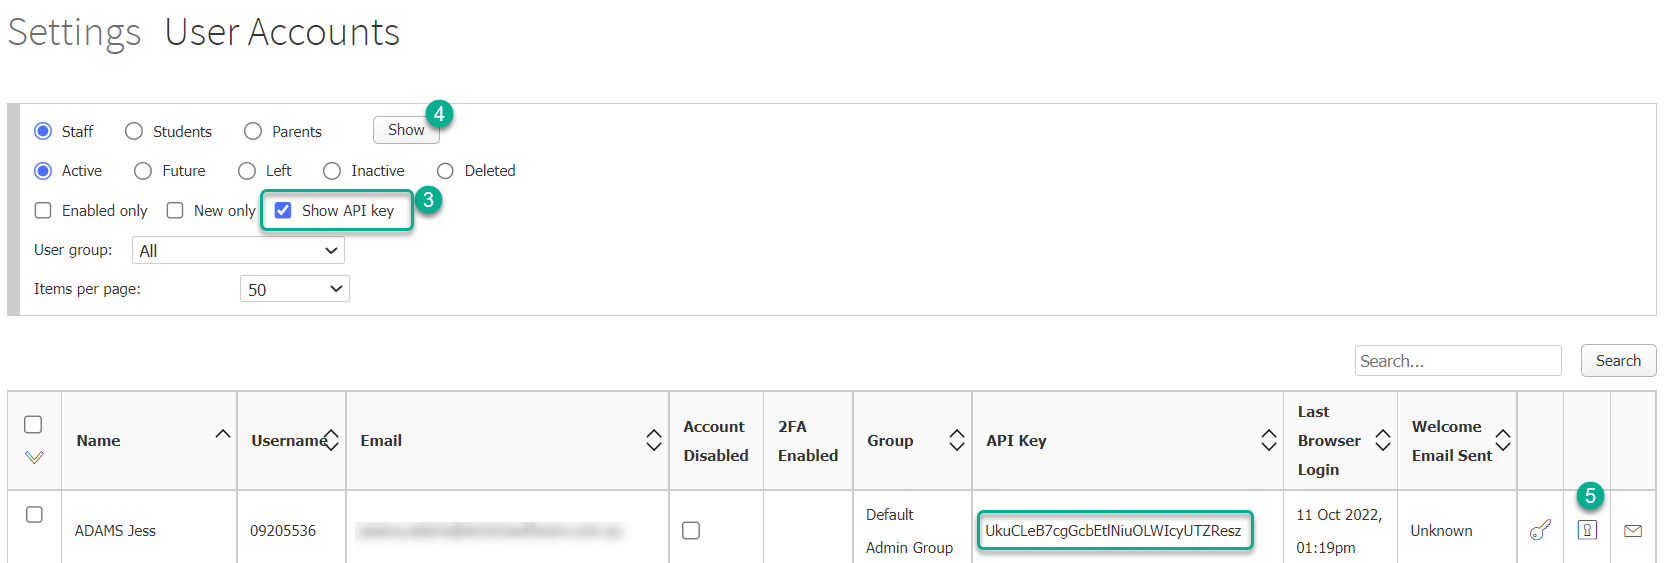
- Click the Show button to view your filtered results.
- You will see the user's API key in the API Key column. If you wish to reset the user's key, click the Keyhole icon.
How to assign users into user groups
- Sign in to XUNO as an Administrator.
- Go to Options > Software Settings > User Accounts.
- Filter your user accounts as required by using the filtering options provided. Click the Show button to view your filtered results.
- Select the checkboxes of the users that you want to assign to a user group. A user can only be a member of one user group. You can also use the column header checkbox to select all users in the list.
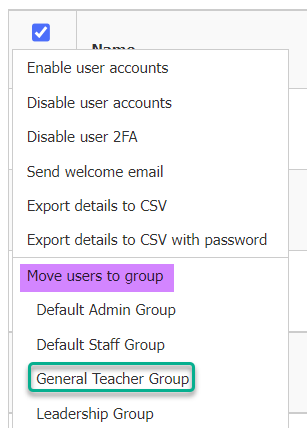
- Click on the down arrow next to the column header checkbox, and click on a new group under the Move users to group section of the dropdown list. The selected users will be moved to the group you selected, and the new group's permissions will now apply to those users when they next login or use their API key.
Printing the QR Code
You can now easily export and print QR codes by selecting the Export QR Code option, as shown below.
