In this article
How to add new incident or action types
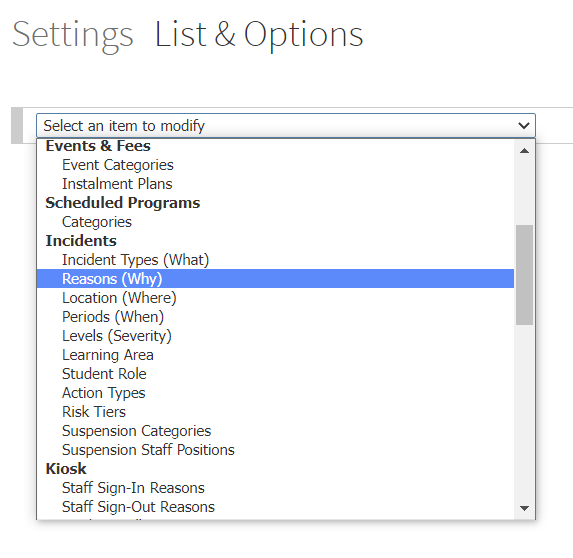
- Go to Options > Software Settings > Lists & Options.
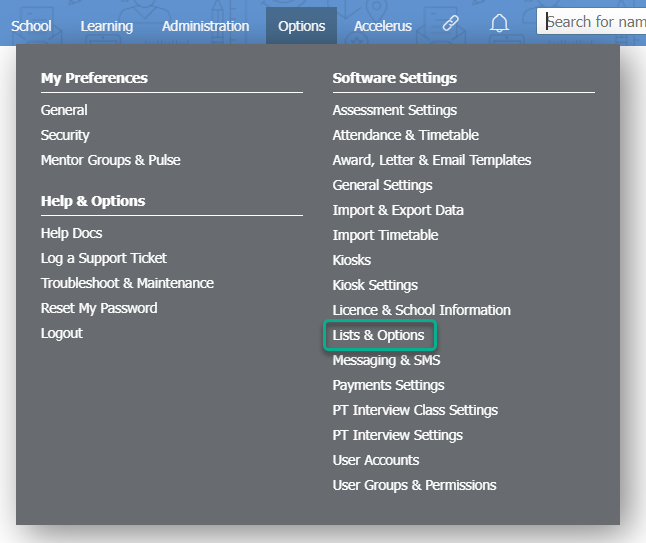
- In the dropdown list, find the Incidents subheading and select Incident Types (What) to create a new incident type, or Action Types to create a new action type.
- To add a new incident or action type, type the new incident description in the Add a new item... field.
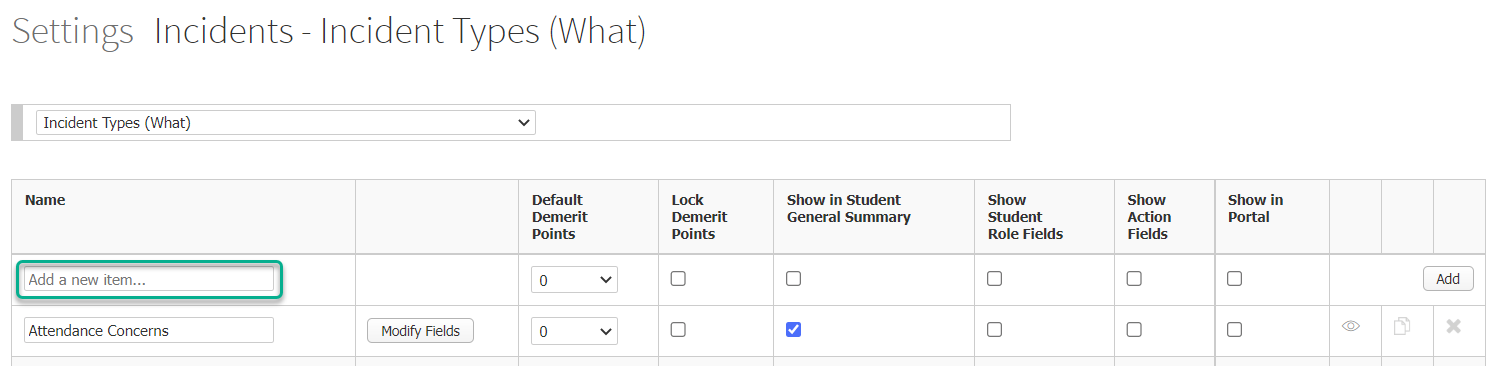
- Use the table below to guide you in making selections in each of the columns.
Column name Description Default Demerit Points Dropdown list to assign a default number of demerit points to the incident or action. Lock Demerit Points Checkbox to lock demerit points so staff cannot change the value when filling in incident or action form for a student. Show in Student General Summary Each student has a Student General Summary to the right of their student dashboard. If this checkbox is ticked, then this incident or action type will count towards the Incidents: count shown. 
Show Student Role Fields (incident types only) If this checkbox is ticked, then staff filling in the incident form can assign a role to each student (e.g. 'Victim', 'Bystander', etc.). To assign student role types, see the related article ' How to enable student role options in an incident type'. Show Action Fields (incident types only) If this checkbox is ticked, then staff can choose to add a linked XUNO action to the incident. Show in Portal If this checkbox is ticked, then the incident or action will be shown to parents/carers or students in their Portal. Note that only the title of the incident/action type and the date will be shown to parents/students for each incident or action recorded. - Click the Add button.
- Your new incident or action type will appear in the table. Click the Modify Fields button to access a popup window allowing you to customise the fields required for this incident or action type.
- To add a new field, enter text in the Add new item... field in the Field Name column, then click the + icon at the end of the row.
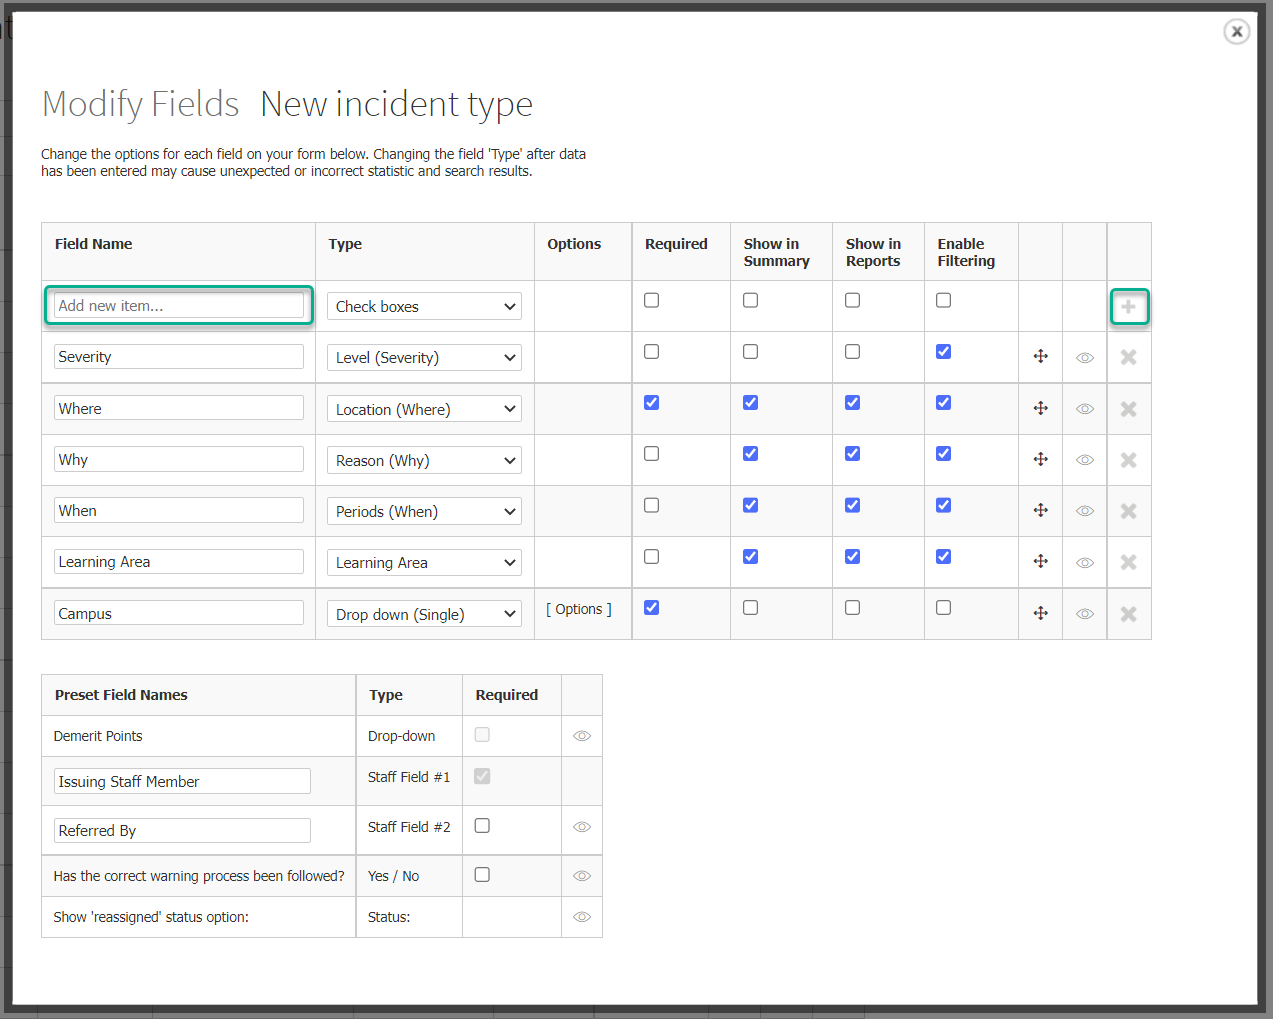
- Use the table below to guide you in making selections in each column as you add or modify the fields in the popup window.
Column name Description Field Name The name of the field as shown on the incident/action form for staff to fill in. Type The type of field. Available types are detailed in the below section, Field types for incident/action forms. Note: We do not recommend that field types or their related options are modified in incident or action types that have been used in the past, as this can cause unexpected or incorrect statistic and search results. Options If a field type is chosen that allows the user to select from several options (e.g. dropdown list, checkboxes), clicking on the [ Options ] text displays a popup window. You can then add as many items as required by typing into the Add a new item... field and clicking the + icon. Close the popup using the X icon in the top right hand corner when you have finished adding options. Required If this checkbox is ticked, users must enter data into the field before the form can be saved. Show in Summary If this checkbox is ticked, then this field will be displayed in the individual student incident summary report. For more information on this report, see the related article ' Viewing and printing an individual student incident summary report'. Show in Reports If this checkbox is ticked, this field will be displayed when a list report is generated for this incident or action type. For more information, see the related article ' Incident/action reporting'. Enable Filtering If this checkbox is ticked, when a list report is generated for this incident or action type, users can filter the report by the data entered in this field. For more information, see the related article ' Incident/action reporting'. Positional icon Clicking on this icon allows you to drag the field to a new position in the list. 
Hide/unhide icon Clicking on this icon allows you to hide or unhide this field. Note that hiding a field does not delete the associated data, but it will no longer show in reports or in the student record. 
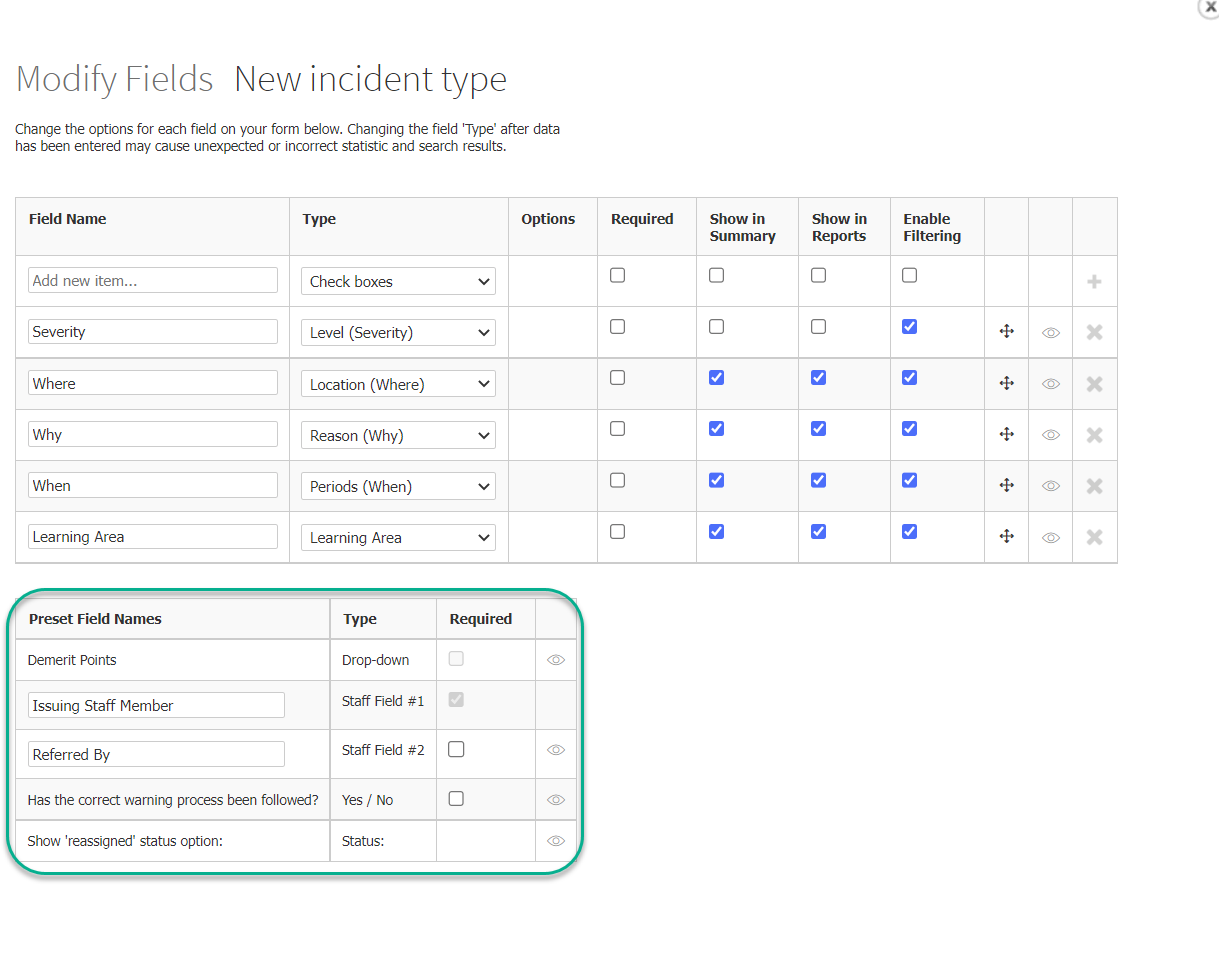
Delete icon Clicking on the X icon allows you to delete a field. Deleting a field will delete all associated data. We recommend that you do not delete a field if you have used the incident/action type in the past, to avoid data integrity breaches. - In the Preset Field Names table, make selections to edit the field name or hide the field, where this is possible, if applicable.
- When you are finished adding and customising your fields, close the popup window by clicking the X icon in the top right hand corner.

Field types for incident/action forms
The available field types for incidents and action forms are:
- Check boxes - allows the user to select one or more options.
- Classes - adds a dropdown list where the user can select classes as per the school timetable.
- Date - adds a calendar picker for users to select a single date.
- Date (Multiple) - adds a calendar picker for users to select one or more dates.
- Drop down (Multiple) - adds a dropdown list where users can select one or more options.
- Drop down (Single) - adds a dropdown list where users can select one option only.
- Sub-heading - adds a subheading to the form.
- Heading (with line) - adds a heading and a horizontal line to the form.
- Learning Area - adds a dropdown list for users to select from your school's Learning Area options.
- Level (Severity) - adds a dropdown list for users to select from your school's Level (Severity) options.
- Location (Where) - adds a dropdown list for users to select from your school's Location (Where) options.
- Reason (Why) - adds a dropdown list for users to select from your school's Reason (Why) options.
- Periods (When) - adds a dropdown list for users to select from your school's Periods (When) options.
- Radio buttons - allows the user to select only one of the options presented (e.g. Yes or No).
- Time - allows the user to select a time from a dropdown list, in 15 minute increments.
- Text area - adds a field where the user can type unlimited characters.
- Text box - adds a field where the user can type a single line of text.
To adjust the school-wide options for field types such as Learning Area, Level (Severity), Location (Where), etc., see the below section How to modify incident and action options for your school.
How to modify incident or action types
- Go to Options > Software Settings > Lists & Options.
- In the dropdown list, find the Incidents subheading and select Incident Types (What) to modify an incident type, or Action Types to modify an action type.
- Make your changes, using information in the above section, How to add a new incident or action type, for guidance. Your changes are automatically saved when you edit the values.
Note: We do not recommend that field types or their related options are modified in incident or action types that have been used in the past, as this can cause unexpected or incorrect statistic and search results.
How to modify incident and action options for your school
Some field types have school-wide options that you can set up, so that incident reporting or graphing can easily be filtered by the data entered in these fields. This allows comparison across different incident and action types based on this data. For example, you can look at all incidents and actions in a particular Learning Area or Location, or see the spread of incidents/actions recorded by Period, to examine trends in your school's reporting.
These field types are:
- Learning Area
- Level (Severity)
- Location (Where)
- Reason (Why)
- Periods (When)
In addition, you can also add school-wide options for Student Role and Risk Tiers. For more information, see the related articles ' How to enable student role options in an incident type' and 'Incident/action reporting'.
To add or modify options for these fields:
- Go to Options > Software Settings > Lists & Options.
- In the dropdown list, find the Incidents subheading and select the field type that you would like to modify options for.
- For whichever list you have selected, you can add a new item by entering a name into the Item column, then clicking the Add button.
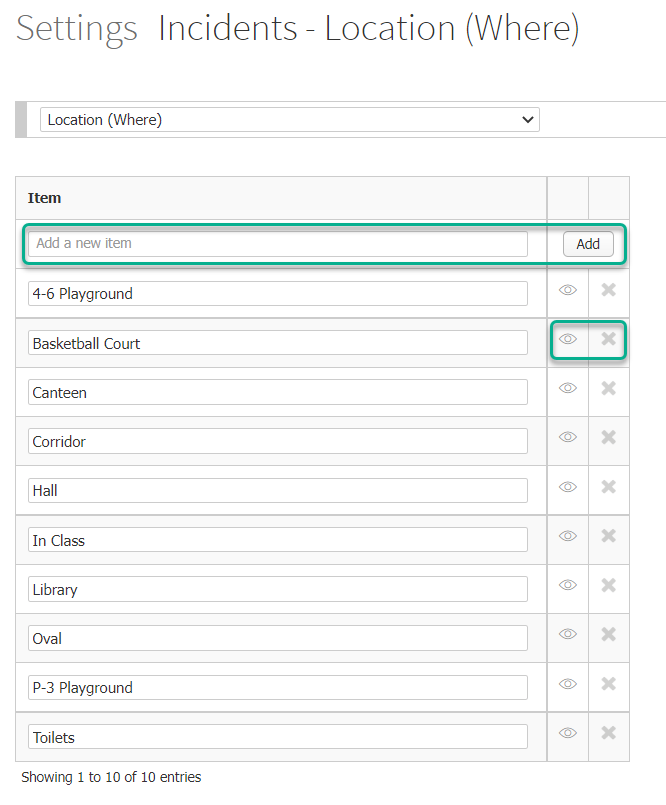
- You can use the Eye icon to hide/unhide options from the list, or the X icon to delete. You will not be able to delete options that you have already used in the past.
Note: Hiding items that have been used can affect what is displayed in incident/action reports.