Manually Staged Import Process
Your First Class timetable is 'staged' from First Class A+ using an .exe that can be run on demand, on your First Class server.
Note: XUNO imports timetables from First Class using the A+ database. Please ensure that your school publishes your First Class timetable to A+ before you import your timetable.
Note: First Class timetabling support will be phased out as School Edge is no longer updating or supporting First Class. It is recommended that schools using First Class consider moving to School Edge Timetable (web version) to ensure future compatibility. The process for syncing a School Edge Timetable is different to the process described here, and is more up to date.
Setting up the First Class Export
- Contact support to obtain the latest version of the First Class Xuno Sync agent .exe files.
- Extract the files in a location on your First Class server, where the person who manages the timetable can access it.
- Run the .exe file. It may appear to do nothing the first time it is run.
- Once it has completed, open the appsettings.json file and enter the appropriate values, as per the screenshot below.
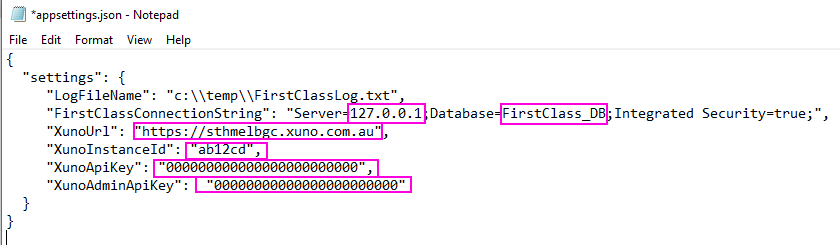 a. First Class SQL Server address (where the A+ SQL database is located)
b. The name of the First Class SQL Database
c. Your school's XUNO URL
d. XunoApiKey - provided by support
e. XunoAdminApiKey - provided by support - Save the file and close it
- Then, in the adress bar of the folder where your FirstClassXunoAgent.exe is saved, type 'cmd' and press enter, which will open a Command Prompt.
- Enter 'fir' and press the up arrow - it should prefill with 'FirstClassXunoAgent.exe'. Press enter.
- Wait for a success message - if it gives an error, contact support for assistance.
- Once successful, the timetable data is staged and ready to be imported via Options > Import Timetable as usual.