In this article
Introduction
The advantage of allowing parents/carers to manage schoolwork for students is that you don't need to create accounts for students and have them remember individual passwords. Also, in the time of home schooling, the parent does not have to log in to accounts for each of their children to see what work is set for the day.
The Markbook feature allows staff to electronically record grades, view and upload classwork/assignments, homework and assessment tasks just like they would in a paper-based mark book or grade book. Staff can set up their own Markbooks in addition to Markbooks that are set up from a school administrative level. This article covers creation of your own staff Markbooks.
Markbook vs. Lesson Plans?
Markbook
- Allows work to be set for a student.
- Work may optionally be viewed by the student and their parent/carer.
- Work may contain attachments.
- Students may submit answers.
- Parents may submit work on behalf of their child, if this option is enabled by the teacher.
- Teachers may mark work.
- Teachers may give feedback to students.
- Available to parents/students in the XUNO Parent Portal and Family App.
Lesson Plans
- Allows work to be set for a student.
- Work may optionally be viewed by the student and their parent/carer.
- Work may contain attachments.
- Available to parents/students in the XUNO Parent and Student Portal.
To avoid students and parents having to access multiple menus, it is recommended to use one method or the other, not a combination.
Markbook groups
Markbook groups allow you to set up groups with one or more Markbook item(s) created in the group. It is similar to creating separate worksheets in an Excel document. Groups are created in a class, so that all students in the class will have the Markbook.
A Markbook group could be something like:
- Week 1, Week 2, Week 2
- Reading, Writing, Speaking
- Year 1, Year 2
- Year 1 Week 1, Year 2 Week 1
- All
The choice is up to the teacher. If you are a specialist teacher setting work for all classes, you would need at least one group (with relevant Markbooks) in each class. If you are a class teacher, you would add at least one group and relevant Markbooks in your class.
NOTE: Groups are for teacher use only - parents and students do not see Group names.
To create a group
- Go to your dashboard.
- Click on Markbook (or go to Learning > My Classes > Markbook in the top menu).
- Choose your class.

- In Add a new group here... type the name of the Group.
- Click the + icon.
- Repeat for all groups required.
- If you need to edit a Group, click the pencil icon next to the group name.
Markbook items
A Markbook item is a piece of work you wish the student to undertake. For example, if using the Week 1, Week 2 grouping system, Week 1 may contain Markbook items for Spelling, 5 items for Reading, etc. Week 2 may contain the same or different items.
Note that each Markbook item has options that allow teachers to:
- See if work has been submitted.
- View submitted work.
- Upload work on behalf of students who have not been able to submit work through the Portal (e.g. if they have emailed the work to the teacher).
- Give text feedback to students/parents. Note: When text feedback is added, it is automatically shown in the student/parent portal if the Markbook item has the 'Show this task to parents and students in the parent portal' option ticked.
To create an item
- Go to your dashboard.
- Click on Markbook.
- Find the class and select the Group to add the task to.
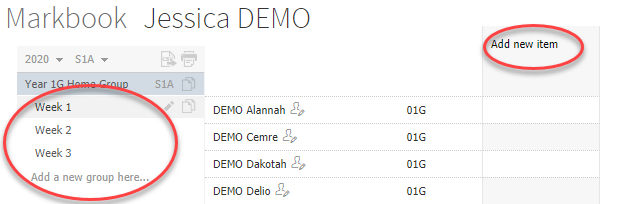
- Click Add new item.
- Enter the details:
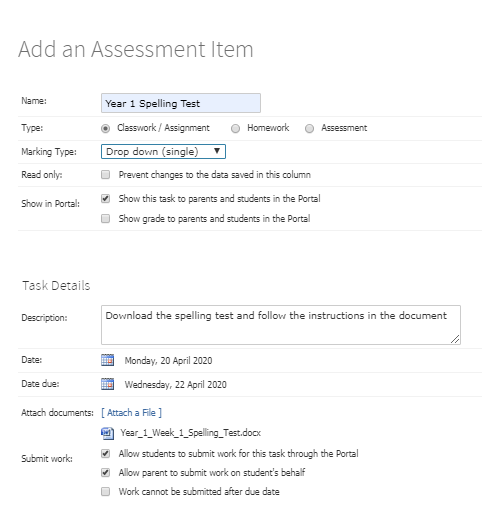
- Name: A short description of the Task, e.g. 'Year 1 Spelling Practice'.
- Type: We recommend Classwork/Assignment as the type of task to use for remote learning, as this is the easiest for students and parents to access.
- Marking Type: This is how you will mark or grade the piece of work and is optional; if you choose not to set up a marking type, you will not need to enter a grade or comment for the item. If you are using the feedback options to record that you have received the work, you may not need to set up a marking type. If you wish to simply pass/acknowledge the work, select Check Box.
- Further details about marking types:
- Drop down (single): Allows you to mark the student from a list of values (e.g. Satisfactory, More work required).
- Text Box (multi-line): Allows for a free text long comment to be used.
- Text Box (single line): Allows for a single line of text to be used.
- Checkbox: A single box that may be checked on/off.
- Read only: Locks any changes to the column. Do not use this unless all results have been added.
- Show this task to parents and students in the Portal: Tick this box when you are ready for Parents / Students to see the task. For example, you may like to add Markbook tasks for a whole week, but only show a days worth of tasks at a time. This will also automatically show any feedback entered.
- Show grade to parents and students in the Portal: Only tick this if you wish parents and students to view grade/results, and only after you have finished grading all students.
- Description: Type more information about what you wish the student to do, e.g. 'Download the attachment', or 'The parent is to read out the list of words and the student is to write them down.'
- Date: The date the task opens. Note: If you set a future date but have 'Show this task to parents and students in the Portal' ticked, parents and students will see this task under 'Future tasks'.
- Date due: The date in which you expect work to be completed; you will see a dashboard alert reminder the day before the due date and on the due date. If any students have not submitted work by the due date, the Markbook item will be shown as overdue in the student and parent portal. You may extend the due date in the Markbook item if required.
- Attach documents: Any files you wish to attach to the task.
- If you ticked Show this task to parents and students in the Portal, the following options will also be available:
- Allow students to submit work for this task through the Portal: This allows the student to upload their results, or evidence of their work, e.g. a photo of a spelling test, drawing, etc.
- Allow parents to submit work on student's behalf: This allows the parent to submit work on behalf of the student through their Parent Portal.
- Work cannot be submitted after due date: Prevents file uploads after the due date.
- Work can only be submitted once: Prevents subsequent file uploads occurring.
- Click Add.
- If you chose Drop down (single) as the Marking Type, click Change options. Otherwise, skip this step.
- Either choose the grade/result values from the dropdown list of available templates and click the + icon, which will create a dropdown list selection based on the template chosen, e.g. A-E; High, Medium, Low; OR
- Enter your own values to mark the item, by entering each in the Item Name field and clicking the + icon after adding each value (e.g. Great, Have another go).
- Click the Close icon (x in the top right).
- Close the pop up (x in the top right).
- Repeat steps 4 - 8 as needed.
- Note: Showing the grade to parents and students is optional; to do so, tick the 'Show grade to parents and students in the Portal' when all grades have been entered.
To edit an item
Editing an item can occur frequently, e.g. to turn on/off whether it is visible in Portal, to show whether the grades are visible, to extend the due date.
To edit, simply click on the name of the task and make the appropriate changes.
Viewing, downloading or uploading work, giving results and feedback
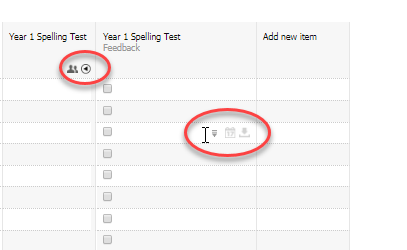
In the header of each task is an arrow icon. Clicking this will expand the feedback column, which allows you to view work submitted by the student or parent, acknowledge and/or upload work submitted outside the Portal (e.g. work sent by email or handed in), enter an extension date for work to be submitted for the student, or enter feedback text and/or attachments for the student/parent. NOTE: Feedback will display automatically in the student/parent portal once entered if the item is set to be visible to parents/students in the Portal.
In the feedback column you will see:
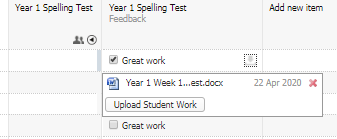
- A submitted checkbox. This will automatically be ticked once a student or parent uploads work. Alternatively, the teacher may tick it when receiving work in person, or via another method.
- An area to type feedback. This is a free text column that allows the teacher to type feedback and/or attach a file for the parents and students to review.
- A fill down icon. This will fill down the feedback to all students below the student chosen. This icon and the two following icons are visible when you hover on any row within the column.
- A calendar icon. This allows an extension to be given to a particular student.
- A download/upload student work icon. This allows you to view/download/upload the work submitted by the parent/student.
Upload or download student work
- Show the feedback column.
- Place your mouse over the feedback column cell that corresponds to the student for whom you want to upload or download work.
- Click on the download icon that appears in the cell.
- Click on the file to download or click the Upload Student Work button to upload work for the student.
Give results and feedback
- Grades can be entered in the task column (in the picture above, the column titled 'Year 1 Spelling test').
- For checkbox results, simply click to tick the box.
- For text boxes, click the cell and enter results.
- For dropdown-marked tests, click in the cell and choose the result from the dropdown. Click on the text to just choose the result, or the arrow next to the result to select and fill down the result.
- Feedback can be entered in the feedback column.
- Click on the arrow icon in the header of the task column to expand the feedback column.
- Click in the feedback cell for the relevant student.
- Type the feedback in the pop up box that appears, as well as attaching any documents (e.g. marking sheets etc.).
- Close the pop up (x in the top right).
- To fill down, click on the fill down icon.
FAQ
What to do with a composite class?
If you have a composite class, you have two options when using XUNO Markbook.
- Type the year level at the start of the name of the task, e.g. 'Year 1: Spelling'.
- You can use the Accelerus Continuous Reporting module to assign tasks to a particular student. However. parents cannot submit work via Continuous Reporting.
How can specialist teachers add Markbook items?
Specialist teachers can add Markbook Groups to the existing classes. If taking this option, it may be useful to label groups accordingly, e.g. 'PE Week 1'. When using this option, the class teachers will also receive any due/overdue alerts for tasks in their dashboard Alerts. Specialist classes can be added into XUNO for Markbook purposes. Contact XUNO Support to discuss options for specialist classes.
A student has left and still shows as having overdue work. How do I stop this?
The enrolments feature of Markbook allows you to adjust the class enrolment and exit dates for each student in your Markbook class. Adjusting these dates will show or hide students from the selected Markbook, and prevent uncompleted work or task alerts from appearing. Note: Any changes made to the enrolment dates will affect all Markbook tasks for the student, for that class.
To learn how to use this feature, read the article: How to modify the enrolment dates of a student in your markbook class.
Can I give a student an extension?
Yes. Follow the steps below:
- Find the task you want to give an extension to.
- Click on the arrow icon to show the feedback column.
- Find the student and hover the mouse in the cell.
- Click on the calendar icon that appears in the cell.
- Select the new extension date in the calendar that appears.
- Click on the Save button.
What about if I want to change the due date for all students?
Open the task and change the date in the Due date field.
Will students and parents see work for future dates?
Yes, in some windows. When a parent/student looks at current classwork, they will not see tasks where the start date is in the future. However, if you have shown the task in the Portal, there is a window that allows students and parents to look at future work. If you do not want them to see work, do not select Show this task to students and parents in the Portal.