Who is this article for?
Schools using XUNO as a SIS (not relying on data flowing in from other systems such as Cases21, SAS2000, Synergetic, etc.) will need this article to step them through the process of:
- adding new students
- activating new students
- exiting leaving students
- promoting students into their new year levels
- changing students' forms
In this article
How to export student data
It is suggested that student details are maintained via the XUNO user interface. However, when there are many fields that need to be updated for students, such as Form groups, you may choose to export the student data in CSV data format, make the necessary changes and then re-import the updated data back into XUNO. If you are comfortable with CSVs and wish to use them to update student details, please follow the steps below.
- Go to Options > Software Settings > Import & Export Data
- Under the Export Data section, select Student Details (CSV) option. All students in the XUNO database including current, left and future students will be extracted in a CSV file.
- You may now make changes to the exported data and import the changes back into XUNO. The CSV file will be in the correct format for importing back into XUNO.
Please read Working with CSV data file section below for hints and tips on data formatting using Excel.
How to add new students
It is suggested that new students are entered via the XUNO user interface as there are many fields that need to be updated for new students, including family information, and the data types are very important. Using the interface reduces the risk of uploading faulty data. However, you may follow the steps below to add new students in bulk.
- Go to Options > Software Settings > Import & Export Data
- Under the Export Data section, select Student Details(CSV) option. All students in the XUNO database including current, left and future students will be extracted in a CSV file.
- You may clear all the student data in the file and add in the new students data. Please see Tips section below for more information on mandatory values/fields and data formatting notes you need to know for adding new students. Do not delete any columns (fields) from the file, but you may leave them blank if they are not listed below as mandatory.
- To import the changes back into XUNO, go to Options > Software Settings > Import & Export Data
- Under the Import Data section, choose Student Details option and select the CSV file that you want to import
Tips:
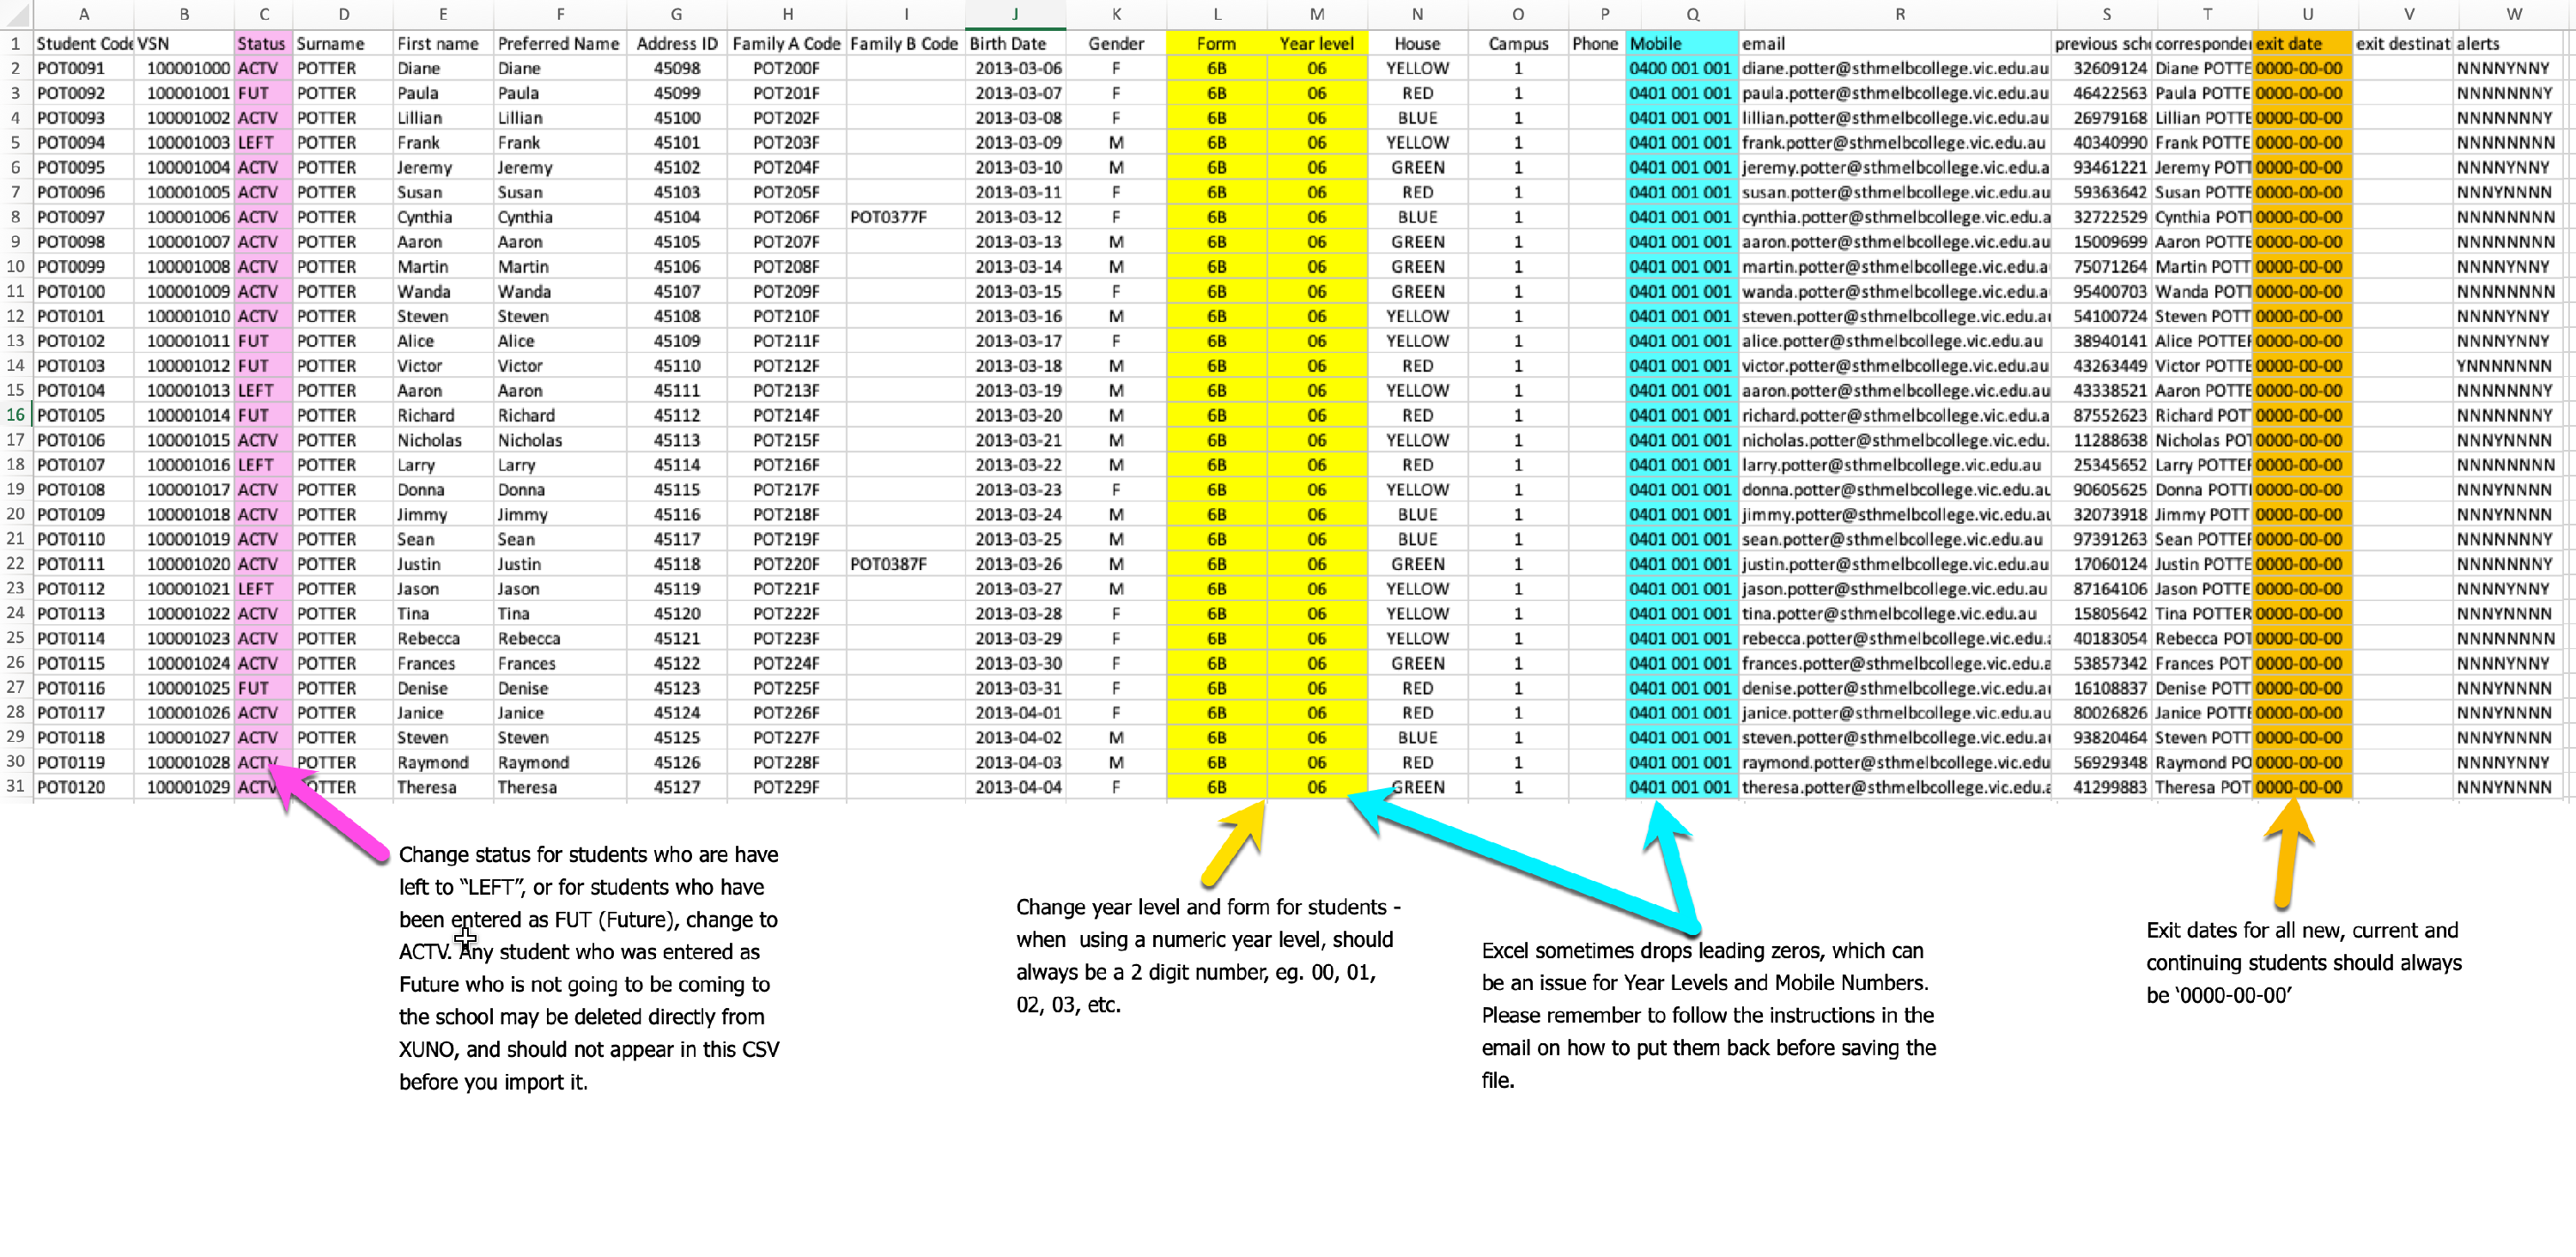
- It is mandatory to have a value for the following fields/columns:
STUDENT CODE
VSN
STATUS
SURNAME
FIRST NAME
PREFERRED NAME
BIRTH DATE
GENDER
CAMPUS
ENTRY DATE
EXIT DATE
ALERTS - Status should be either of the following values: 'ACTV', 'FUT'
- If the student's given and preferred names are the same, put the same name in both cells - do not leave either of them blank
- Always leave Address ID, Family A Code, Family B Code cells blank if adding brand new students this way. Existing students should not have blank cells in these columns however, so do not remove the values
- Entry and Exit date for any current or new student must display 0000-00-00. Do not leave this field blank.
- Exit destination column should be blank
- Alerts column by default needs to have the value 'NNNNNNNN' - eight letter 'N's. It is best to adjust these alerts manually via the user interface individually after importing. These are the values which relate to ATSI, medical alerts, wellbeing, student at risk, and others.
How to activate Future students
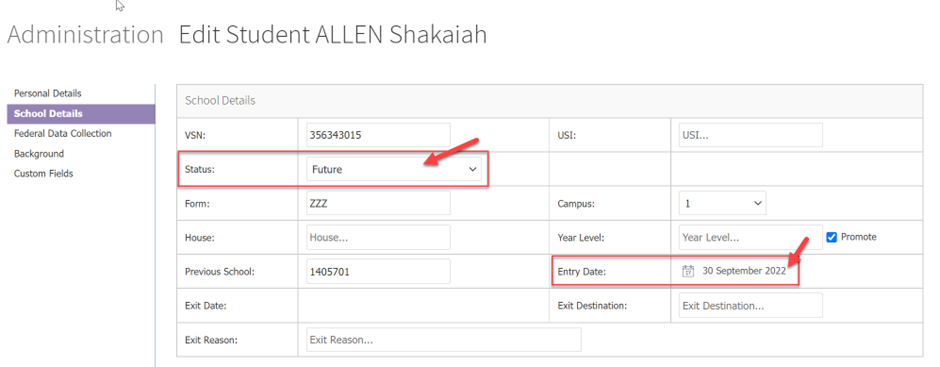
If you have any future students in XUNO you will benefit from using the automatic Student Promotion tool so that students with the status of Future (FUT) will be changed to Active (ACTV) automatically on the student's Entry Date. The student’s Entry Date must be entered in the Student Profile – School Details section in order for the automatic update process to change their status.
To allow the automatic Student Promotion tool to update Future students to Active status:
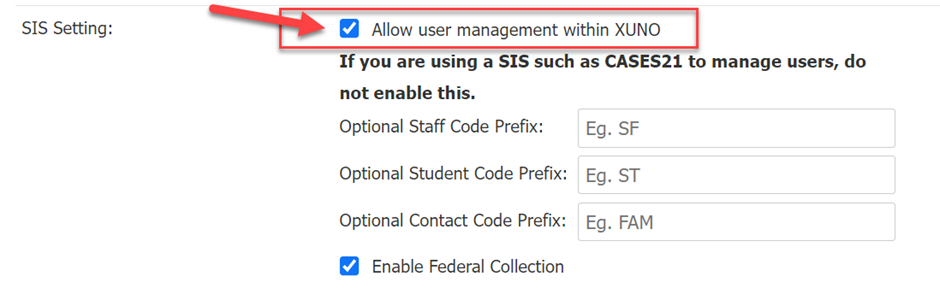
- Click on the Options > Software Settings > General Settings menu option. Make sure “Allow user management within XUNO” check box is ticked.
- Scroll to the Student Promotion Settings section on the page. Make sure the “Future Student Status” check box is ticked.
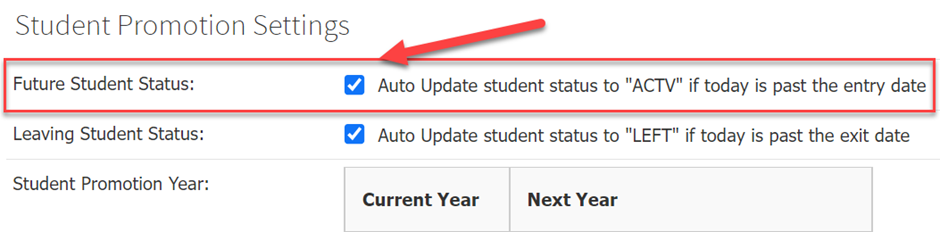
- The auto-update process will run once a day - usually occurring overnight. Any student with status = Future and has entry date >= Today will have the status changed to Active.
Notes:
- The Student Promotion Settings section will only be available on this page if the “Allow user management within XUNO” check box is ticked.
- To adjust the “Future Student Status” setting, you will need to check the box and then click the Save button at the bottom of the page. So if you have enabled it now, you can expect it to begin working from tomorrow onwards.
How to exit Leaving students
If you have any students in XUNO who are leaving, you will benefit from using the automatic Student Promotion tool so that students with the status of Leaving (LVNG) will be changed to Left (LEFT) automatically on the student's Exit Date. The student's status must be set to Leaving and has an Exit Date in the Student Profile – School Details section in order for the automatic update process to change their status.

To allow the automatic Student Promotion tool to update Leaving students to Left status:
- Click on the Options > Software Settings > General Settings menu option. Make sure Allow user management within XUNO check box is ticked.
- Scroll to the Student Promotion Settings section on the page. Make sure the Leaving Student Status check box is ticked.
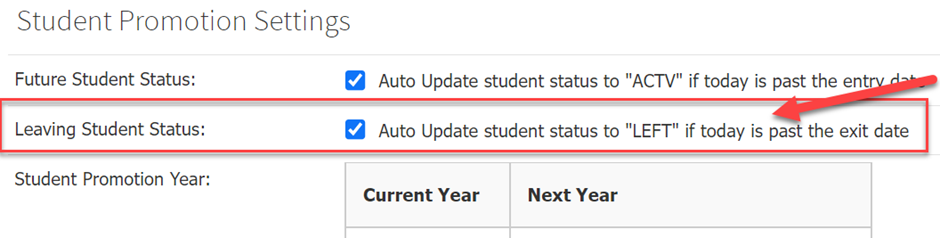
- The auto-update process will run overnight. Any student with status = Leaving and has exit date <= Today will have the status changed to Left.
Notes:
- The Student Promotion Settings section will only be available on this page if the “Allow user management within XUNO” check box is ticked.
- To adjust the Leaving Student Status setting, you will need to check the box and then click the Save button at the bottom of the page. So if you have enabled it now, you can expect it to begin working from tomorrow onwards.
How to promote students into new year levels
To easily move students into their new year levels, you can use the Student Promotion tool. This will allow you to specify which year levels should change (in bulk) and also allows you to leave individual students in their current levels if you have any who will be repeating a level.
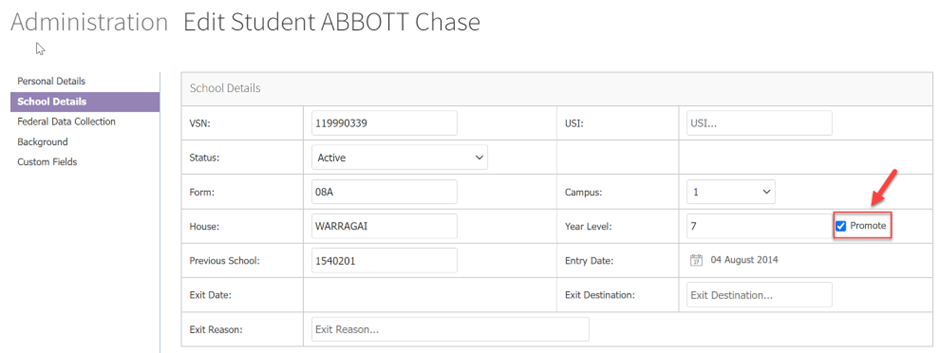
To specify that certain individuals should not be promoted into the next level
Only active or future students with Promote check box ticked will be promoted. This check box is found in Edit Student > School Details section. This box is ticked by default, as it is assumed that all students are to be promoted to the next Year Level.
To prevent individuals from being promoted, follow these steps
- Search for the student using the search in the right corner, or via Administration > Reports > Students.
- Click the pencil icon next to the student, to open the Edit screen.
- Click School Details on the left menu.
To promote the remaining students into new year levels
- Click on the Options > Software Settings > General Settings menu option. Make sure Allow user management within XUNO check box is ticked. The Student Promotion Settings section will only be available on this page if the Allow user management within XUNO check box is ticked.

- When you are ready to promote students to the new year level, update the Student Promotion Year table to ensure students are promoted to the correct year level.
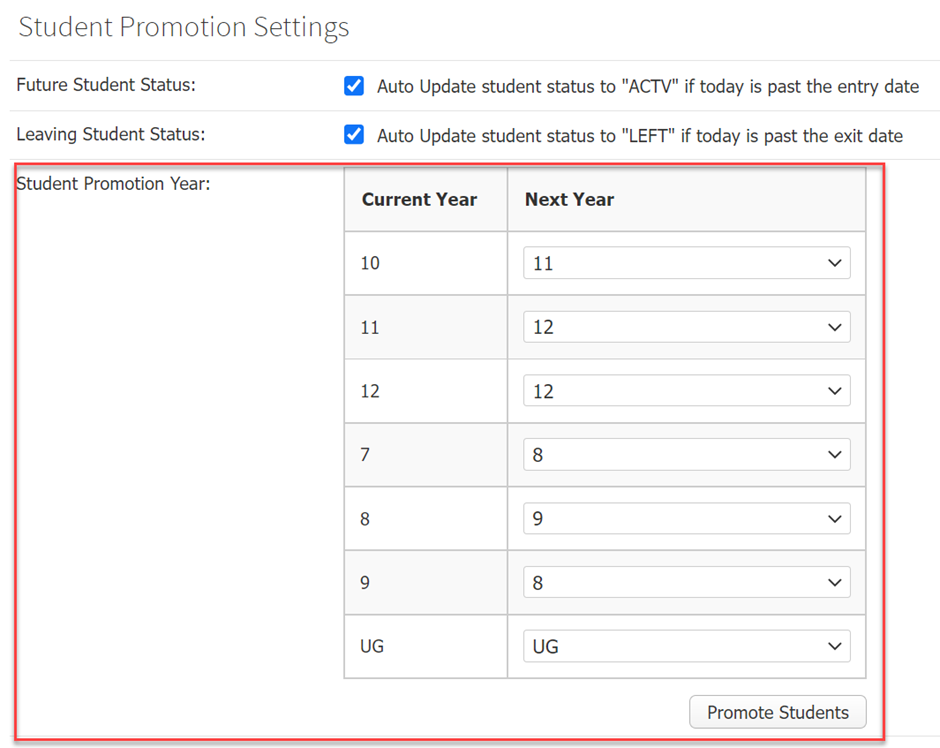
- Click the Promote Students button.
- Click OK to confirm your request.
How to change student Forms
- Go to Options > Software Settings > Import & Export Data
- Under the Export Data section, select Student Details (CSV) option. All students in the XUNO database including current, left and future students will be extracted in a CSV file.
- You may now change the value in the Form column to the student's new form for next year.
- To import the changes back into XUNO, go to Options > Software Settings > Import & Export Data
- Under the Import Data section, choose Student Details option and select the CSV file that you want to import
Tips:
- You may wish to clear out the existing forms column before proceeding if there is no relationship between the student's previous form and their new form.
- If the form is based on their house or year level, you may wish to come up with a formula to help pre-populate the Form column.
- If you have the form group data somewhere else, like another spreadsheet where you have come up with the student grouping, you may wish to use formulas to bring the data in. The student's codes must be present in both spreadsheets, or the student's first and last names must be in the same exact format in both spreadsheets if you wish to use this idea.
Working with CSV data file
Schools always have the option of completing these tasks manually via the user interface, however the tasks need to be completed one student at a time which is not optimal in terms of the time that it would take. Using a CSV, while it can be fiddly, gives you a significant time advantage as Excel allows copying and pasting in bulk, filtering and more.
Issues when handling a CSV using Excel
Never delete any columns from this file if you are intending to use it to import into XUNO. All fields are required for the import to be successful, although not all fields require a value. More on this further down in the article, in the How to add new students section. Excel makes assumptions about the format of some of the data. The most common problem is the dropping of leading zeros off codes which are assumed to be numbers. For example, year level code '09' will automatically become '9'. In order to combat this, you can do the following: Birth Dates Birth dates must be in 0000-00-00 format, e.g. 2003-12-03 for 3 December 2003. Entry and Exit Dates Exit dates must be in 0000-00-00 format, e.g. 2020-12-18 for 18 December 2020. Year Levels- Open the CSV in Excel
- Select the entire Year Level column
- Then access the format menu (On a mac, press Cmd+1. On a PC, press Ctrl+1. If these shortcuts don't work, use the menus to find the Format options.)
- In the Format window, under the Number section, select Custom, and in the Type field, type '00' (two zeros)
Mobile Numbers
- Open the CSV in Excel
- Select the entire Mobile Number column
- Then access the format menu (On a mac, press Cmd+1. On a PC, press Ctrl+1. If these shortcuts don't work, use the menus to find the Format options.)
- In the Format window, under the Number section, select Custom, and in the Type field, type '0000000000' (ten zeros)
You might also need to do something similar for your Form column if your form codes are only numeric characters, and you need leading zeros. This also may need to be repeated just before importing, if you have opened and reopened your CSV many times. The best way to check if the leading zeros have been retained is by opening the CSV in Notepad / TextEdit instead of Excel to see whether the zeros are there.
If you have lots of changes to make, it would be simpler to only redo the formatting once you've finished making all your changes, especially if you feel you will be saving, closing and reopening the file many times while you are completing this task, or are completing this task over multiple days or on different computers etc.
If you have tried and can't seem to get it working, please phone support for assistance.
How to use Excel's filtering options to your advantage
With the CSV open, highlight all rows and columns. The click Sort & Filter in the Home menu ribbon, and click Filter. This will give you drop down menus at the top of every column, which can be used to sort all data, filter using certain strings of characters or exclude certain values.
A visual guide to editing your CSV file for changing year levels, forms and student active status
Download the visual guide here.