You can customise your XUNO dashboard so that widgets are arranged to suit your workflow. You can also hide widgets that you don't use, so that everything you need is at your fingertips.
Did you know?
XUNO has a unique Classes tab on the staff dashboard, where you can see a customised range of information related to your current class. You can send messages to parents, mark attendance, add incidents and more, all from the one screen. See the Classes tab section below for more information on viewing this part of your dashboard.
In this article
Navigating the staff dashboard
See below for an explanation of how to get around your dashboard, and customise it to your needs. Dashboard features are detailed below, with numbers corresponding to the numbers in the screenshot. The functionality of each widget is explained in its own section later in this article.
Note: If you are using the older version of the XUNO staff dashboard, your widgets may be displayed in two columns instead of three, and you will not see the Classes tab. If there are some options you can't see, this can be because of permissions assigned to you by your school's XUNO Administrator.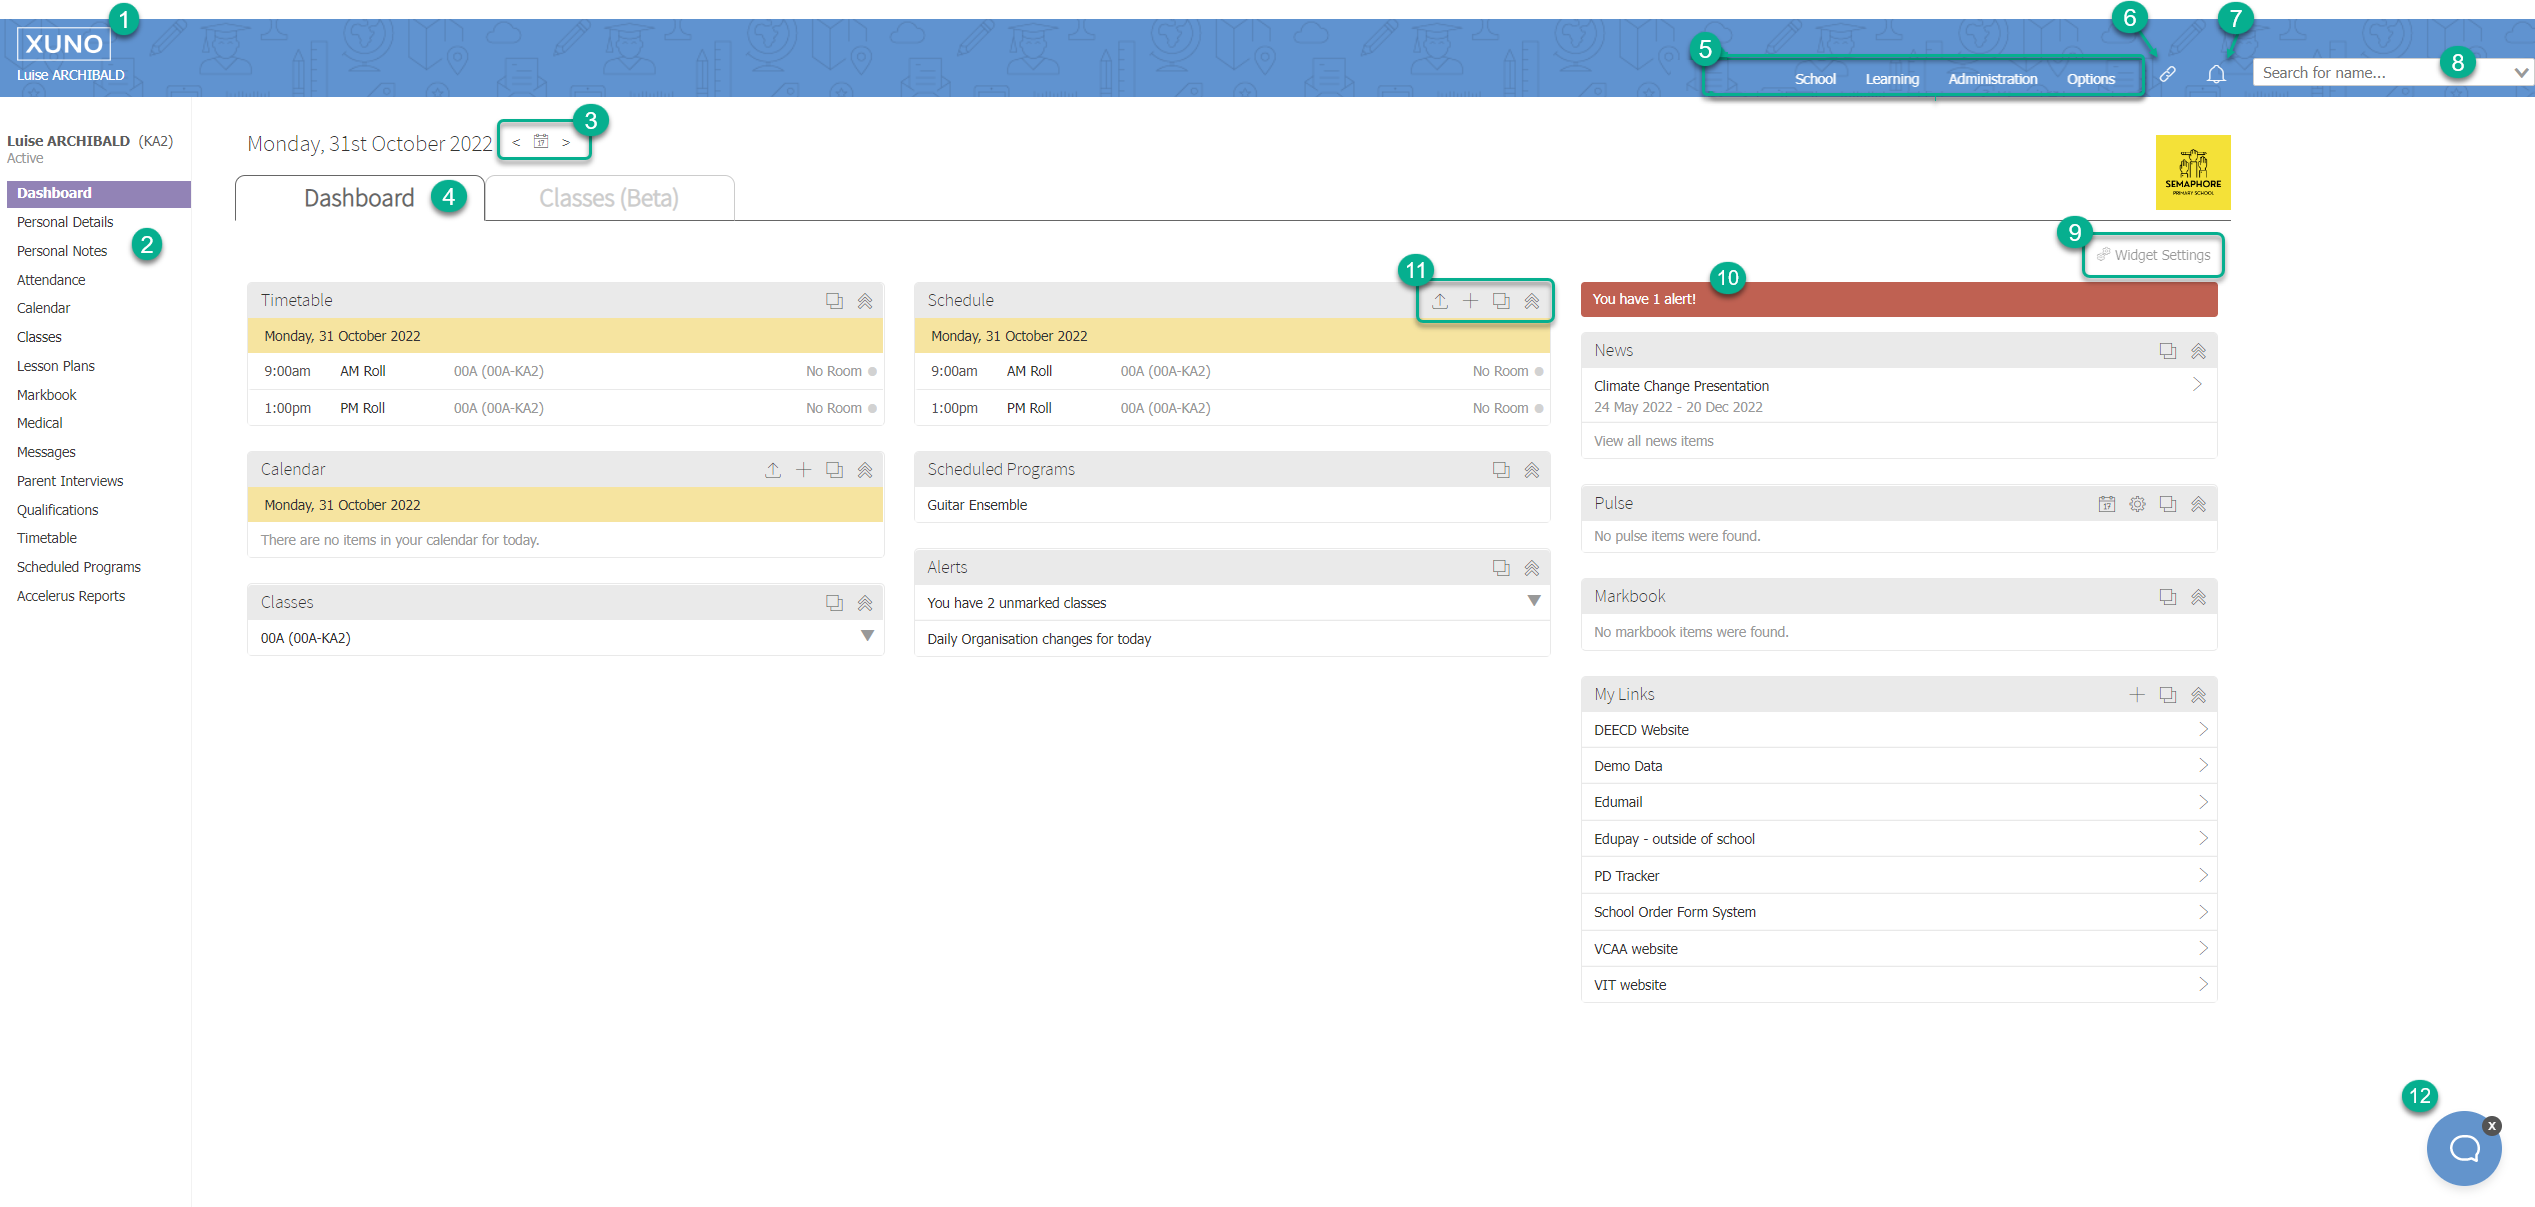
- XUNO button - This is your home button, and will take you to your dashboard from anywhere else in XUNO. XUNO will remember which tab you were last using, the Dashboard or the Classes tab.
- The left hand menu - You can click on any of these menu options to take you to your pages in XUNO. For example, your own Lesson Plans, Parent Interviews, or Timetable. The purple bar shows you which part of your staff profile you are currently viewing. You may not see all menu options shown here, depending on your school's settings.
Note that you can also visit other staff members' dashboards. If you click on their menu options, you will see their information (e.g. their timetable) instead of your own. You need to have the correct permissions to view certain content. - Date selection - Use the back and forward arrows to move one day at a time, or click on the Calendar icon and use the calendar picker to select a specific date. This date affects the dates shown on the Timetable, Calendar and Schedule widgets.
- Tab selection - Click on the tab headers to switch between the Dashboard and Classes tabs. For more information on the Classes tab, see its section below.
- Main menus - You will see menu options under each main menu, dependant on your permissions.
- Link menu - Click to see school-wide URL links, as well as an option to add your own links to the list.
- Notifications - Click to see any current notifications, including new messages, unmarked classes, and more.
- Search bar - You can search for any student, staff member, or parent/carer using given name, preferred name, family name, or code.
- Widget Settings - Click to untick any widgets you wish to hide, and then click the Update Dashboard button. You can also use the Reset Widgets button to display all XUNO widgets in their default positions.
- Alerts bar - This red bar will appear if you have alerts that have not been actioned.
- Widget icons - each widget has two or more icons. These are as follows:
- Subscribe icon - used to subscribe to your XUNO calendar. You can use this option to sync to an external calendar such as Outlook or Google Calendar.

- Add icon - used to add a new item in the Calendar, Schedule, News or My Links widgets.

- Move icon - click and drag on this icon to move widgets wherever you like on your dashboard.

- Minimise icon - click to minimise the widget content so that only the grey header bar is displayed. Click again to maximise.

- Subscribe icon - used to subscribe to your XUNO calendar. You can use this option to sync to an external calendar such as Outlook or Google Calendar.
Timetable widget
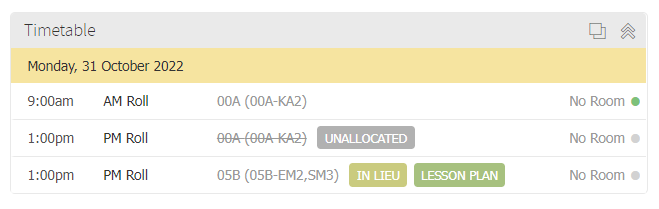
- Your Timetable widget shows all classes and yard duties you are assigned to for the day. Yard duties are shaded blue. If you have no classes allocated, you will see empty rows next to the period names.
- You can see the start time, period, class code and room for each class. The dot at the end of each class row will be shaded grey if attendance is unmarked or partially marked, and turn green when marked.
- You can click on a class row to mark attendance.
- If you have extra or in lieu classes assigned to you, they will show on your timetable widget with tags.
- Lesson plans will show as tags next to the class. You can click on the tag to go to that class' lesson plan.
Calendar widget

- Your Calendar widget will show all calendar items scheduled for the day that are set to be shown to you. This includes items created in the school's XUNO calendars, as well as any XUNO events.
- Click on an item to view more details, or edit if you have permission to.
- Calendar items are colour coded - in the example above, the camp appears once in the School Events Calendar (green) and once in the staff member's own event calendar (lilac). This indicates that this staff member is assigned to this event. They can then click on the calendar item in their widget and use the Arrow icon to go directly to the event details in XUNO's Events feature.
- You can subscribe to an external calendar using the Subscribe icon, or use the Add icon to add a new calendar item, if you have permission to.
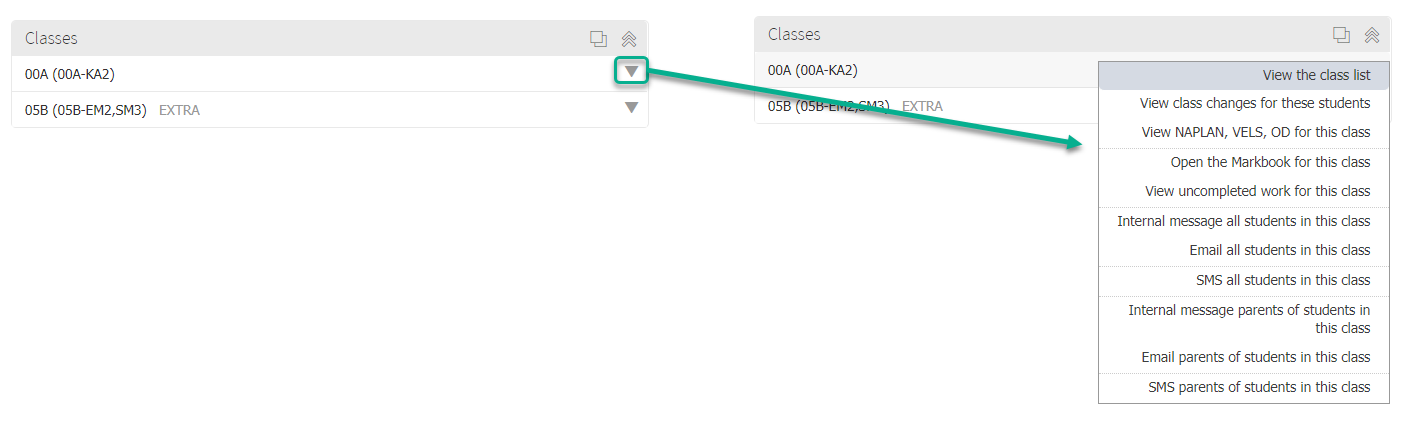
Classes widget
You can perform multiple actions from the Classes widget. Click on the Arrow icon next to a class to view the class list, send a message to parents, and more.
Schedule widget
The Schedule widget works in a similar way to the Timetable widget, except it will show calendar items as well as timetabled classes and yard duties. If you are not assigned classes or yard duties in a particular period, then that period will be hidden in your Schedule widget.
You may decide to hide the Calendar and Timetable widgets and use the Schedule widget, or vice versa, whichever is best for your school role.
Scheduled Programs widget
This widget will only appear if you are assigned as a staff member to one or more current scheduled programs. Clicking on the name of a program will take you directly to the details of that program in XUNO's Scheduled Programs feature.
Alerts widget
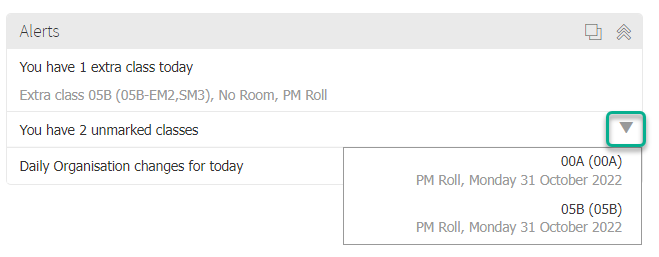
- Your Alerts widget displays pertinent information to you each day. It notifies you of unmarked classes, Markbook alerts, and daily organisational changes that you need to be informed of in real time.
- Click on an alert to expand and show extra information, or click on an Arrow icon to make a selection from a dropdown list. In the above example, clicking on the arrow next to the unmarked classes alert allows the staff member to choose a class. Clicking on the class takes them directly to that period's attendance page to mark attendance for the class.
- The Alerts widget will always show the Daily Organisation changes for today item. Click on it to go to the daily summary report showing staff absences, room changes and staff replacements.
News widget
- Your News widget displays the current news items in your school.
- Click on a news item to display it in a popup window, or click on View all news items to go to the school News page.
- You can use the Add icon to create a new news item, if you have permission to.
Pulse widget
Your Pulse provides a live feed of recent student activity - including classwork, incidents, achievements, notes and notifications. Pulse is a live list of newly added entries to students in your mentor group. The colour of the writing in the entries indicate if you have acknowledged (grey) an entry or not (black). A Tick icon will appear on entries you have yet to acknowledge.

- Click the Calendar icon to change the date range and show or hide more entries.
- To add or edit the students shown in your Pulse, click on the Gear icon.
- Click on the Tick icon to acknowledge an item.
- Click on the Pencil icon to view information about the item.
Note: To learn more about the Pulse, including adding students to your mentor group, see the article: How to use and set up your Pulse notifications
Markbook widget
The Markbook widget shows items that you have created in your Markbook that are due either today or tomorrow, so you can keep track of assessment tasks for your classes.

- Click the Tick icon to acknowledge the item. It will disappear from your Markbook widget, but this does not delete the Markbook item itself.
- Click on the name of the item to expand it. You will see details of which class this item is assigned to, and its classification (classwork, homework, or assessment), and a Pencil icon that allows you to view and/or edit the item in Markbook.
Note: To learn more about XUNO Markbook, see the article: How to use your staff Markbook.
My Links widget
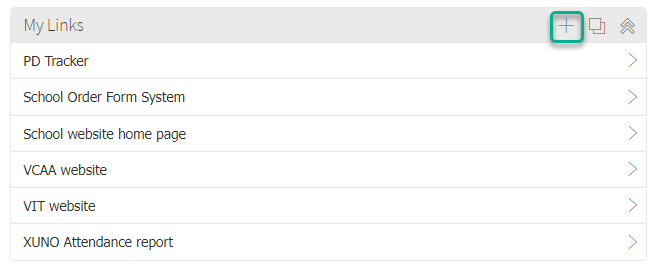
You can add links to websites that you use frequently to your XUNO Dashboard using the My Links widget. You can add external URL links, or a link to a page that you use often within XUNO.
The widget also displays links that your school's XUNO Administrator has added.
- To add a new link, click the + icon.
- Then, enter a name for your link in the New name... field, and a URL in the New link URL... field.

- Click the Add button to add your link.
- Links are displayed in the widget in alphabetical order.
Classes tab
You can customise your XUNO Classes tab to show the information most important to you on a day-to-day basis. There are also a range of actions you can take from this same page, including sending an email to selected parents or students, creating a new incident for one or more students, and much more.
A list of how to use the features available in the Classes tab are shown below the screenshot. The numbers correspond to numbers in the screenshot.
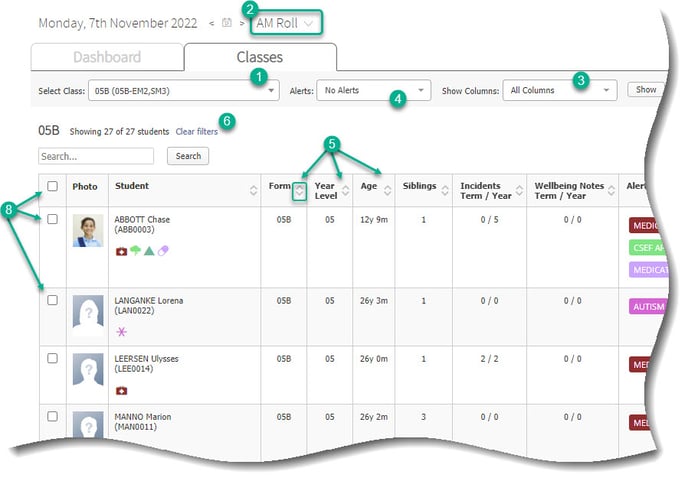
- Change displayed class - When you open your Classes tab, XUNO will show you your current timetabled class, based on what time it is. If you are not assigned to a class at that time, XUNO will show you your next assigned class. You can change the displayed class using the Select Class: dropdown list.
- Change displayed period - To view the same class, but a different period for the day, use the Period dropdown at the top of the page.
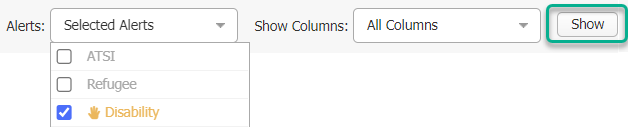
- Customise columns shown - You can adjust the columns that are shown to you, so that you only see the information that is most relevant to you. Click the Show Columns: dropdown list, and untick any columns you do not wish to see. Click the Show button to display your new settings.

- Filter students by alerts - The Alerts column shows all XUNO circumstances and custom alerts, e.g. medical alerts, CSEF recipient, school programs, etc. You can filter your class list to show only students with alerts you select from the Alerts: dropdown list. Tick any checkboxes for alerts you wish to filter by in the dropdown list, then click the Show button. Note that selections made here are OR selections - i.e. if you select 'Medical alert' and 'CSEF', you will see students with either of those alerts in your class list.
- Sort by columns - You can use the up and down arrows to sort by a column - for example, sort by Subject Attendance to show your students in order of attendance percentage for this subject.
- Reset class display - To reset your class display, use the Clear filters text. This will revert to the default display, which sorts students alphabetically according to family name, and shows all students in the class regardless of which alerts are assigned to them. This function does not affect the columns you have selected to display in step 3 above.
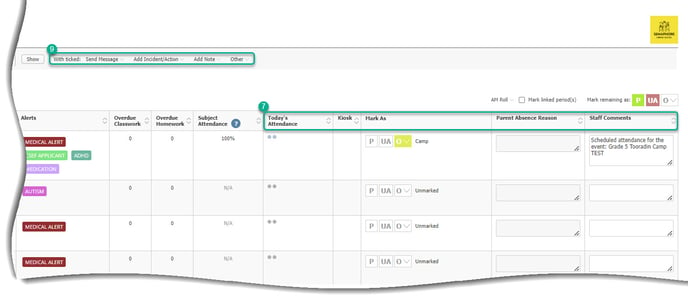
- Mark or view attendance - You can mark your class attendance directly in the Classes tab. See the article Marking attendance in XUNO as a teacher for more information.
- Select students - use the checkbox to the left of a student's row to select them for further actions. You can also use the checkbox in the column header to select all displayed students. If you have filtered by alerts, only those students shown will be selected.
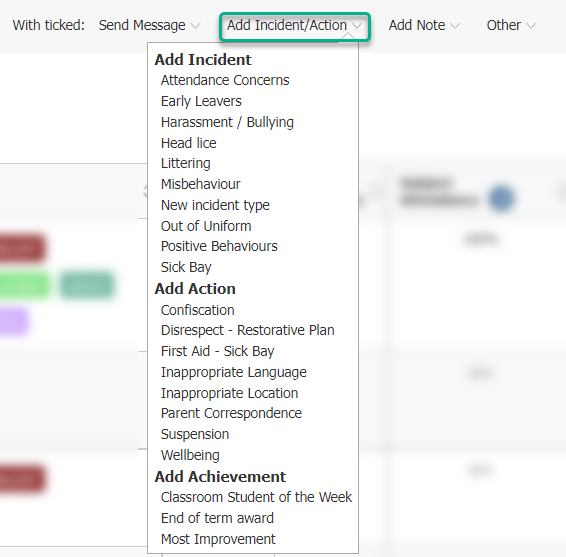
- Send messages, or add incidents, actions or notes - After selecting one or more students, use the With ticked: dropdown lists to:
- Send a message to parents or students.

- Add an incident, action or achievement for the selected student(s).
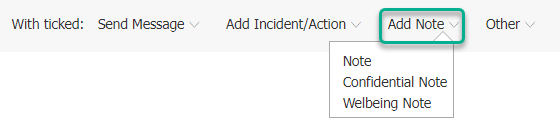
- Add a note, confidential note or wellbeing note for the selected student(s).
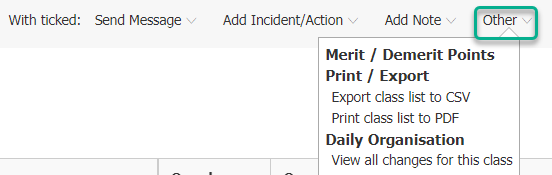
- Add merit or demerit points, print or export the class list, or view all Daily Organisation changes for the class.
- Send a message to parents or students.