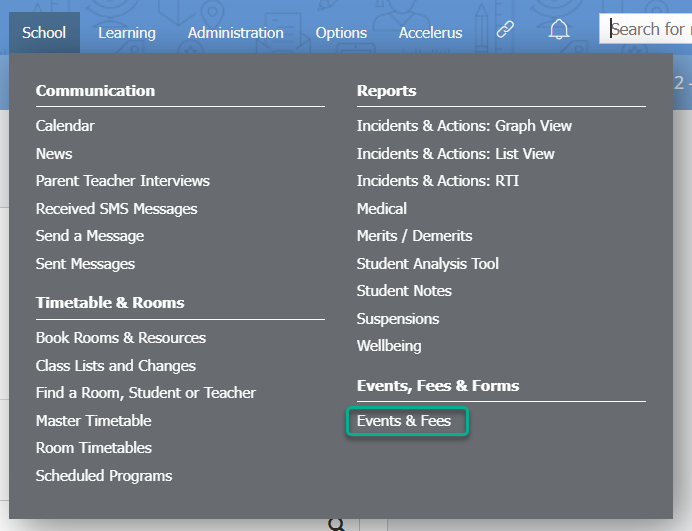
To access an event, go to School > Events, Fees & Forms > Events & Fees, then click on the row of the event.
Note: Parents can see instructions on how to print their own permission slips/forms in the related article Using XUNO events and fees - For parents and carers.
In this article
Printing permission slips
- Click on the Students tab of an event.
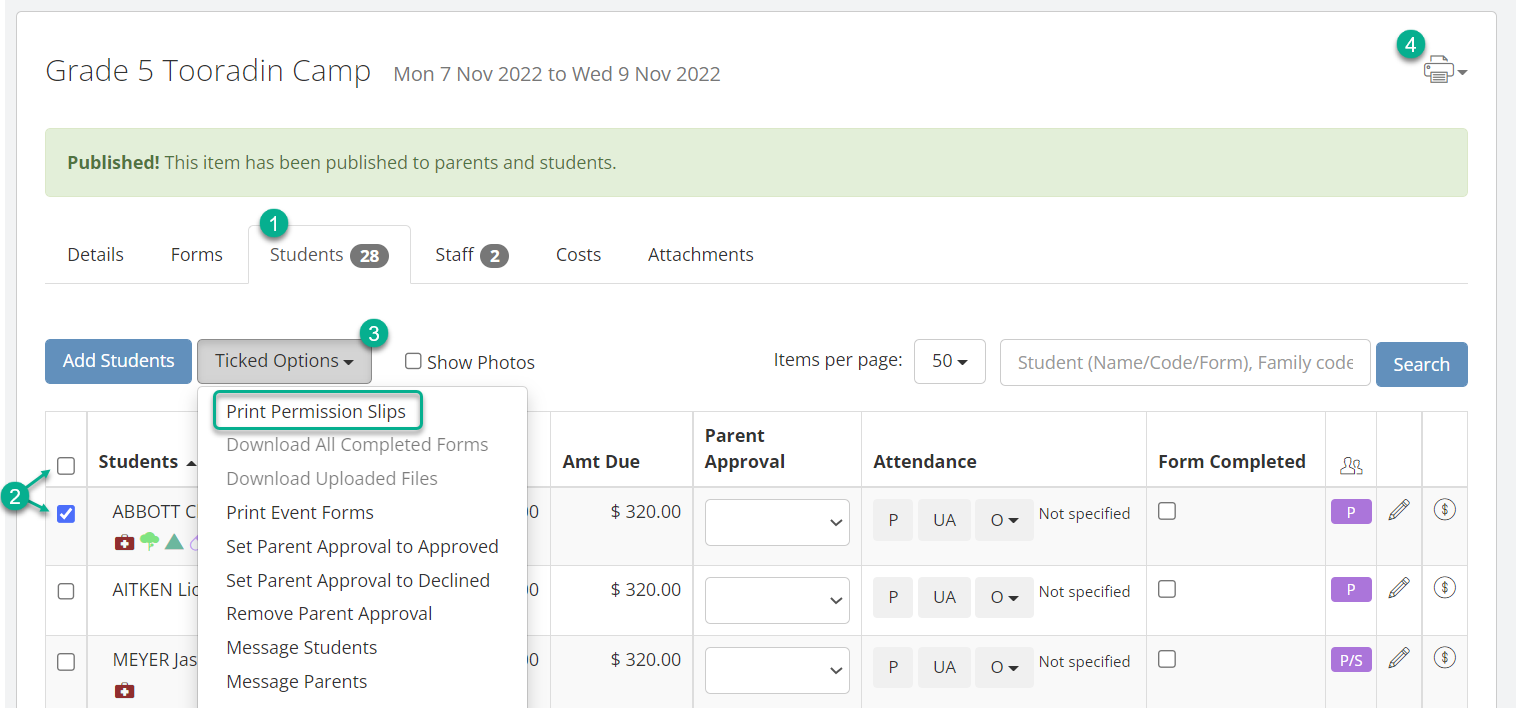
- Select the student(s) you wish to print permission slips for, or select all students using the checkbox in the top left.
- Click on the Ticked Options dropdown list and select Print Permission Slips. This produces a permission slip with all the event details and name for each student you selected as a PDF, which you can then print.
- Alternatively, you can print a permission slip with no name attached using the Printer icon in the top left. Click on the icon and select Blank Permission Slip from the dropdown list. The permission slip will contain all the event details, but no student name.
Note: You cannot change the formatting or content of the template that produces permission slips.
Printing event forms for parents to complete
- Click on the Students tab of an event.
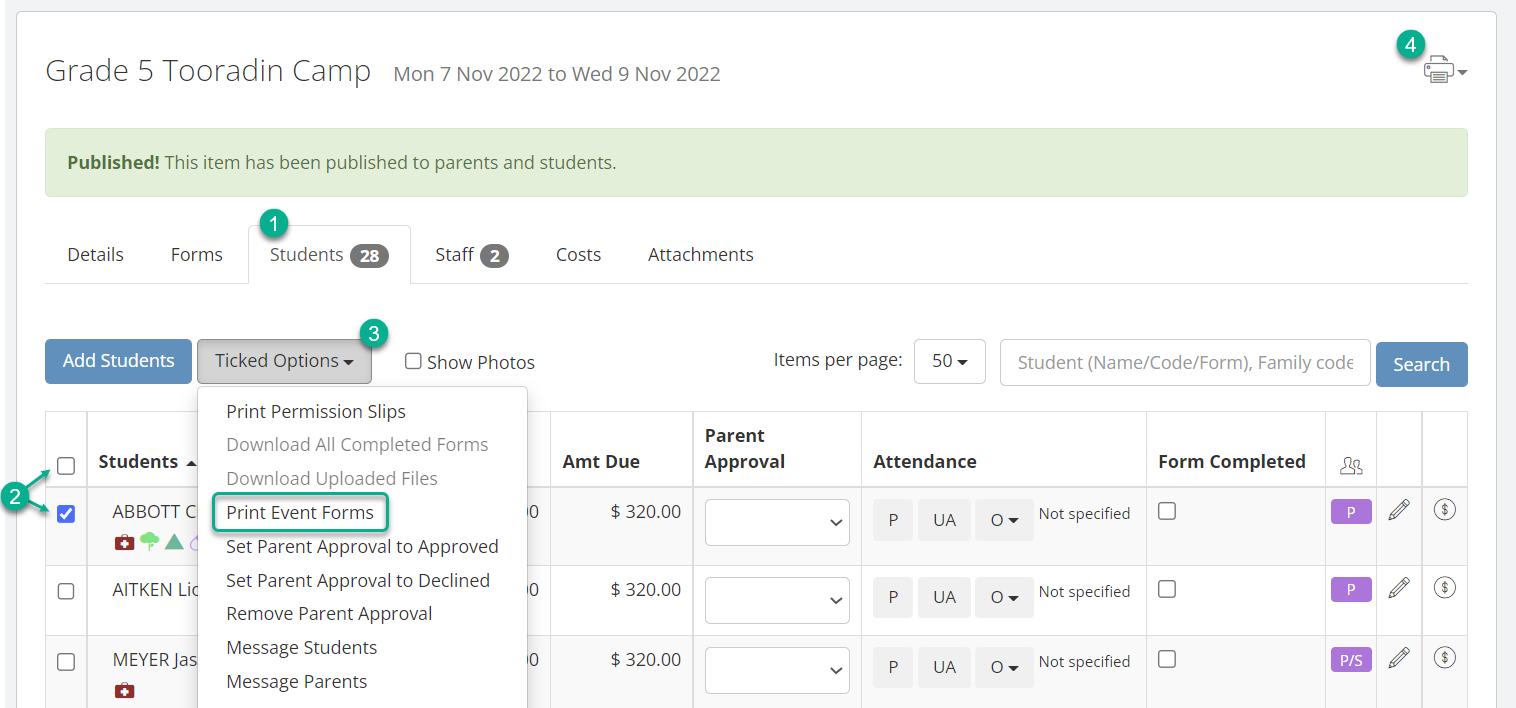
- Select the student(s) you wish to print event forms for, or select all students using the checkbox in the top left. Note: This will select all students shown on the current page. You may need to increase the Items per page count using the dropdown list.
- Click on the Ticked Options dropdown list and select Print Event Forms. This produces an event form with all the event details, form fields and questions, and name for each student you selected as a PDF, which you can then print.
- Alternatively, you can print an event form with no name attached using the Printer icon in the top left. Click on the icon and select Print Default Event Form from the dropdown list. The event form will contain all the event details, form fields and questions, but no student name.
Note: To adjust the formatting of the template that is used to print event forms, see the following section.
Event form templates
You can adjust the template that XUNO will use when a parent or staff member chooses to print an event form for an event.
There are two relevant templates in XUNO:
- The Default Event Form template. To adjust this template:
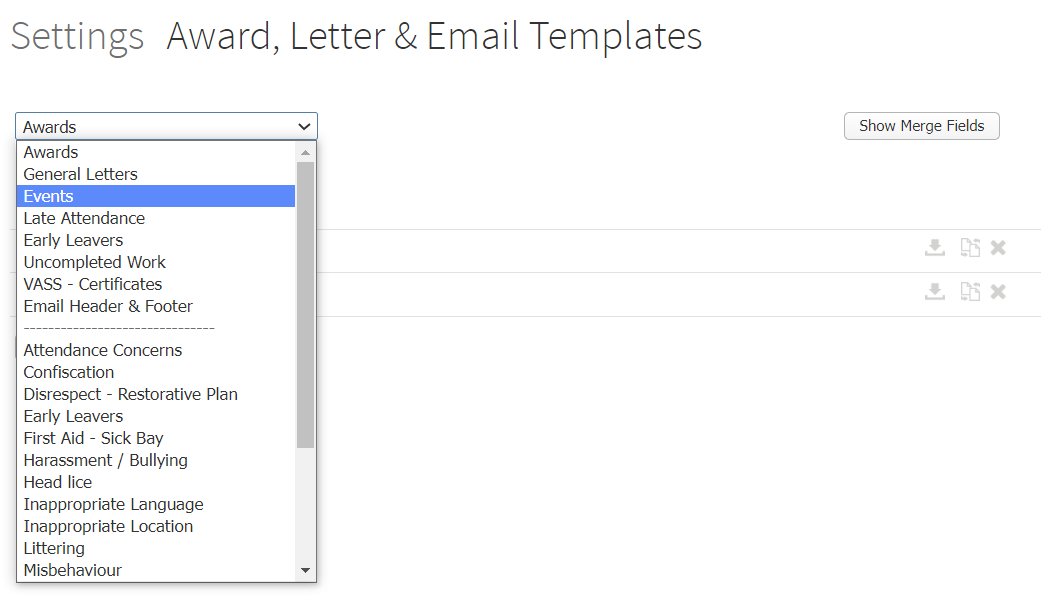
- Go to Options > Software Settings > Award, Letter & Email Templates.
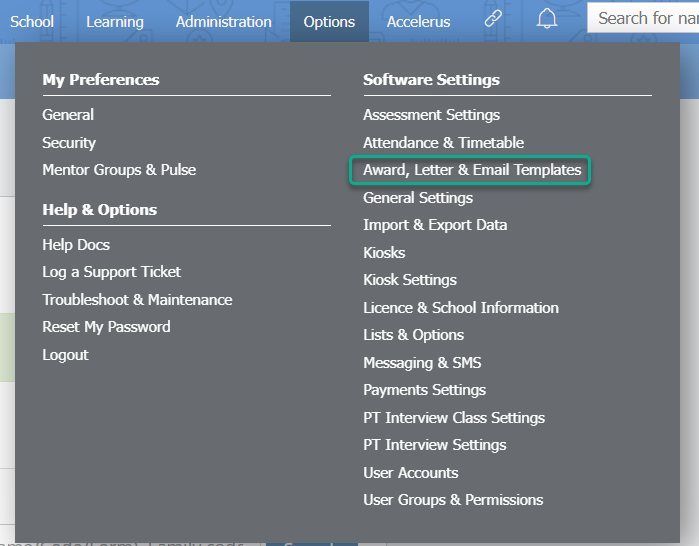
- Select Events from the dropdown list.
- To download the existing template to view and/or edit it, click on the Download template icon.
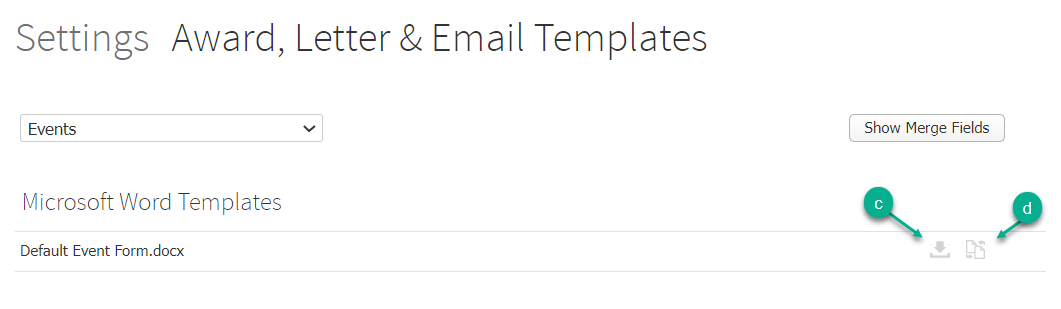
- To replace the existing template, click the Replace template icon and upload your new template.
- Go to Options > Software Settings > Award, Letter & Email Templates.
- The Custom template for a particular event. To add a custom template to an event, click on the Attachments tab in the event, then use the Upload custom template button.
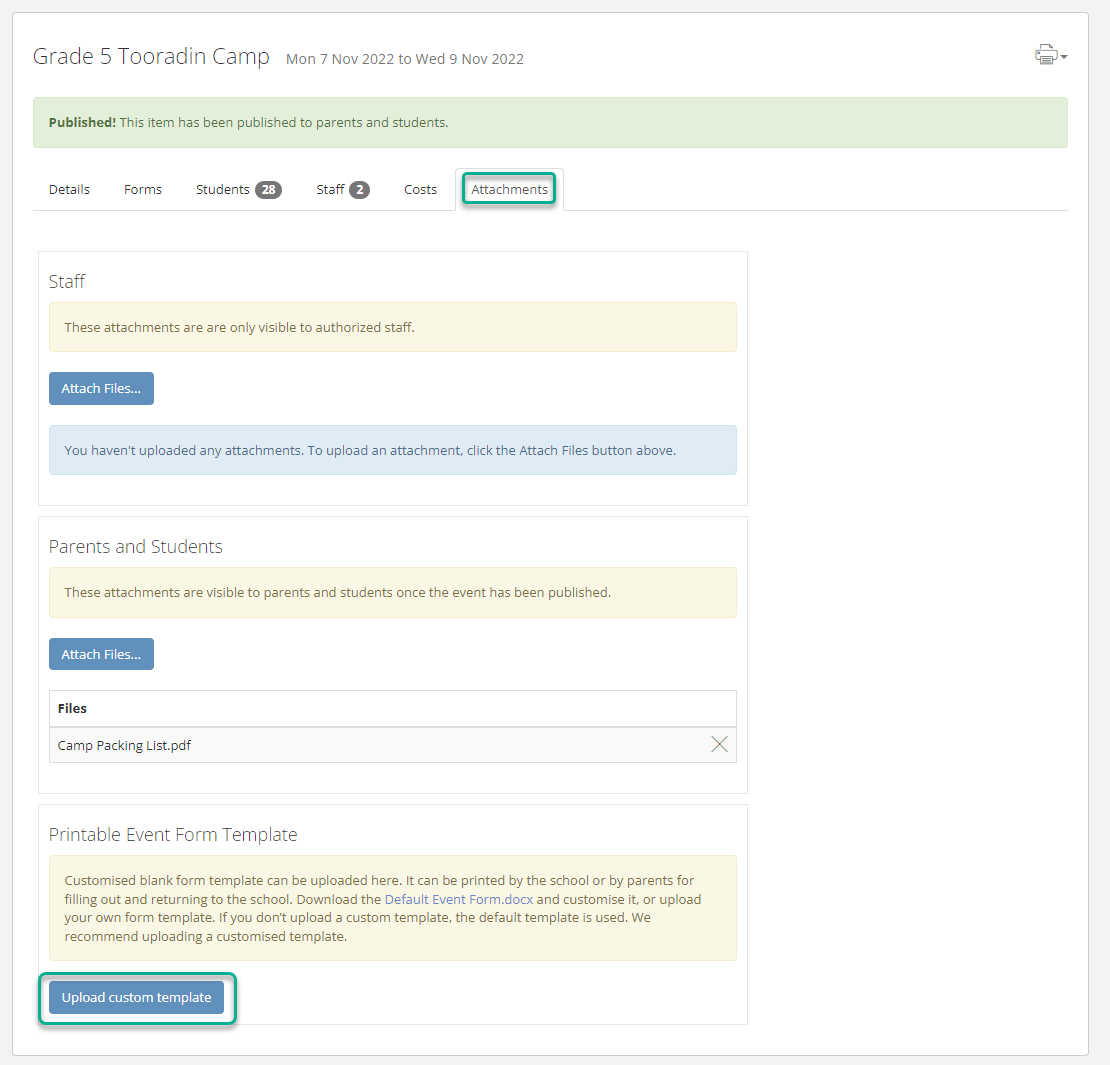
Note: If there is no custom template attached to an event, XUNO will instead use the default event form template when an event form is printed.
Viewing completed event forms and entering information from a paper form into XUNO
Once parents have started inputting their answers to your form questions, you may need to see their answers, or download their completed forms to print out. If a parent chooses to fill in a paper form, you can transfer their answers into XUNO, so that all students' information for the event is stored electronically, in the one place.
To view or edit an event form:
- In the event, go to the Students tab.
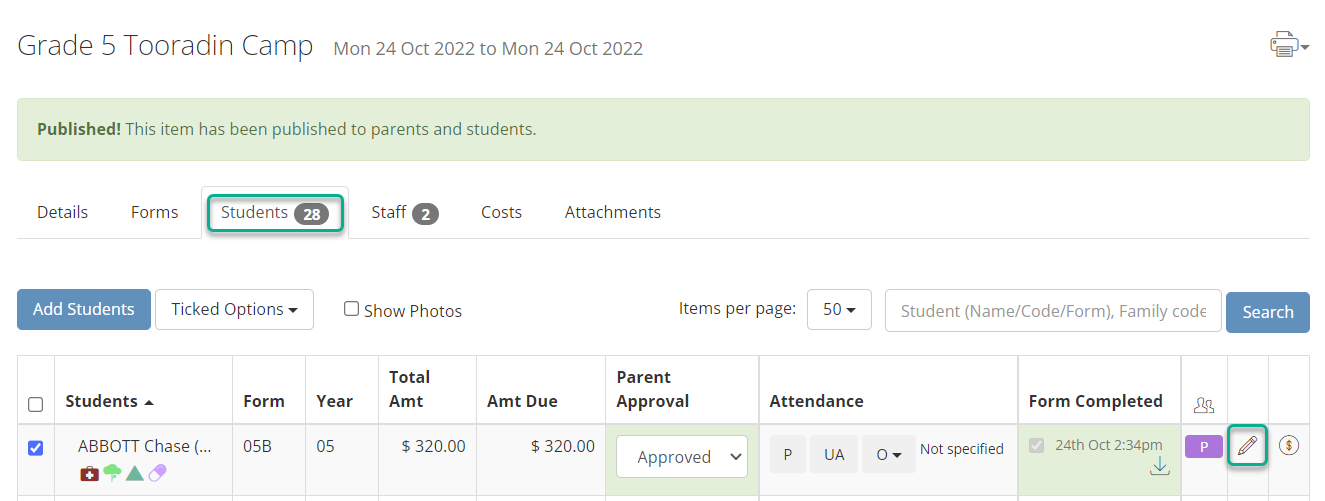
- Click on the Pencil icon to view a parent or student's completed form, or to transfer information from a paper form into XUNO.
- Click the Update or Cancel button when you have finished viewing or editing the form.
To download completed forms:
- In the event, go to the Students tab.
- Select the student(s) you wish to download completed event forms for, or select all students using the checkbox in the top left. Note: This will select all students shown on the current page. You may need to increase the Items per page count using the dropdown list.
- Click on the Ticked Options: dropdown list and select Download all Completed Forms.
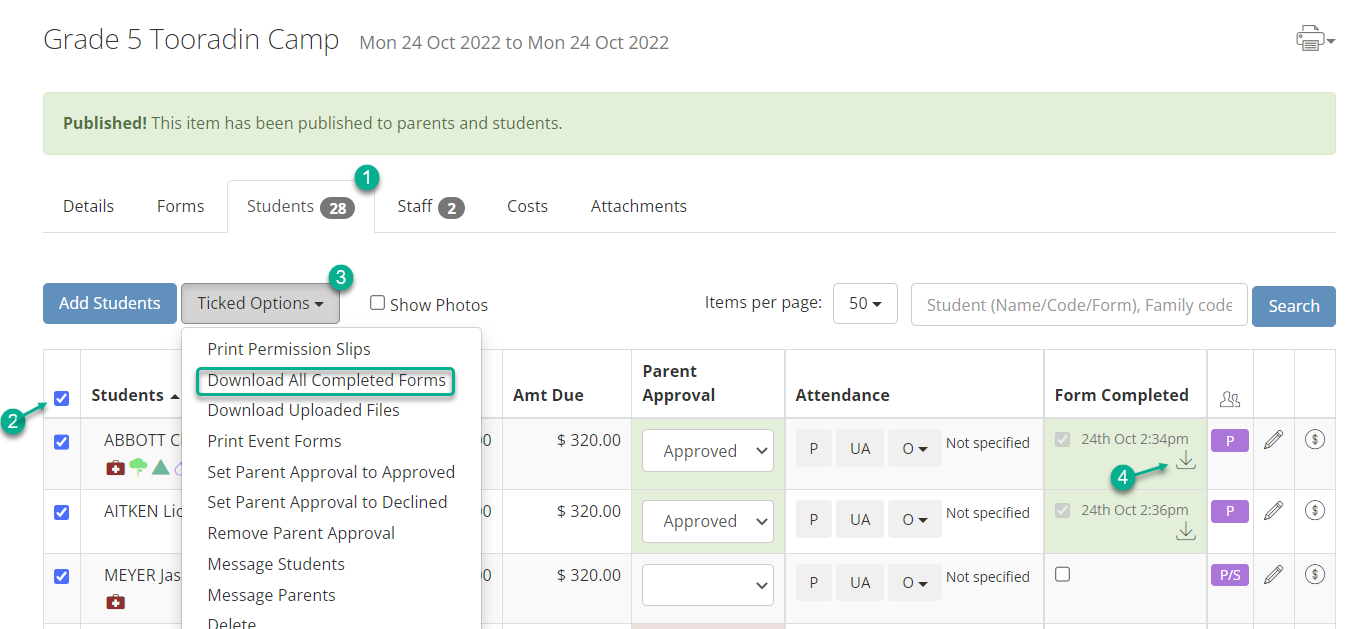
- Alternatively, you can download an individual student's form using the Download icon in their row.
- If parents have uploaded files as part of the event form, you can also Download Uploaded Files by selecting this option in step 3.
Event form report
The event form report is useful for collating data from all students in an event, organised by event form question. You can report on the information from one or more questions in your event form, and export the report to PDF or CSV. This can be useful, for example, to pull out dietary restriction details from a full camp event form, when you need only this information and not the rest of that entered in the form.
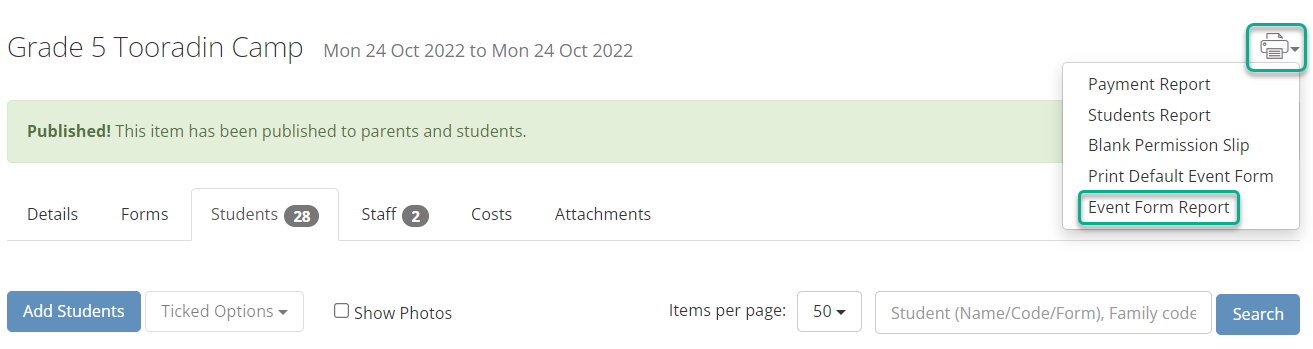
To access the event form report:
- In any tab of your event, click on the Printer icon and use the dropdown list to select Event Form Report.
- Use the checkboxes to select the question(s) you'd like included in the report, or use the checkbox in the top left to select all questions.
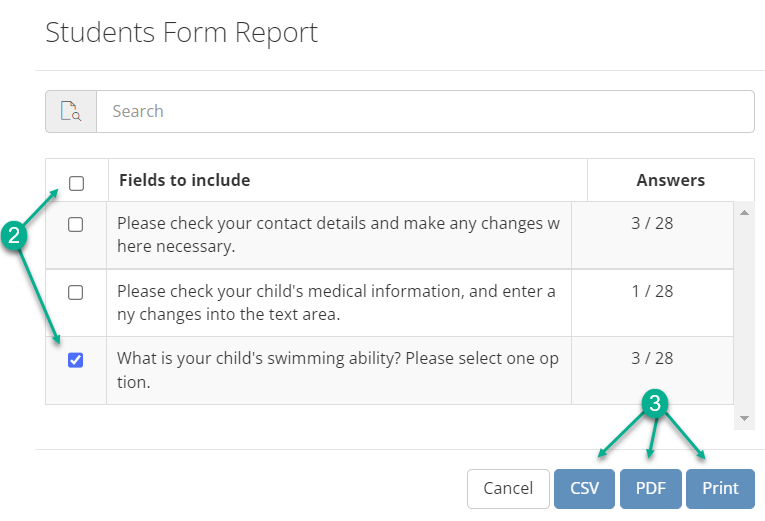
- Use the applicable button to either export to CSV or PDF, or Print the report.
Viewing or editing parental approval
The Parent Approval field is automatically updated for the corresponding student on the Students tab of the event when a parent successfully approves or declines an event online. A staff member can also use the dropdown list to change the selection manually.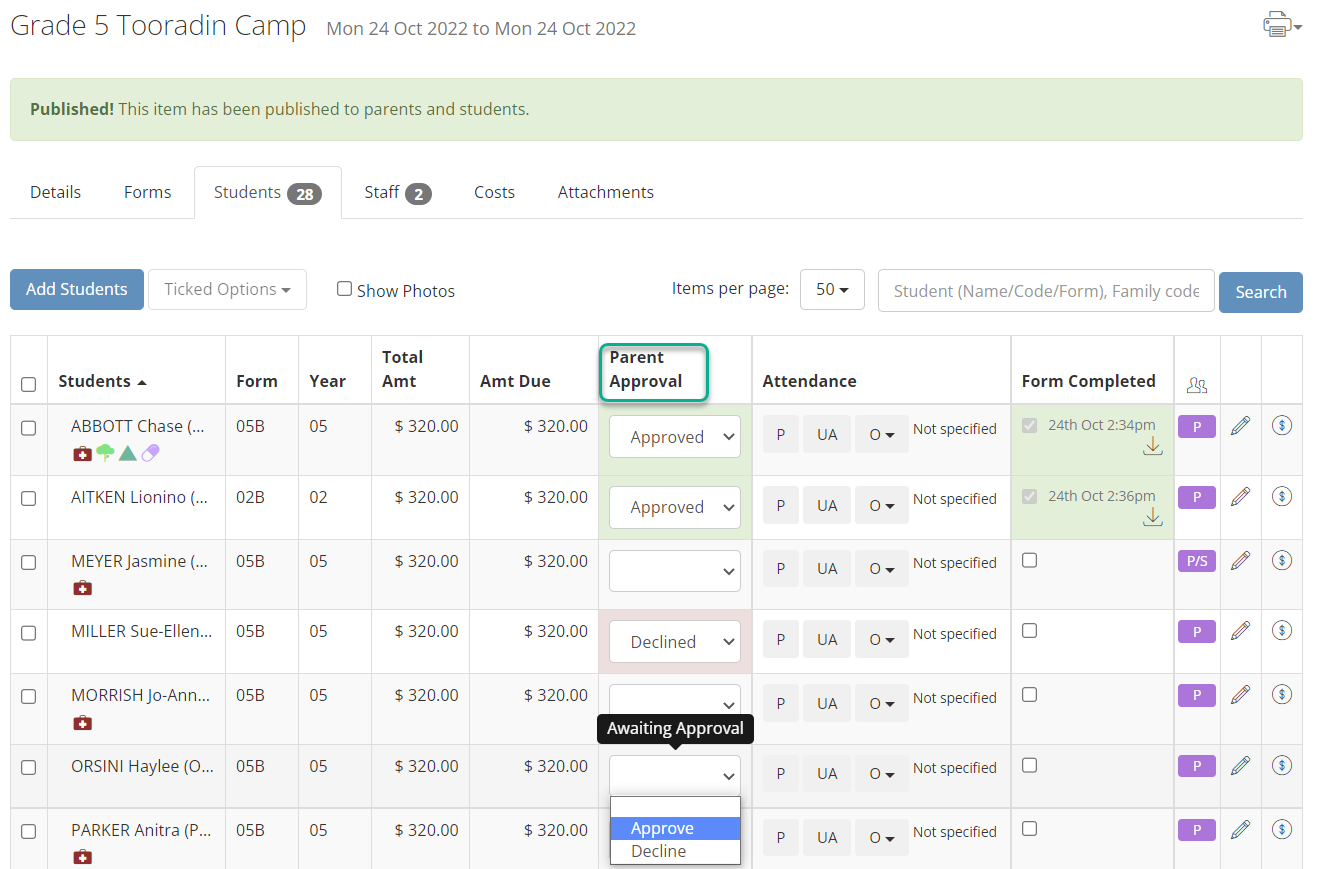
Hovering over the field will show details of who last approved or declined the event, and when. If a parent has given a reason for declining, this will also be displayed.
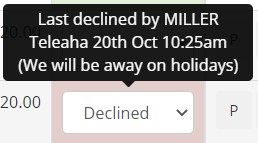
Note that the Decline option will only be available if this particular event allows it. This setting is chosen in the Details tab.
Students report
This report is designed to be used during the event to show which students have paid in full and have been approved. The report also shows each student's medical details (imported from your SIS and those entered in XUNO) and the student's primary emergency contacts.
- In any tab of your event, click on the Printer icon and use the dropdown list to select Students Report.
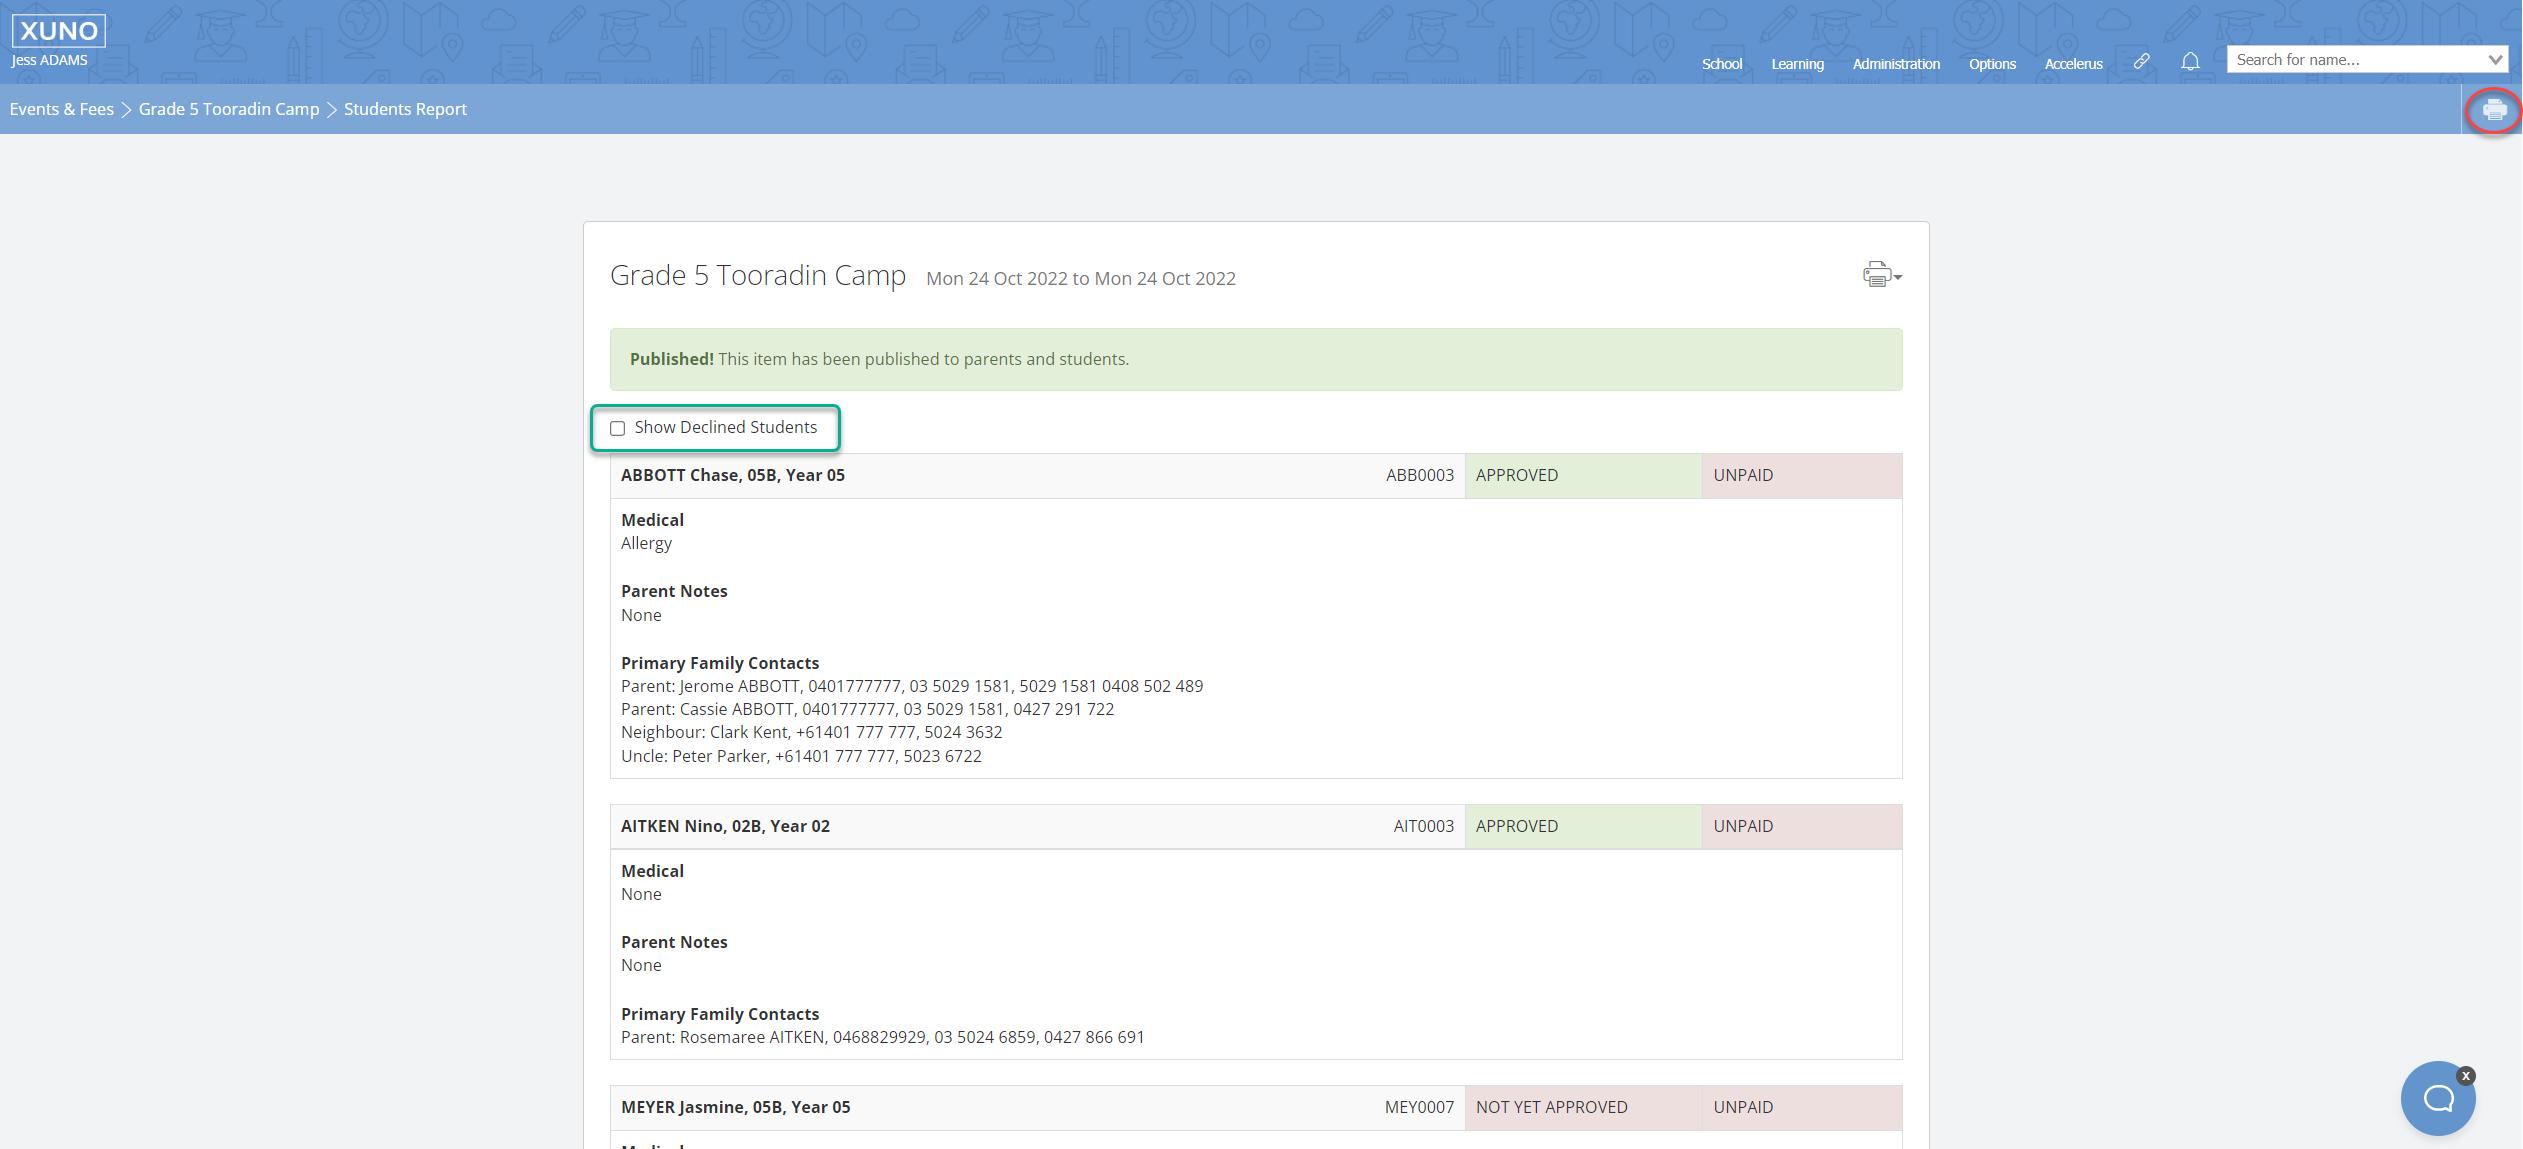 You can show declined students in the report by ticking the Show Declined Students checkbox. Declined students will be displayed immediately, there is no need to save or refresh the page.
- To print the report to PDF or your printer, use the Printer icon in the top right of your XUNO page, shown above circled in red.
Payments report
This report is designed to show you the balance due for each individual payment item for each student, including payment plans and split payments. View the transactions report for a complete list of each manual and online payment made.
- In any tab of your event, click on the Printer icon and use the dropdown list to select Payment Report.
- You can view the report on screen, use the Export to CSV button, or print the report to PDF or your printer, using the Printer icon in the top right of your XUNO page, shown below circled in red.
