Accelerus Fields Word Add-in
Any computer being used to work on Accelerus templates must have the Accelerus Word Add-in installed on it. The Add-in can be downloaded from our support website and installed on your Windows computer.
Accelerus Fields pane
When a template is created or refreshed in Accelerus, internally it has all the data required to link it to the relevant database fields, e.g. student, cohort, subject, class and assessment item fields. To work on the templates and insert these fields into them, download the template to your computer and ensure that you have the Accelerus Word Add-in installed.
Once the Accelerus Word Add-in is installed and you open a downloaded template in Word, an Accelerus Fields pane will display, as seen on the right. Please note that the only template where the Accelerus Fields pane will not be visible is the Style template.
The Accelerus Fields pane in a template generated from Accelerus, contains all the fields available for insertion in the template.
If the Accelerus Fields pane is not displayed, you may make it visible by selecting it from the Insert ribbon.
You may insert any of the available fields, in the positions you want the substitution text to be printed. This way, each printed student report includes the relevant student data and results, for the relevant subject.
NB If your school uses the Accelerus Goals Management System, you will see additional tabs relating to the Goals fields, as shown here.
In these notes, however, we only cover the Results fields. Information about the Goals Management System and its reporting fields are covered in the Goals Management System training.
Types of available fields
The Accelerus Fields Results tab groups the different available fields by their entity type, e.g., Student fields, Year Level fields, Subject fields, etc. Within these, further subgroupings of fields may be found, for example, in the case of the Student entity, whereby Custom Properties are a subbranch of Student and, within this, Restricted Properties are grouped together.
Different types of entity fields are available in the different types of templates:
- The first five branches of the Accelerus Fields pane – Student, School, Academic Cycle, Report Run and Subject List – appear in every Accelerus template. These are generic fields that apply across the board, at all schools.
- Branches will appear for each of the cohort types that have been defined by your school, e.g. Year Level and Home Group. If cohort types have been defined, fields for these will appear in all types of Accelerus templates.
- The remaining Subject, Class and Assessment Items groups of fields, shown here, are only available in Subject templates.
Sorting and searching
At the top of the Results tab you will find:
- A search field in which you can enter text to find specific fields. Only the fields that meet your search criteria will be displayed. As shown here, comment was entered in the search field and only the four fields under the Assessment Items branch were found and are displayed.
Remove the text to redisplay all fields.
- Three sort buttons that allow the fields in the Accelerus Fields pane to be sorted within their branches. This is particularly useful for assessment items where results may have been entered in them.
- System: is the default sort mode. In the case of assessment items, this means in the order in which the assessment items appear in the Assessment Item tab of the subject for which the template was created.
- By code: uses the unique field code to sort.
- By name: lists the fields by their name, e.g. Student Code, Subject Level, etc.
Visible and hidden field codes
A hierarchical coding system is used for the Accelerus fields, with each type of field beginning with a particular prefix, e.g. St.Family, Sb.Name, Cl.Code, Ct.YRLV.Code, etc.
|
Prefix |
Definition |
|
St.Family |
Student Family Name |
|
Sb.Name |
Subject Name |
|
Cl.Code |
Class Code |
|
Ct.YRLV.Code |
Cohort Year Level Code |
|
Visible Field Text |
Underlying Autotext Fields |
|
OC1 (desc) |
{ AUTOTEXT AI.OC1.N } |
|
OC2 (desc, delete row) |
{ AUTOTEXT DR. AI.OC2.N } |
However, these displayed codes are an abbreviated or more readable form of the underlying autotext field code. When you press Alt + F9, the underlying autotext codes are displayed, as shown in the second column above. It is these that are used when Accelerus is processing the template and substituting data for the fields. Therefore, great care must be taken when setting up templates, so that the underlying field code is not accidentally changed.
Pressing Alt + F9 again will hide the underlying field codes. It is a toggle between the Visible Field and the Underlying Autotext Field.
You cannot simply change the visible code of an inserted field, e.g. from TASK1 to TASK2, as the underlying field will still be TASK1 and the wrong result will be inserted in the student’s report at print time. You should delete the field and reinsert the correct one.
Also, should part of a field code be deleted or modified inadvertently, you should delete the whole inserted field and reinsert it.
Field variations - general
At the bottom of the Accelerus Fields pane is a Variations panel. This will vary according to whether the field belongs to an assessment item, a student custom property, or to one of the other categories or subcategories of items.
In the latter case, when you click a field, a Value checkbox will appear. You may insert the value of the field by ticking its Value checkbox.
If the Value checkbox had been selected, as in the example shown here, the value of the Subject description found in the database will be inserted, whether this description exists or is blank.
If you expand the Value branch to reveal its variations, you will reveal a series of fields that allow you to insert the value of the field, if it is not blank, and to delete aspects of the template if it is blank: The field, the paragraph, the table row or the whole table may be deleted.

Field variations – assessment items and custom properties
In the case of assessment items and student custom properties, which are found under the Student branch, additional field variations are available.
These allow different aspects of each assessment item and custom property, and the results and data therein, to be inserted into the templates. Some of the checkboxes are available for all these types of fields, whereas others only apply to assessment items and custom properties using specific marking schemes.
Different aspects of the same data field may be inserted at the same time, by ticking the boxes of the properties required before inserting the field.
An example of each of the six fields, as they appear in a template, is shown here where the assessment item coded T1EFF has been inserted.
The table below describe the usage of each of the three result fields, available for assessment items and custom properties:
|
Result Fields |
|
|
Entered value e.g. T1EFF |
This field is always available, no matter if a comment, list or numeric marking scheme has been used for the assessment item or custom property. It will print the result that was entered by the teacher, e.g. S or N in a Satisfactory/Not Satisfactory marking scheme, the comment text, etc. |
|
Displayed value e.g. T1EFF (disp) |
This will insert whatever is found in the Displayed Value of the marking scheme, e.g. Satisfactory when S is the entered result. It is not available for comment marking schemes. |
|
Reported value e.g. T1EFF (rpt) |
When the Reported value field is inserted in a template and this field exists in the marking scheme, it is printed on the report. This is most commonly used for graphical marking schemes where a value is translated into a tick, for example. The Reported Value field is not available for comment type assessment items. It is available for Custom Properties because they often use a Marking Scheme that is not a comment marking scheme. |
The three description fields and their usage are outlined in the table below:
|
Description Fields |
|
|
Description e.g. T1EFF (desc) |
This will insert the actual textual description of the item, e.g. If the item T1EFF has the description Effort, this is what will print on the report. This field is available for all assessment items and custom properties. If an item has text in both its description and long description fields, the long description will be used. Otherwise, the shorter description will print. |
|
Short description e.g. T1EFF (short desc) |
This field, if used, will always insert the description field, even if an assessment item has both a long and short description. This field is not available for custom properties. |
|
Long description e.g. T1EFF (long desc) |
The Long description field is not a mandatory field for assessment items and is not available for custom properties. Inserting this field will always insert the long description field, even if it is blank, which it often is. This may be useful where the long description is used for subheadings, e.g. strand names. |
As is the case with the other types of fields in the Accelerus Fields pane, for each type of assessment item and custom property field, a series of variations is available, allowing you to delete aspects of the template if the field inserted is blank.
All roles field
Accelerus allows a school to define multiple roles for each class, subject or cohort group. For example, you may have two teachers teaching the same classes, or multiple teachers coordinating a cohort group such as a home room or year level. These roles are defined in the Security tile found on the Management tab.
Where there are multiple teachers in different roles, schools may want to insert the names of all teachers in the roles on student reports, not just the first one, especially in the case of the classroom teachers.
To facilitate this, an exhaustive list of options is available.
Under each Cohort, Subject and Class branch of the Accelerus Fields pane, in addition to the individual roles defined, e.g. Teacher1 and Teacher 2, an All Roles branch can be found.
As shown here, in the example of the Class entity, all of the different combinations of name fields are available, with codes beginning Cl.Roles. (Class Role)
For each of these combinations, two options are available – comma separated and slash separated lists.
For example, the Cl.Roles.TPF.Comma field would print: (Where TPF = Title/ Preferred Name/ Family Name)
- Mr Jack Smith if there is only one teacher for the class.
- Mr Jack Smith and Ms Sue Davies if there were two teachers teaching the class.
- Mr Jack Smith, Ms Sue Davies and Mr Kyle Hsu if there were three teachers teaching the class.
The Slash version of each field separates multiple teacher names with a slash, e.g. Ms Brown / Mrs Zhou.
NB It is recommended that you use these All roles fields, instead of the individual fields for the teacher’s title, family name, etc.
Other fields
Other fields available in the Accelerus Fields pane are:
- A field to insert the name of the school, as found in the school’s Accelerus licence.
- Fields for the name of the cycle, for each of the academic cycle types defined.
- Report Run fields that allow the insertion of the Report Run name, portion name and slot name to which the template belongs.
- Subject List fields which allow you to print a count or list of the subjects in which the student is enrolled which form part of the portion or the Report Run.
For example, on the cover page, you could print a list of all the subjects being undertaken by the student in the semester or just in the portion to which the cover page belongs to.
Fields to delete unused sections of the template.
At the bottom of the Accelerus Fields pane, is the Variations pane. For each field that may be inserted into an Accelerus template, this pane displays the variations available for the field.
For each field, you may:
- Select its value field which will print the value of the field in the report, whether it is blank or not.
- Choose from one of the four fields that contain special instructions if the inserted field is found to be blank or missing when the report template is being printed.
These options should allow you to decrease the number of templates, especially where subjects have a common format, but each subject may have more or fewer of certain types of items, e.g. some subjects have two assessment tasks, some three, others four and so on.
If you do not use one of the Delete options, a blank will appear in the report if the field is blank, and an Autotext error will appear if the field does not exist, e.g. if a subject does not have a particular assessment item. The alternatives are to:
- Delete the blank field from the template before it is printed.
You may have a custom property that is used when the student is on a modified program. You could use the Delete field option to print the displayed or reported value of Modified on the report but exclude it where the student is not on such a program.
- Delete the paragraph in which the field is found.
For example, you may want to print the words Parent Interview requested by teacher Mary Smith on a report, but only if the teacher has entered Y in an assessment item. The text could be typed onto the report and include the fields for the name of the teacher, all as part of one paragraph. The whole paragraph would be removed when the report is printed if the teacher did not enter Y.
- Delete the table row in which the field has been inserted.
The table shown below has four rows which use this option. The rows for WH2 through to WH5 will only appear in the printed report if the description for the assessment item is not blank. Given that the assessment description field is mandatory, the only time these rows would not print is when the items do not exist in the subject.
- Delete a table totally if a particular field within it is blank.
The example to the right also shows the use of this field, whereby, if the first work habit, WH1, is missing from the subject, the whole Work habit table is deleted.
Another example could be where you have a template with three separate tables, for each strand of Mathematics. If a teacher does not assess a particular strand, the whole table could be removed, leaving the other two tables.
Potentially, this means that the number of templates may be reduced to just one or two, rather than a separate one for each subject.
NB Where possible, use the description field rather than a result field to remove assessment items that are blank. Otherwise, legitimate assessment items, where a teacher has not yet entered results or missed a result, will be removed from the template prior to it being printed.
NB When reports are printed, Accelerus does a pre pass and removes fields from the templates where a field is missing or the value is blank. Therefore, the results for these fields will not be picked up by the Blank Result listing process as blanks.
Presenting results graphically
Some schools wish to present a student's report in a graphical manner rather than use a letter or word to report a student's grade, as shown in the two examples below. Although a teacher may enter, say, an H, M or L value to represent the student's mark, its reported value is to be a tick or another symbol.

 Accelerus allows you to present results graphically, but to do so you must:
- Set up the marking schemes so that they contain special control characters in the Reported Value field.
- Follow certain steps when setting up the actual report template in Word.
Graphical marking schemes
The first example above uses a list marking scheme coded HML. This scheme is shown here, in its Marking Scheme window.
Rather strange “hieroglyphics” appear in the Reported Value field, but these all have a very specific meaning.
There are two types of character sets entered in the Reported Value field: spacing characters and symbol characters.
Spacing characters
When representing results graphically, you do not print every student's result in the exact same place, e.g. if a student receives a Satisfactory grade, the tick should be inserted under the Satisfactory heading and it should be moved under the Not Satisfactory heading if the result is N, and so forth.
Therefore, you need to indicate columns or tabs in the reported values, where applicable. There are specific keystrokes to use to signify spacing characters:
|
^t |
Indicates a Tab should be inserted at that position |
|
^p |
Indicates a paragraph (i.e., a <Return> or <Enter>) should be inserted |
|
^c |
The instruction to jump to the next column in a table |
The ^ character is usually found above the number 6 key on your keyboard.
The list marking scheme shown below uses the scale Always, Usually, Sometimes, Rarely, Never, and represents students' results as ticks.
In the A row's reported value field, just the symbol for a tick is entered, as outlined in the Symbol Characters section below, but in the U row, a column jump precedes the tick symbol. In the S row, there are two column jumps, in the R row three, and so on. These will ensure that the ticks print in the appropriate column, according to the result the student has received.
If you have defined any Exceptional Values in the marking scheme, e.g. NA, you should also set up their reported values accordingly.

Symbol characters
In the example marking scheme above, the ü character shown as the reported value represents the tick symbol. It was created by holding down the Alt key while pressing the numbers 0252 using the numeric keypad.
If you use this method of creating these characters, you must use the numeric keypad to enter the special character keystrokes. Alternatively, you may copy and paste these from the Windows Character Map.
You can use whatever symbol you wish to use to represent your results in the printed reports, although ticks, tick boxes and crosses are the most common ones used. The table below covers the most commonly used symbols with their Alt key keystrokes:

Windows Character Map
The graphical characters above are not the only ones you may use. The full range of available graphical characters can be found and copied.
- On your computer, go to Character Map, usually found under Windows Start symbol > All apps > Windows Tools.
- Select Wingdings or any other font you have available from the dropdown list of fonts.
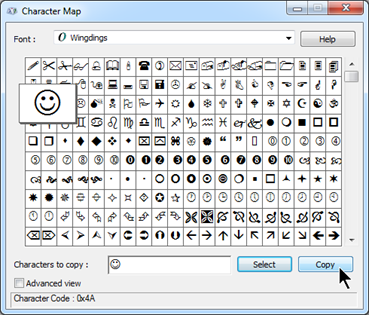
Ensure that you select a font that is usually found on most computers, e.g., standard Wingdings. Otherwise, when reports are printed errors will occur if the font cannot be found.
- Highlight any symbol.
- Click the Select button.
- Click the Copy button.
- In Accelerus, go to the reported value field in the marking scheme and paste the copied symbol, e.g. press Ctrl or select Paste from the Edit menu.