![XUno logo White with border.png]](https://docs.xuno.com.au/hs-fs/hubfs/XUno%20logo%20White%20with%20border.png?height=35&name=XUno%20logo%20White%20with%20border.png)
The Event Reminders feature allows schools to send automated messages to parents and other selected recipients for events and fees. Schools can configure messages to be sent when a new event is published or schedule reminder messages to be sent on a specific date.
Messages can be sent via Internal Message, Email, or SMS, giving schools flexibility in how they communicate important event information.
This feature can be used to help ensure parents are notified about upcoming events, required actions, forms, payments, and other important event-related information.
Accessing Messaging Settings
To configure an event reminder:
- Navigate to the relevant Event/Fee.
- Open the event you want to configure.
- Select the Messaging Settings tab.
- The Messaging Settings tab is located after Attachments and before Removed Students.
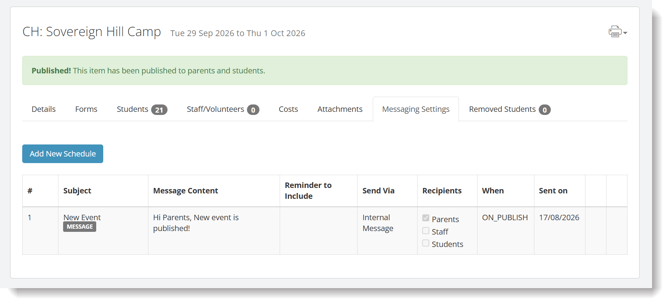 The Messaging Settings page displays any messages that have already been configured for the event, including their scheduled date, message details, and sent status.
Adding a New Message Schedule
To create a new message:
Open the event and navigate to Messaging Settings. Click Add New Schedule.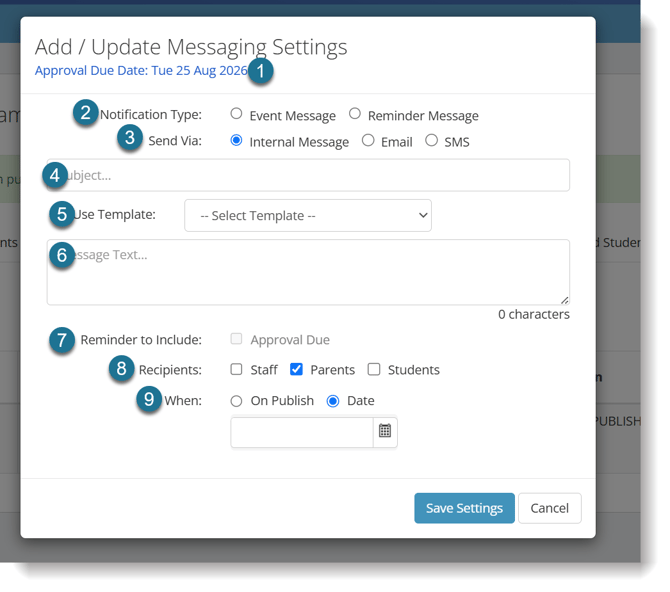
- This gives the Approval, Form, Payment Due Date information.
- Select the notification type either:
- New Event Message – used to notify recipients when a new event is published.
- Reminder Message – used to send a reminder on a scheduled date.
- Select the type of message you want to use.
- Enter the Subject of the notification.
- Choose the preferred Message Template. The template can be added or modified through Software Settings > Lists & Options > Events & Fees > Event Reminder Templates.
Tip: You can use the available Event Merge Fields to automatically include relevant event information in your message.
6. Enter the Message Content that will be included in the communication.
7. Select the Reminder to Include. You can choose from Approval, Form, or Payment
Due.
8. Select the recipients who should receive the notifications.
9. Select the Date:
- On Publish – select this option if you want to send the message when you publish the event.
- Date – select the date on which you want the notification to be sent.
Editing a Scheduled Message
Scheduled messages can be edited as long as they have not yet been sent and their scheduled date is still in the future.
To edit a message:
- Go to Messaging Settings for the event.
- Locate the scheduled message.
- Select Edit.
- Update the required details.
- Save the changes.
Once a message has been sent, it can no longer be edited.
Removing a Scheduled Message
A scheduled message can be removed if it has not yet been sent and its scheduled date is still in the future.
To remove a message:
- Go to Messaging Settings.
- Locate the scheduled message.
- Select [x] to remove the scheduled message.
Once a message has been sent, it cannot be removed.