![XUno logo White with border.png]](https://docs.xuno.com.au/hs-fs/hubfs/XUno%20logo%20White%20with%20border.png?height=35&name=XUno%20logo%20White%20with%20border.png)
Student Maps includes the ability for any user to set up customisable dashboard views, which is a set of preselected graphs and their display options.
Views allow you to display these graphs (for selected students only) when a staff member logs in to Student Maps, meaning those staff members do not need to select a map, select columns to graph or how the graphs must look.
Individual users can create any number of their own views, share these views with other users and make a view the default view to display when logging in to Student Maps.
Open Existing View
Once at least one view has been created by you or by someone else who has shared this view with you, you can open this view at any time, which will load the associated map as well.
• Click the Views drop-down menu on the toolbar and select Open View.
• The list of available views is then displayed for you to select from.
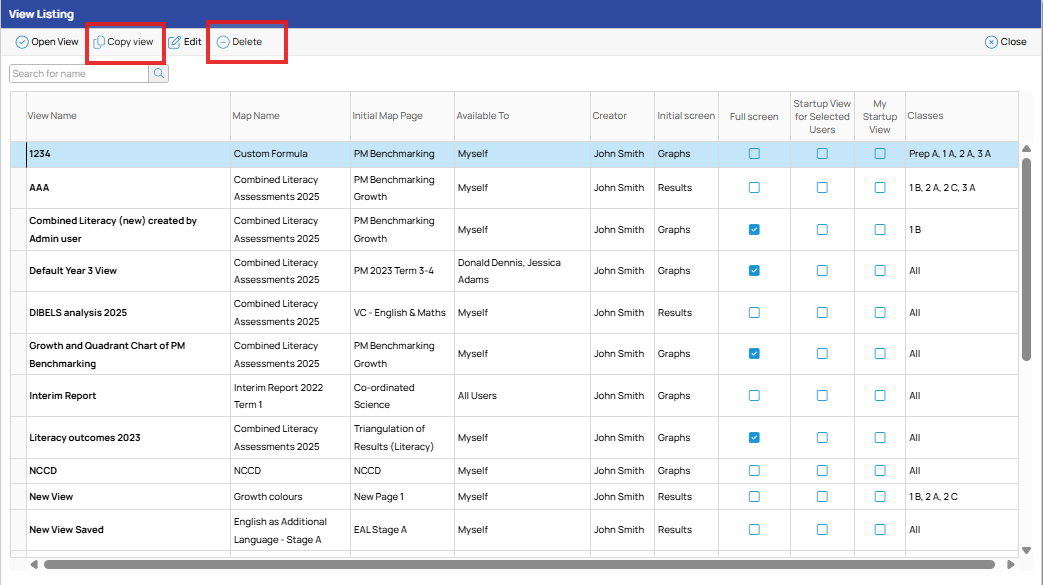
• The list of available views shows view names (descriptions), the name of the map that this view is linked to and will open with the view, the initial page that the user will be taken to when the view is opened, the list of users who have access to this view, the name of the staff member who created the view, as well as the selected option of the opening screen, either the map itself or the graphs.
• To open a view, just double-click anywhere on the view row, or click once on the view row and select Open.
• The map linked to that view is then opened automatically, columns that were selected when the view was created will be automatically selected again, and any graphs set up when this view was created will also be displayed.
• The currently open view name will also be shown alongside the Views button.
• Depending on the Initial Screen option set when creating the view, either the map pages themselves will be shown first, or the graphs that were set up for this view will be shown first.
• You can then move between the map pages and graphs as usual. You can modify the graph options, change map selections, enter data into the map as normal.

Update Current View
• If you have opened a view and made changes to the selections, or graph options, and you want the current view to reflect these changes for you and other users with access to this view, click the Views drop-down menu and select Update current view.
• This will open the view details screen showing the other settings of this view, allowing you to rename the view, change startup options and select which staff members can access this view.
• You do not need to make changes to any of these areas (name, staff etc.) if you are only making changes to the map columns selected and graphing options.
• When you are happy with any changes, click Update.
• Any user who has access to this view will then see the changes when next opening this view.
Create a New View
You can easily create a new view once your graphs are set up as you’d like. Saving these selections as a view allows you to open this saved view at any time, which will first open the map used in this view, then select the same columns of data that were selected when creating the view, then display the graphs (in the correct format, i.e. progress over time, distribution of results etc.) that were displayed when creating the view.
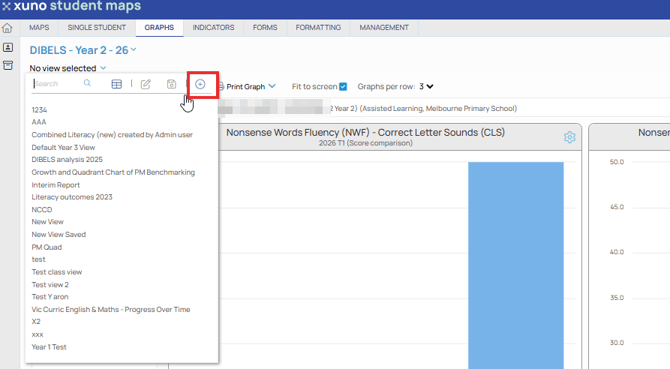
• Once the graphs are shown in the desired order and format, click the Views drop-down button and select Save as new view.
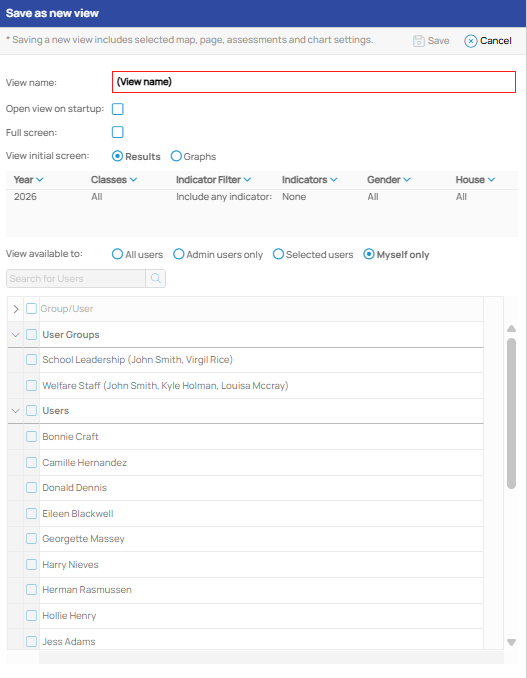
• Type in a description for this view, for example, “Reading and Writing outcomes for 2023 Semester 1”.
• If you want this view to open automatically when logging in to Student Maps, tick the Open view on startup checkbox.
• If you want the graphs or map to take up as much available space on the screen as possible, tick the Hide options checkbox, which will ensure the toolbars are hidden when opening the view, allowing the graphs or maps to use as much vertical space as is available on the screen.
• You can select whether to show the map pages or the graphs as the first screen when opening this view. You can always move between the map pages and graphs at any time by clicking Results or Graphs on the left of the toolbar.
• You can select certain staff members (or all or none) who will be able to open this view (i.e. this view will appear on their list of views to open, even though they did not create it). The options are to make this view available to All users (everyone who has access to the student map used in this view), Admin users only (only users with level 3 access), Selected users (you can select individual users or user groups if you choose this option), or Myself only (default option, so this view is only available to you). You can change these settings at any time, e.g. create a view and make it available to yourself only until you have shown it to other staff, after which you can make it available to other users.
• If you select users to make this view available to, you can further specify if this view must be their default view that opens when they log in to Student Maps. For example, you may create a Science view for your science teachers that contains a number of science assessments and graphs showing progress over time in science per student, and a distribution of end of semester grades for science students. You can then make this view available to science teachers only, and ticking Use this view as the startup view for selected users will ensure this view is opened automatically for those users when logging in to Student Maps.
• When you have finished updating these settings, click Save to save this as a new view.
Copy View
You can easily make copies of existing views and then change the settings of the copy, while leaving the original view intact.
• When looking at the list of available views after clicking Open View, click on the name of the view you want to make a copy of.
• Then click Copy view at the top of the screen.
• A new view will be created with all the same settings and selections as the source view, and the suffix “copy” will be added to the view name.
• You can then change any settings and view name as needed, and then click Copy to save this new copy of the source view.
Delete View
Deleting a view does not delete any data from the map, it only deletes the view of the map and graphs set up for this view only.
• When looking at the list of available views after clicking Open View, click on the name of the view you want to delete.
• Then click Delete at the top of the screen.